There are many ways to enter posts into your Ushahidi deployment other than from the deployment itself. This section shows you how to configure all the possible data source types.
NB: If you’re a user on ushahidi.com, the number of data source types available to you may be limited, based on the Ushahidi plan you are subscribed to. You may review these from **[_our plans page](https://www.ushahidi.com/pricing). For open source/self hosted deployments, all data source types are available to you**_
To access the data sources configuration page,
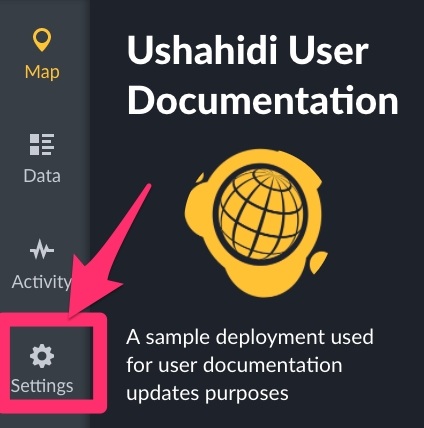
On the left hand menu bar, click on Settings
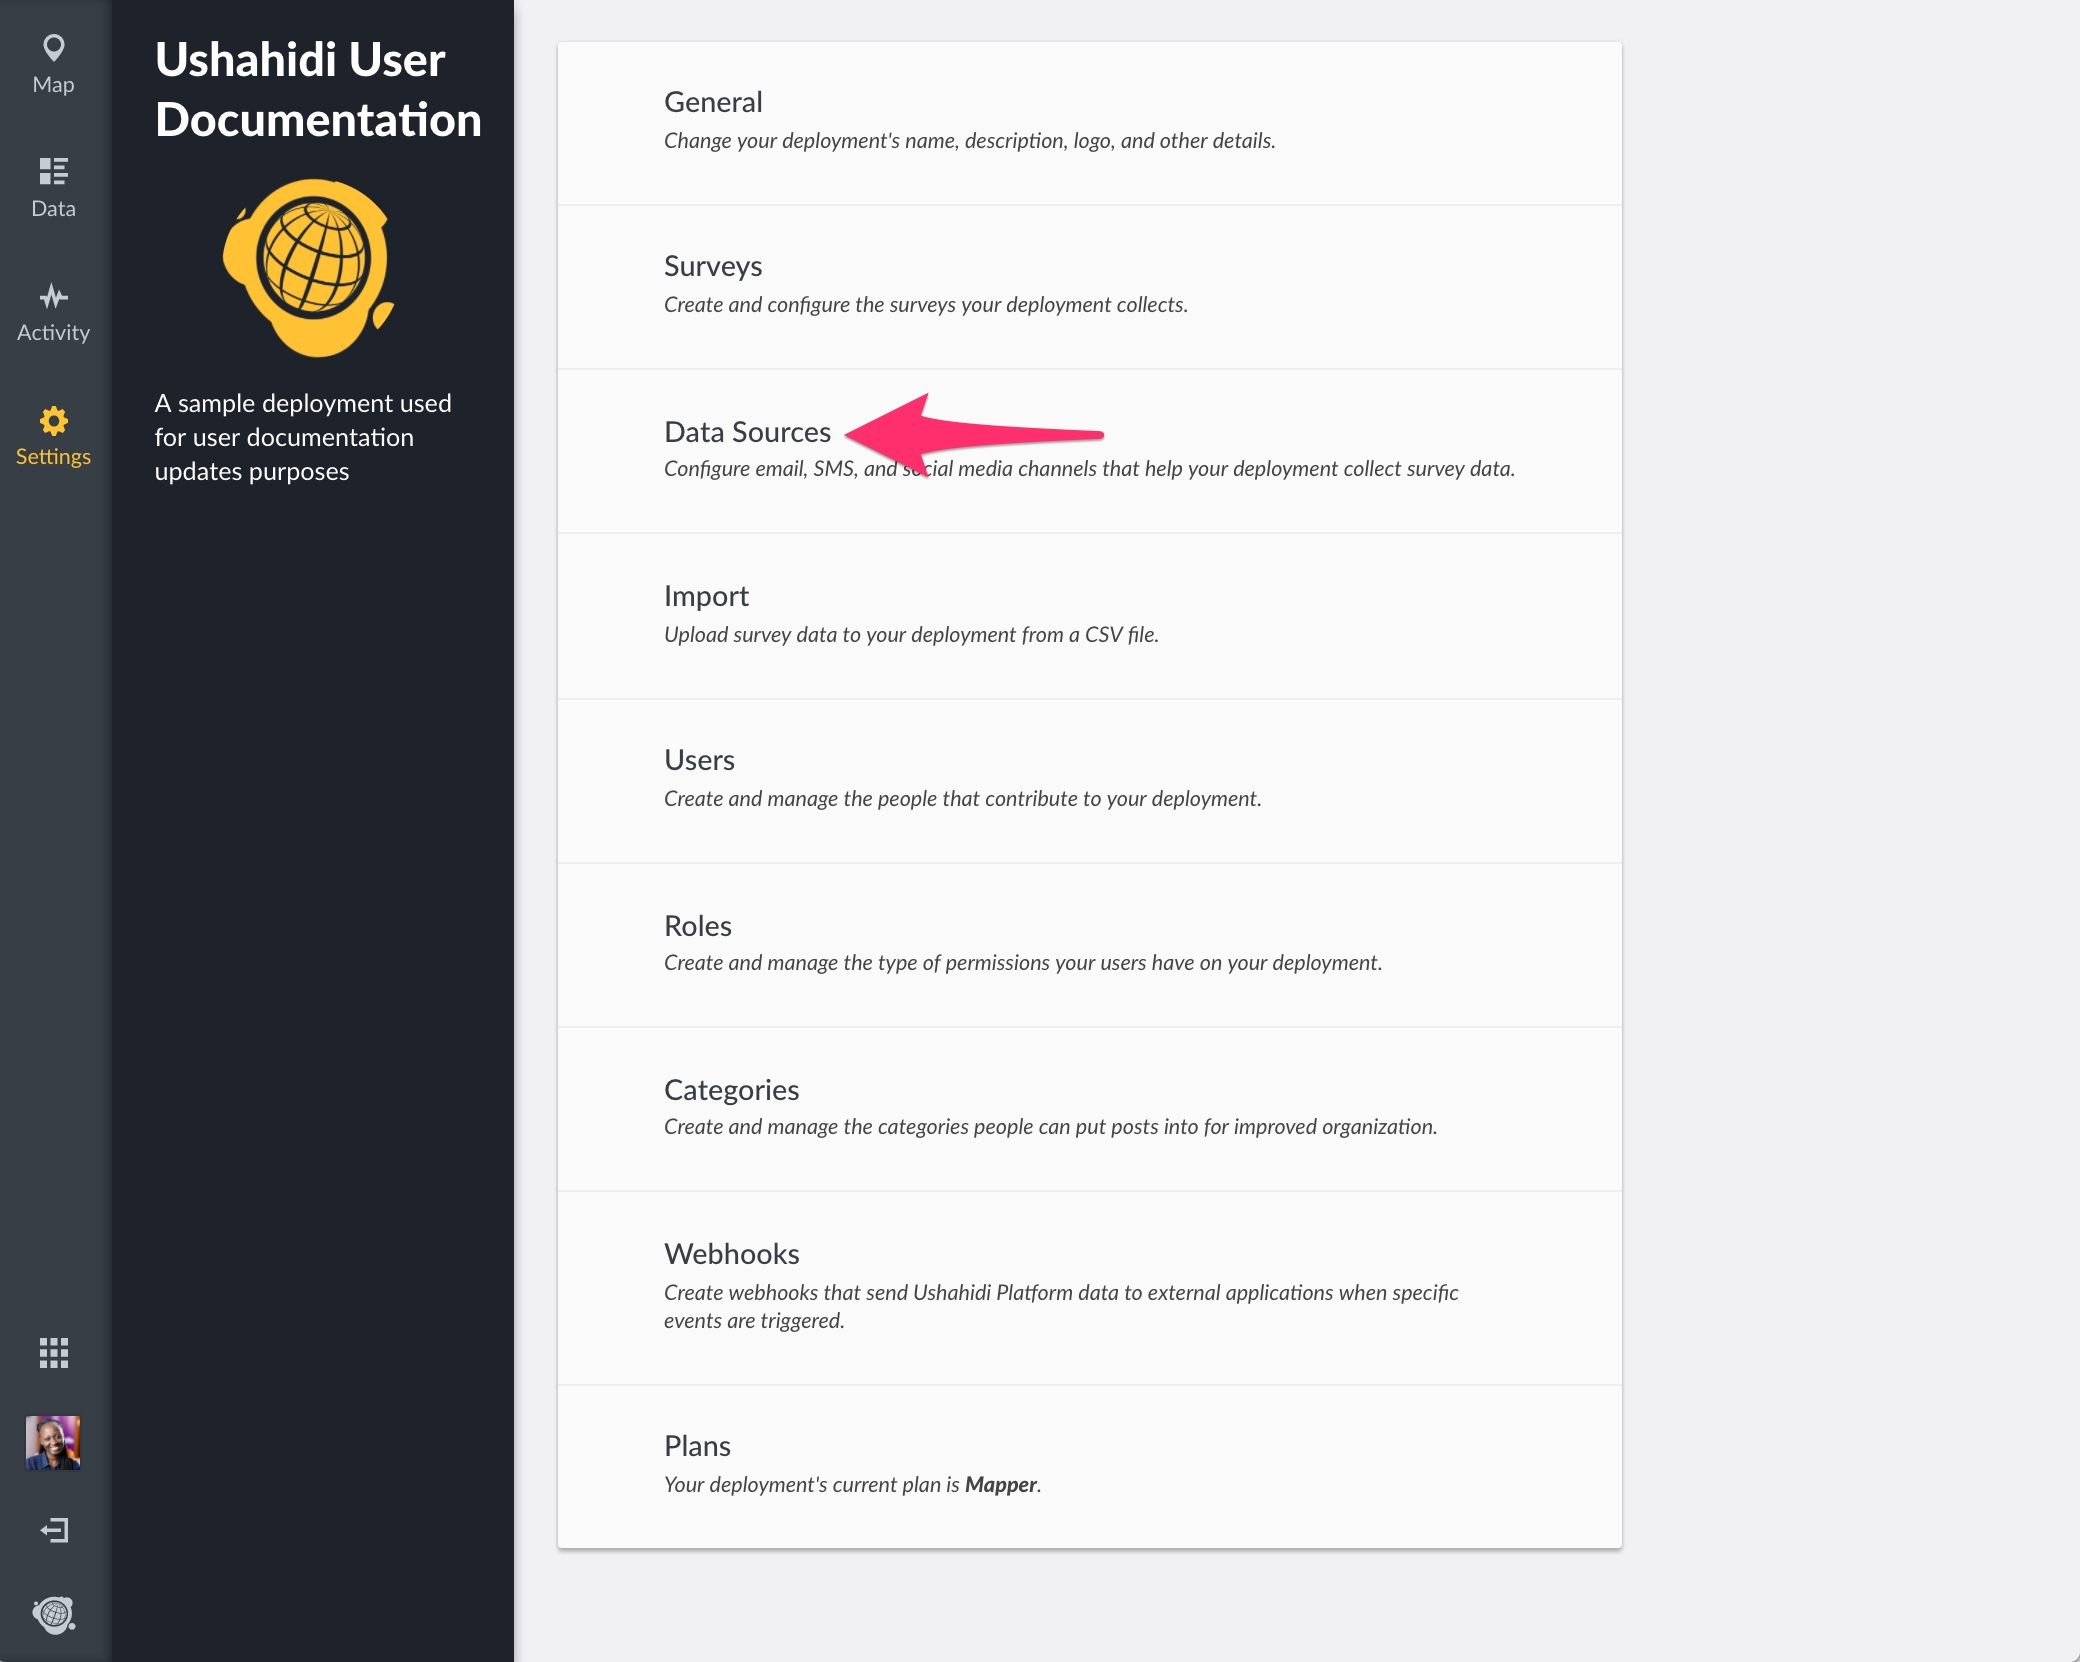
Then, click on Data Sources.
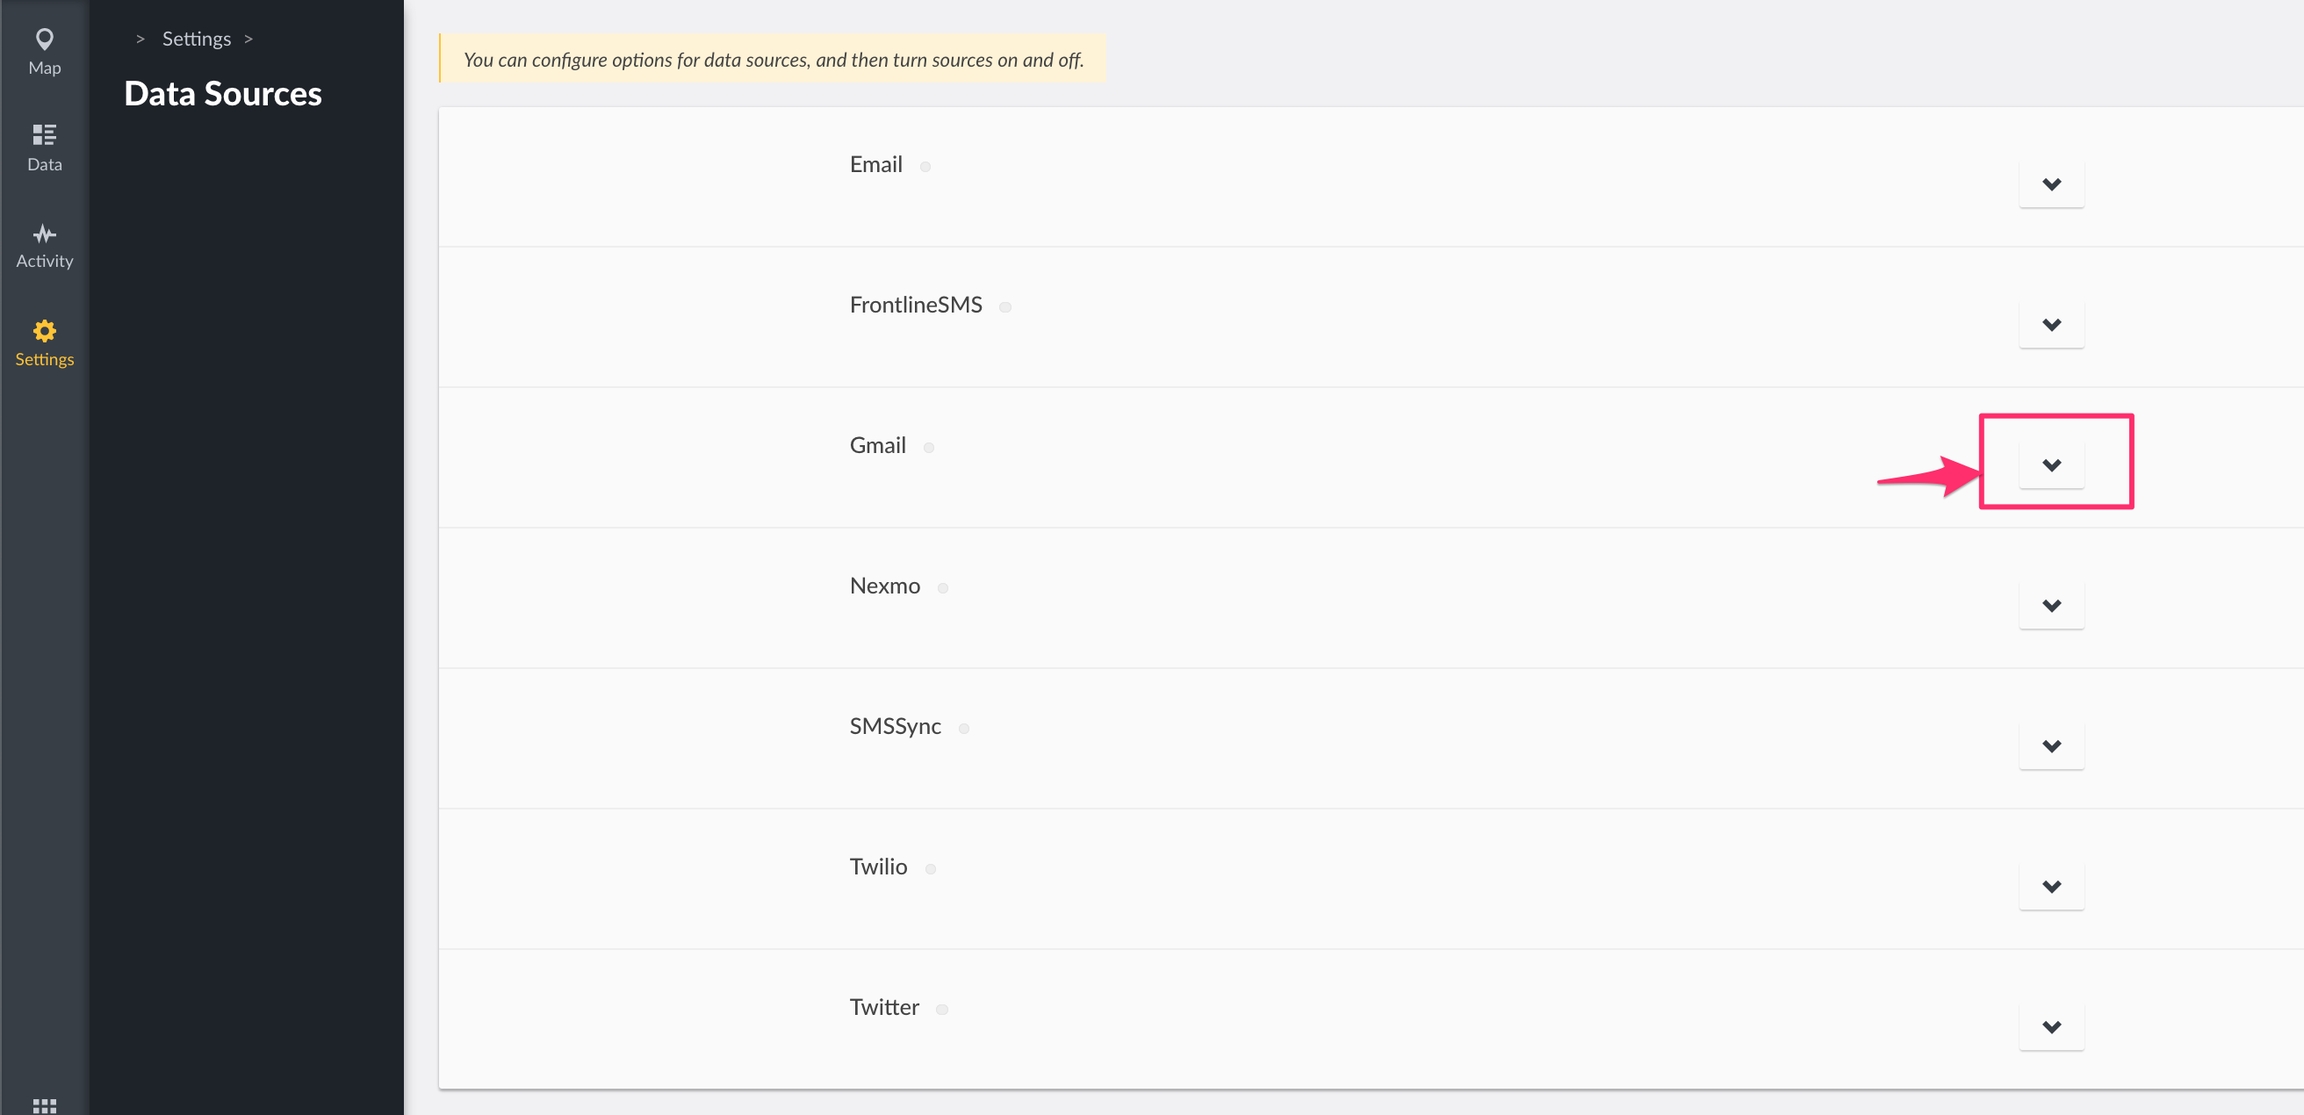
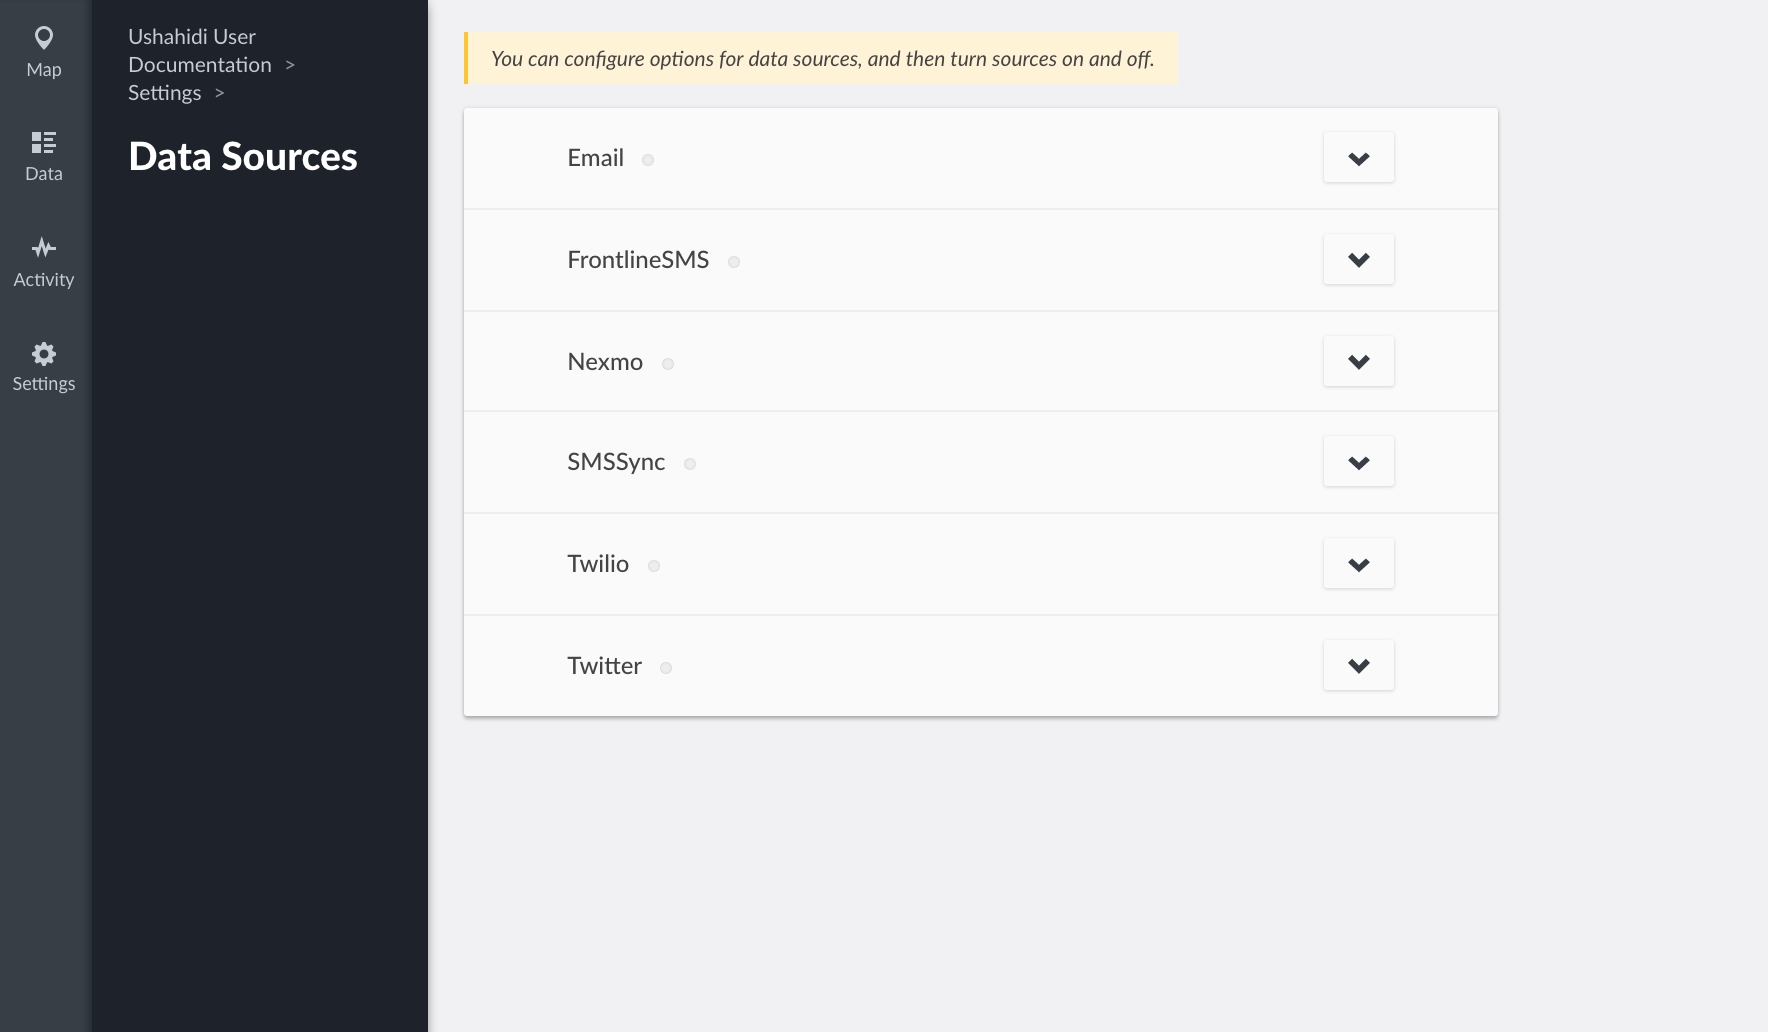
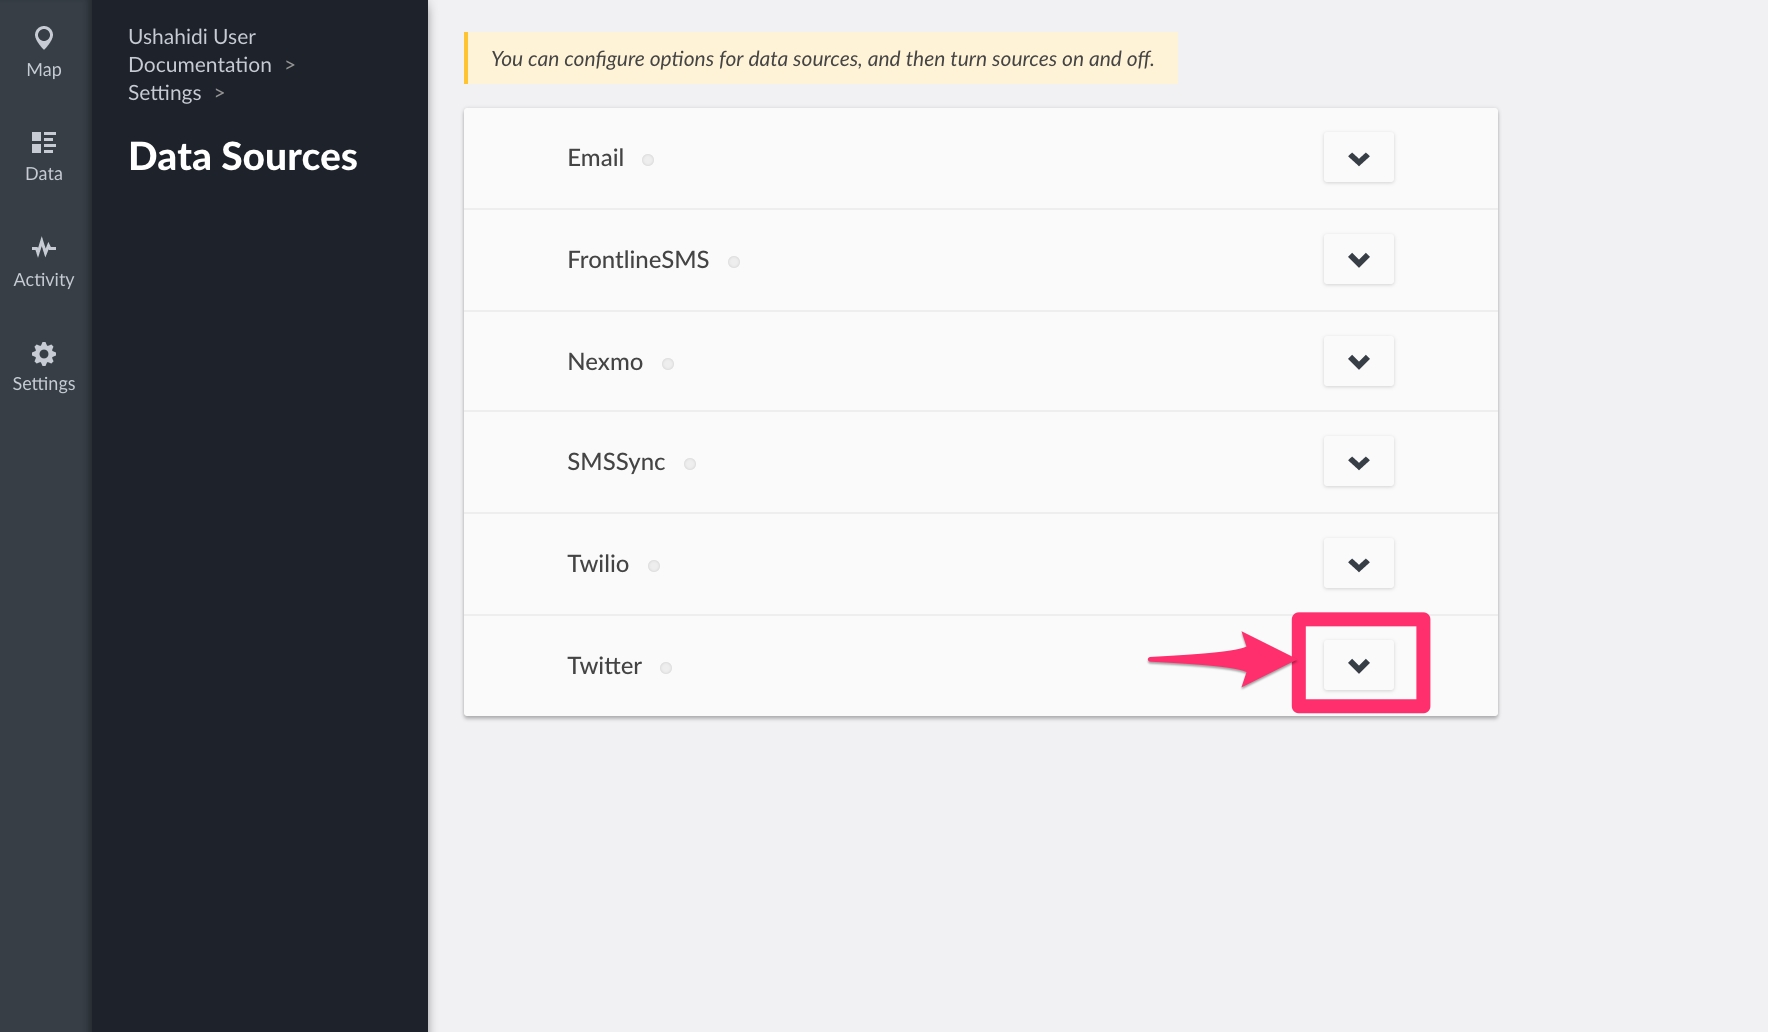
You should get a full list of data sources as shown below
This section allows you to set up the platform to receive emails from users. Before getting started, make sure that you have an email account set up on Gmail, Yahoo or any other service provider. Make sure that you have IMAP/POP enabled (For more information on these two protocols, visit this website. Instructions on how to enable the IMAP/POP settings in your email can be found here
Follow this guide to enable IMAP from external clients with Gmail. Keep in mind:
There are a few settings you need to configure so that Ushahidi can pull from a Gmail account.
Step 1: Check that IMAP is turned on
On your computer, open Gmail.
In the top right, click Settings See all settings.
Click the Forwarding and POP/IMAP tab.
In the "IMAP access" section, select Enable IMAP.
Click Save Changes.
Step 2: Check that Two-Factor Authentication is turned on
One needs to have Gmail's Two-Factor Authentication enabled. Visithttps://www.google.com/landing/2step/ if you do not have it enabled for your account.
Step 3: Create an App password
This is a 16-digit passcode that gives a non-Google app or device permission to access your Google Account. (Google Docs here:https://support.google.com/mail/answer/185833?hl=en-GB)
On your computer, open App passwords
When prompted for "Select the app and device you want to generate the app password for":
Select “Mail” under the drop-down for “Select app”
Select “Other” under the drop-down for “Select device”
When prompted for text input, enter your ushahidi deployment name
(e.g. The name of my deployment is Free Media, I’ll enter “Ushahidi Free Media ”).
Copy the password to your clipboard that is automatically generated and save it somewhere (we would need this later).
To get started with email the setup;
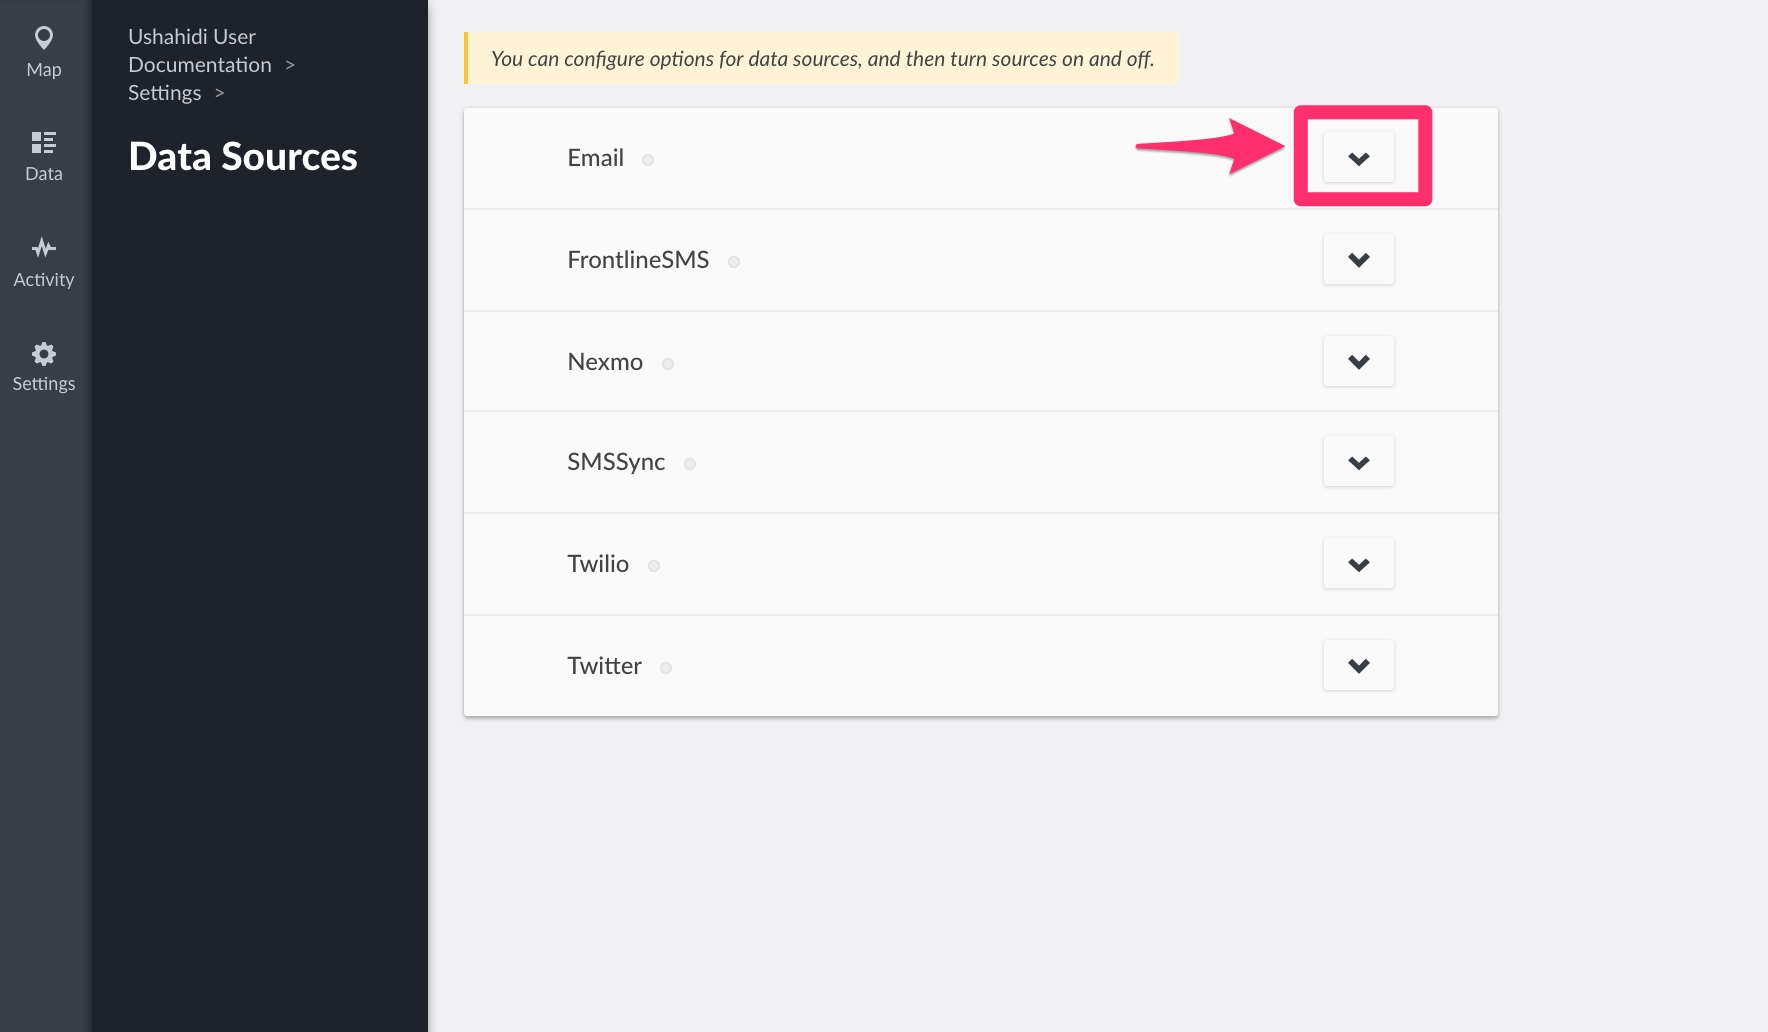
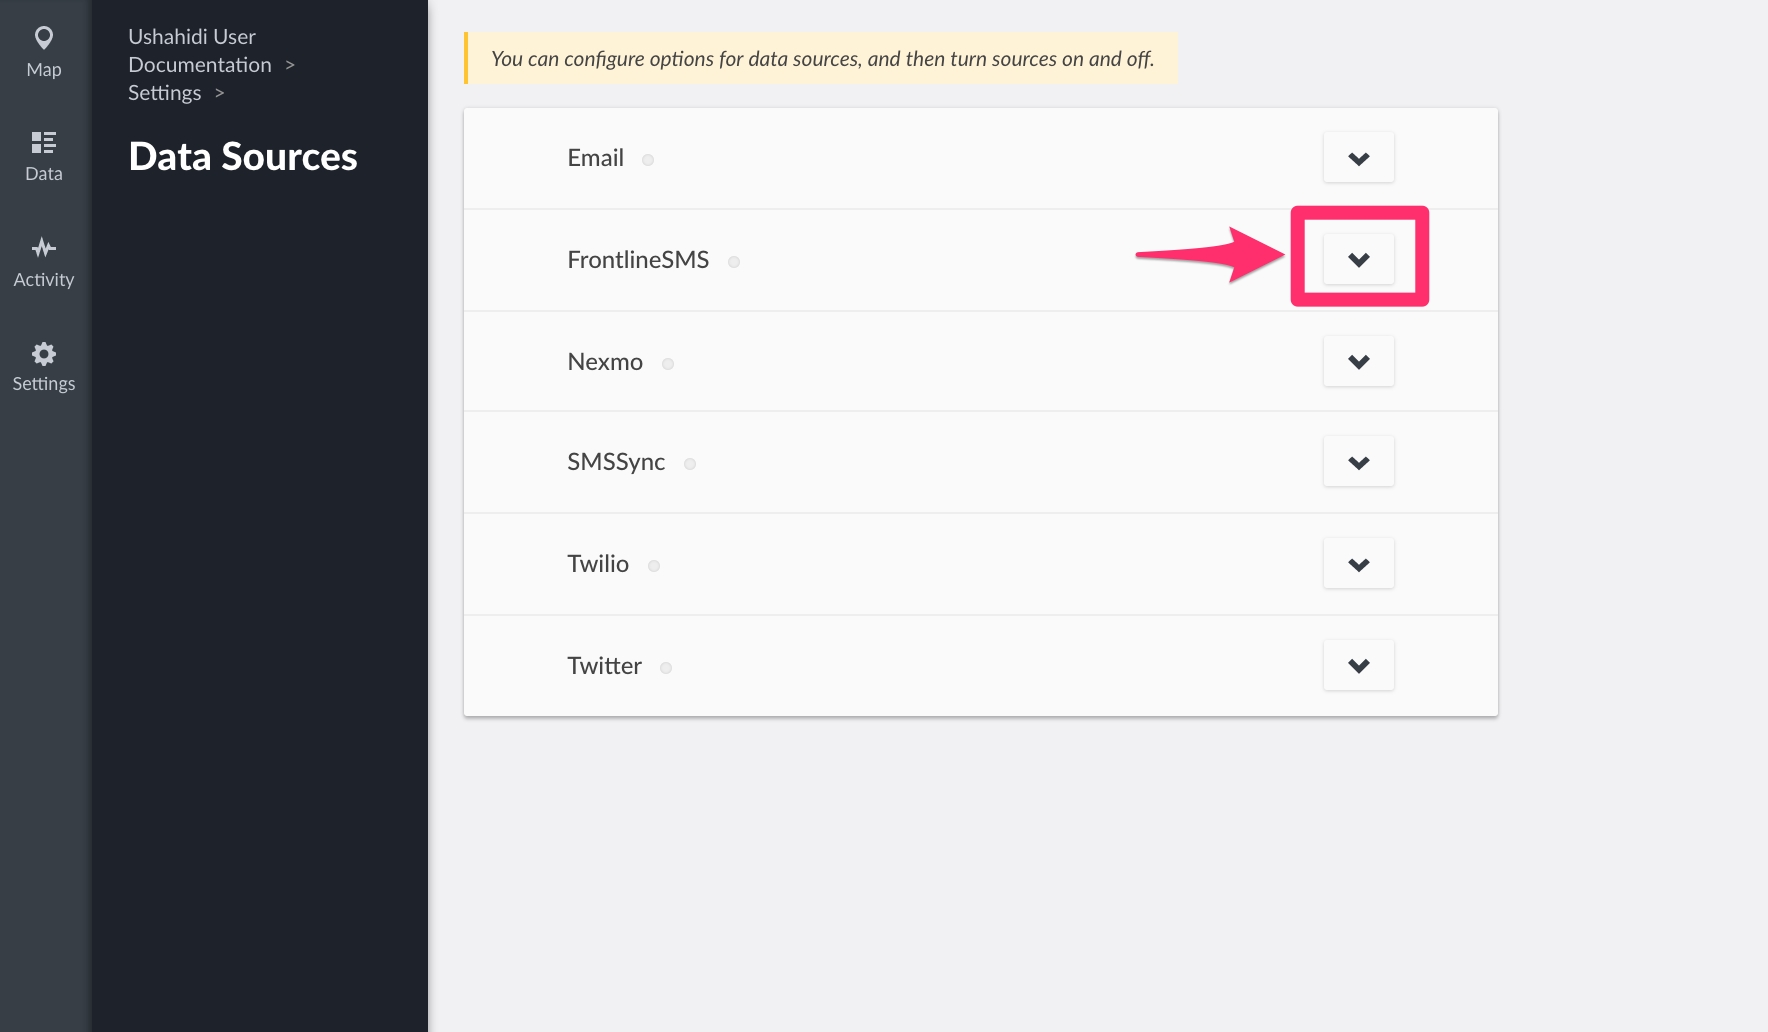
Click on the drop down icon on the right as shown
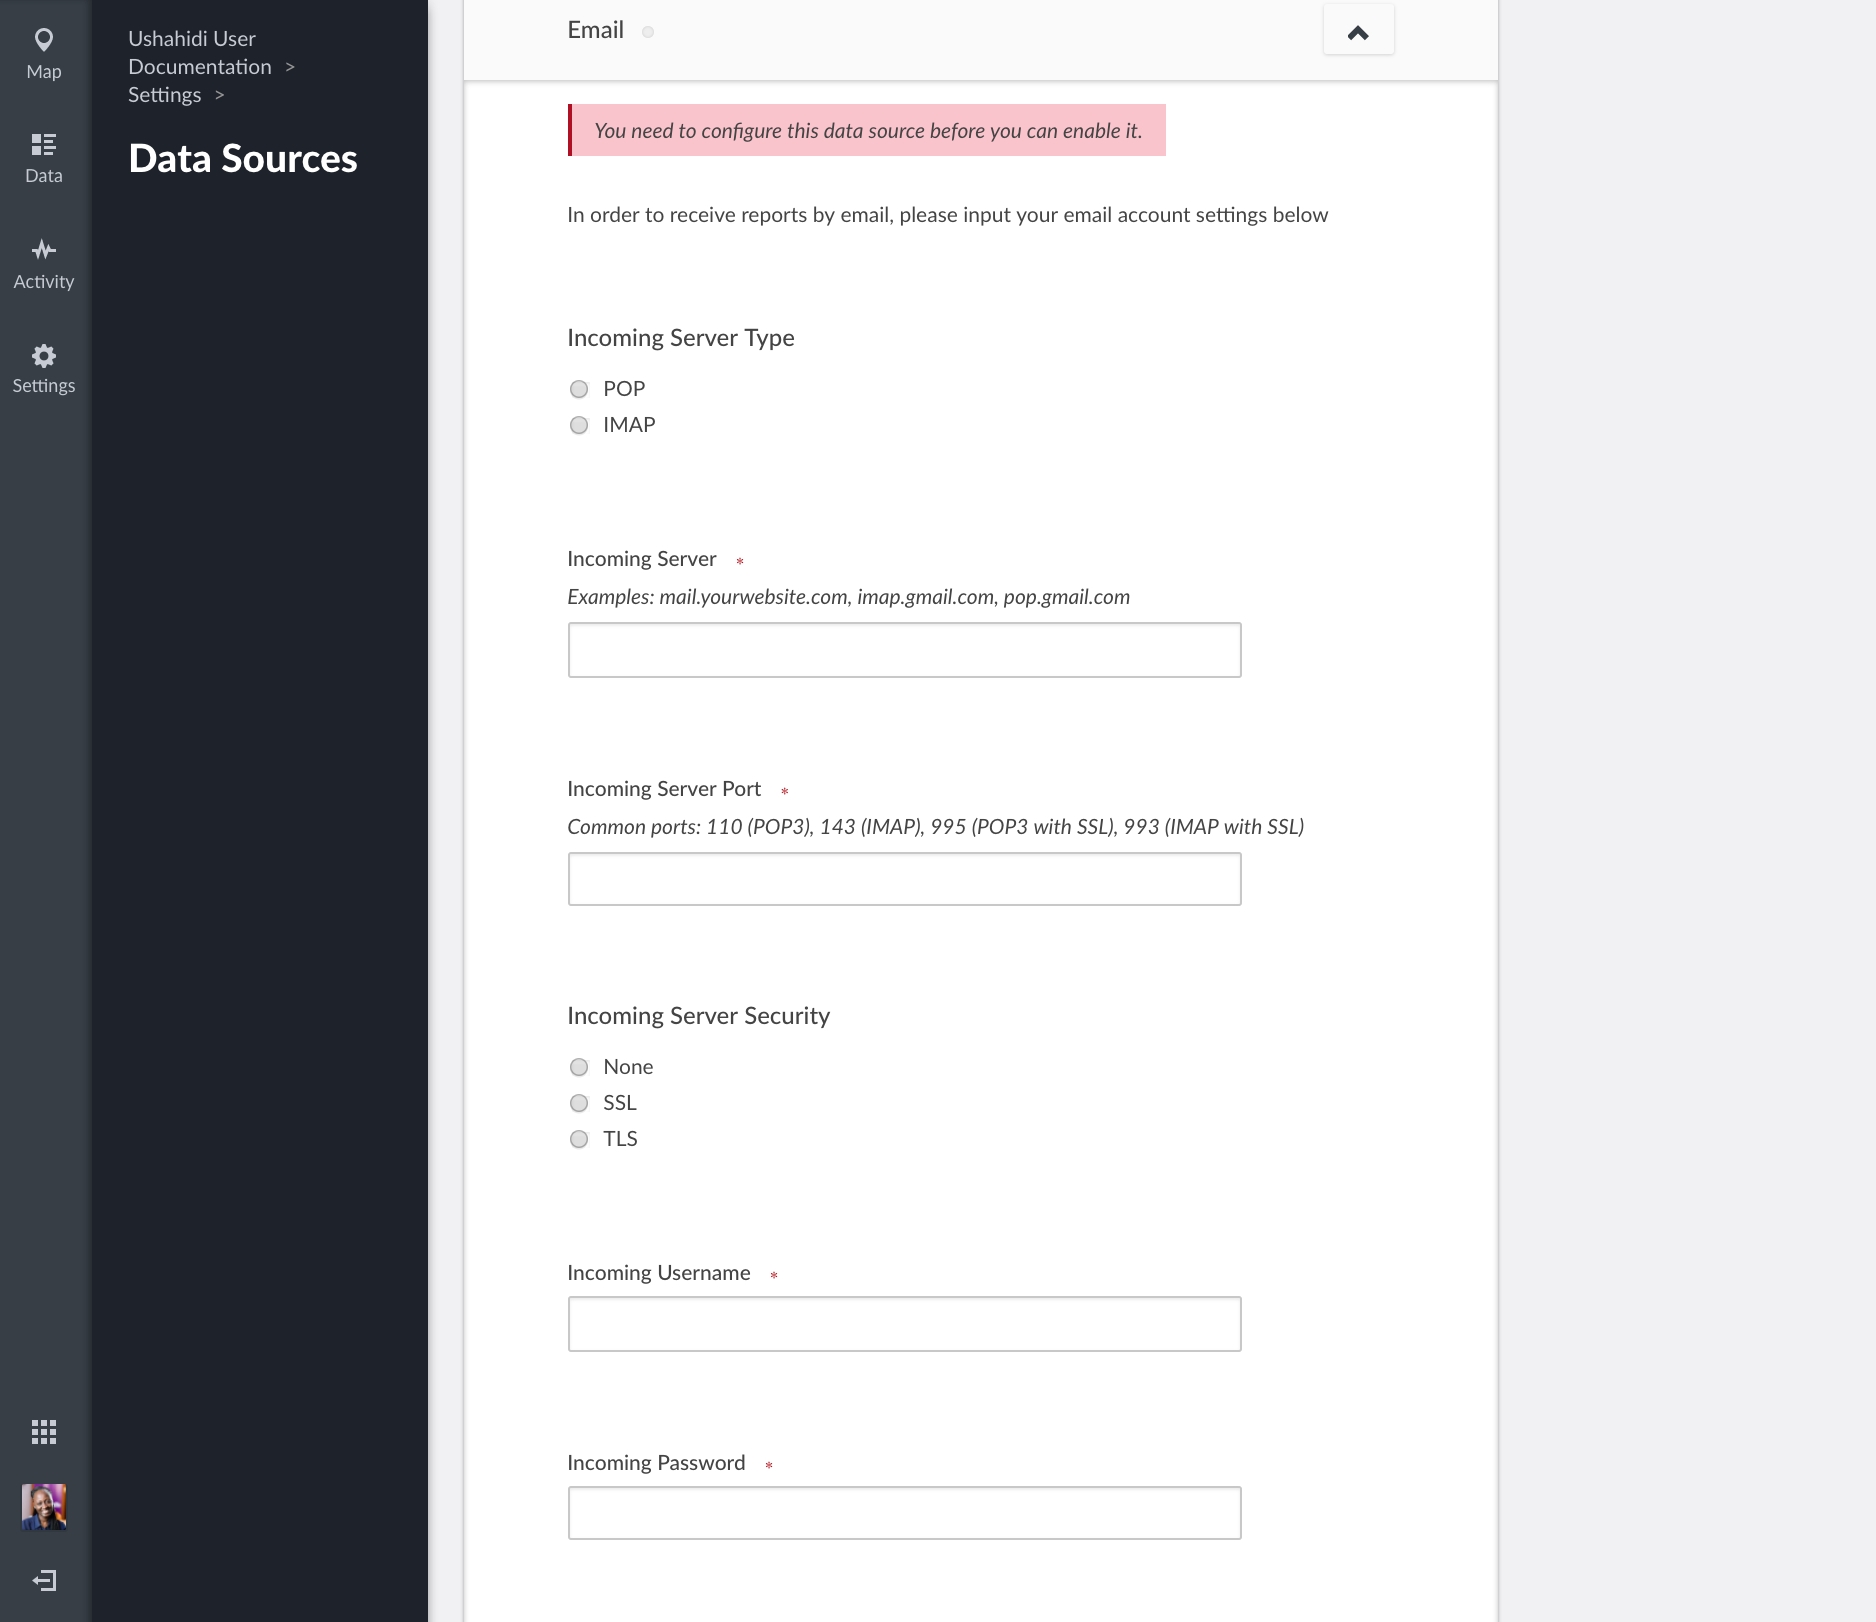
Input the following email account settings:-
Incoming server type: You have two options to select from, POP and IMAP. We recommend using IMAP if possible because it’s the best way to make sure you can see all your mail at any time on all of your devices
Incoming server: Enter the address of the server where your email services are hosted. E.g mail.yourwebsite.com and for Gmail: imap.gmail.com
Incoming server port: Enter the port that your email account uses for incoming emails. This is also provided by your service provider and depends on the use of SSL(Secure Sockets Layer)/Transport Layer Security(TLS) or not. As a standard rule;
Enter 993 (Since we’re using IMAP) for Gmail.
POP uses port 110 , but SSL/TLS encrypted POP uses port 995
Incoming server security: You have 3 options to choose from to enhance secure connection to your email mailbox, depending on which is supported by your email service provider.
None
SSL - Read more on Secure Sockets Layer for Gmail
Incoming user name: Enter the email address you want to use to receive emails e.g sample@youremail.com. We recommend setting up a separate email address for this purpose, preferably one that has a lot of available space to avoid the account getting full in a short time, especially if the platform will be receiving a lot of submissions via email.
Incoming password: Enter the password of the email account inserted above.
: Enter the “App password” generated above for the gmail account.
Click on Save **and this data source’s settings will be saved. Unstructured posts from email will now be pulled into the platform.
To enable/disable the email data source, simply click on the green toggle.
If you’d like to edit your email configuration, simply click on the drop down icon on the right while on the data sources list page and make your changes.
Nb: Reports coming via email will take a while before they reflect on the platform because there is a “job” that needs to be run in the database and those jobs run every 10 minutes or so.
This data source is not available in your deployments. You will not find it in your settings, please reach out to support@ushahidi.com or our chat messenger to enable it in your deployment.
This section allows you to set up the platform to receive and send emails through a connected Gmail account via the API. Before getting started, make sure that you have an email account set up on Gmail.
Nb: If you're self hosting the Ushahidi platform, the Gmail Provider makes use of the server-side flow when making a request to Gmail API, and must be authorized using OAuth 2.0 Credentials.
Follow this guide to create the OAuth 2.0 Credentials (Client ID and Client Secret) with Gmail. Keep in mind:
Select "where you will be calling the API from" as Other UI.
Select User data as the data type to be accessed.
Select your application type as TVs and Limited Input devices.
There's a need to set up a consent screen.
To get started with Gmail set up.
Click on the drop down icon on the right as shown
The following fields are available for only self hosted ushahidi platforms, where there is a need to manually provide the Gmail API credentials.
Input the following email account settings:-
Email Address: Enter the Gmail address you will be receiving and sending emails with.
Fetch Email From: Pick the date you want to start fetching messages from.
Client Id: Enter the Gmail client id gotten from the OAuth credentials.
Client Secret: Enter the Gmail client secret gotten from the OAuth credentials.
Redirect URL: Enter the redirect URL from the OAuth credentials. The default value set here is urn:ietf:wg:oauth:2.0:oob and in most cases should be left this way.
Click on Save and this data source’s settings will be saved.
The below setup will be available to both the hosted and self-hosted users.
Next, Scroll up and click on Connect your Gmail Account and this will show a google prompt to authenticate your Gmail account.
Follow the prompt through and click on Allow to be presented with the list of Gmail accounts that you have.
Grant permission by selecting the Gmail account that you would like the Ushahidi platform to access.
This will display an auth code.
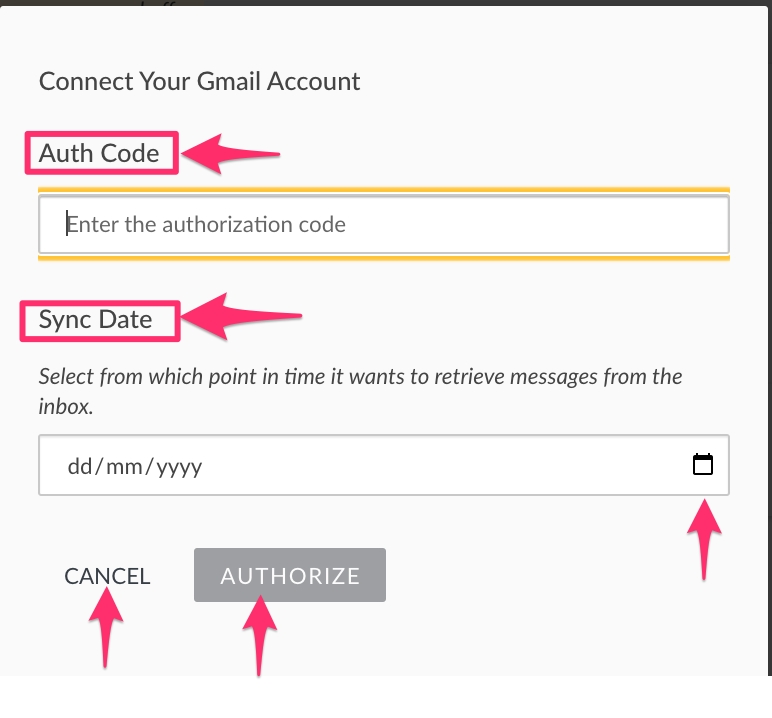
Please copy the provided code, switch back to your Ushahidi application, and paste/enter it on the opened modal:
Enter the point in time that you would like the Ushahidi platform to fetch messages from your inbox.
Click on Authorize to save the auth code and date entered.
A message will be displayed in your deployment to indicate that your account is connected, messages from Gmail will now be pulled into the platform via the API.
To disconnect your account, simply click on Disconnect your Gmail account to stop all messages from being fetched from your inbox.
NB: All messages that were previously fetched will not be deleted from your deployment.
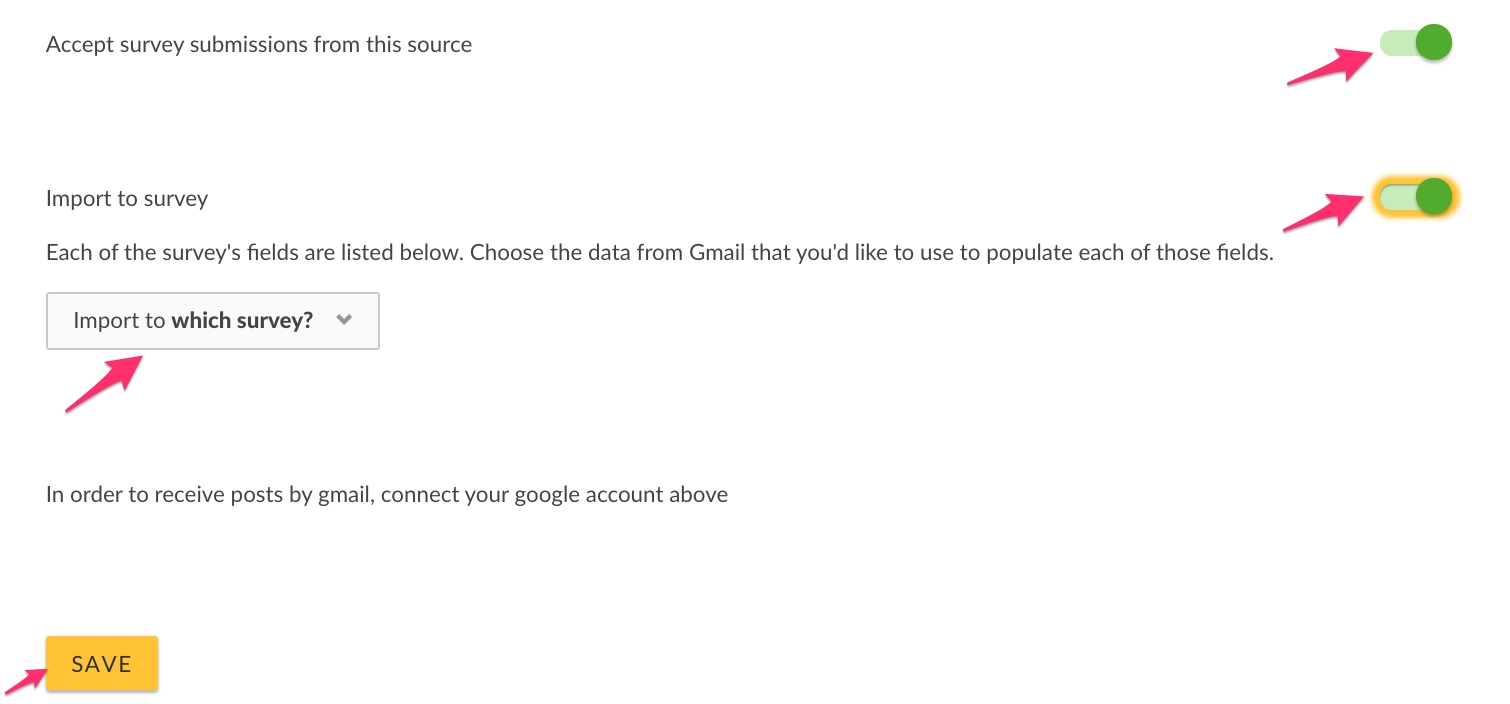
To enable/disable the email data source, simply click on the green toggle and click on save.
FrontlineCloud is an online SMS management platform that lets you control and manage 2-way SMS engagement with anyone in the world.
NB: You need a FrontlineCloud Starter or Pro account to be able to configure this as a data source. To sign up, go to https://cloud.frontlinesms.com **
You also need to create a FrontlineSync connection with your mobile phone as a gateway with FrontlineSMS
To set up your Frontlinesync using your mobile phone;
Download FrontlineSync from the Google play store
You need to accept all permissions that it requests unfortunately or it won't run
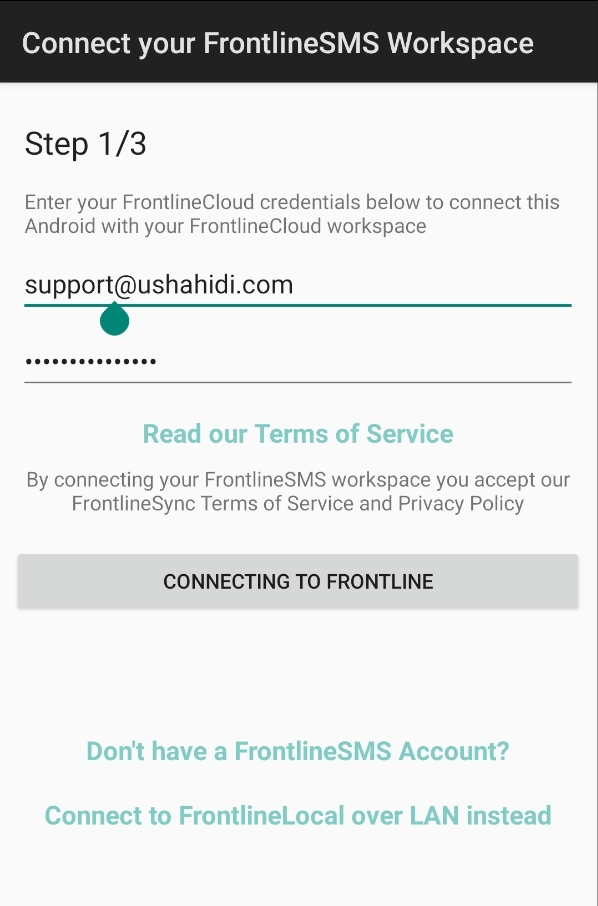
Log in with your Frontline SMS account that you created on the FrontlineCloud platform.
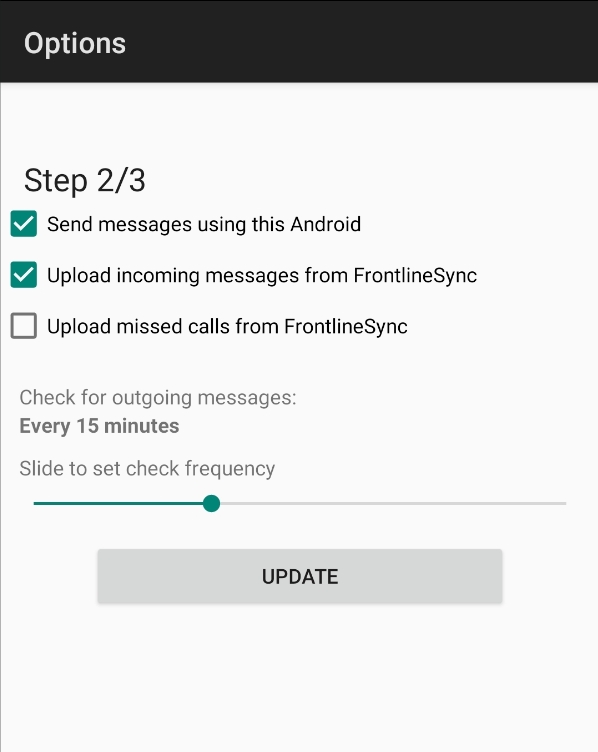
Then you need to select how you want the sync to work. You will be presented with a few options.
Definition for each option are referenced from the FrontlineSMS documentation
Send messages using this Android
"This option sets whether or not messages are sent from FrontlineCloud or FrontlineSMS to recipients using the Android device as an SMS gateway. If this option is not active, SMS messages will not be sent via FrontlineSync to recipients. Messages sent via FrontlineSync will appear in the native 'Sent Messages' folder within Android phones. There may be limits on the number of messages that the Android device can send over a certain period. Please note these restrictions are from the Android phone, and vary handset to handset"
Upload incoming messages from FrontlineSync
"This option sets whether or not incoming SMS to your Android device are sent to your FrontlineCloud or FrontlineSMS workspace. Any and all messages received to the device while FrontlineSync is running will automatically be uploaded to your workspace. If you disabled the app, upon reactivating FrontlineSync, you will be prompted as to whether you wish to upload all SMS received while the app was off. FrontlineSync will attempt to upload an SMS as soon as it arrives on the phone. If unsuccessful, it will retry until successful. The state of every message is maintained and visible in the Activity Log."
Upload missed calls from FrontlineSync [you can leave this one off]
It also has an option to select how often you want the synchronization to happen. By default it's 15minutes.
After selecting the options you want, click on update to finish configuring Frontlinesync.
Click on 'Done! start using FrontlineSync', you will be taken to a dashboard screen that shows which options are selected.
WARNING: FROM THE POINT, FRONTLINE SYNC WILL START SYNCHRONIZING NEW MESSAGES AS THEY COME IN.
You can change your settings by going to the options in Frontline Sync.
Click the gear icon on the top-right side of the screen
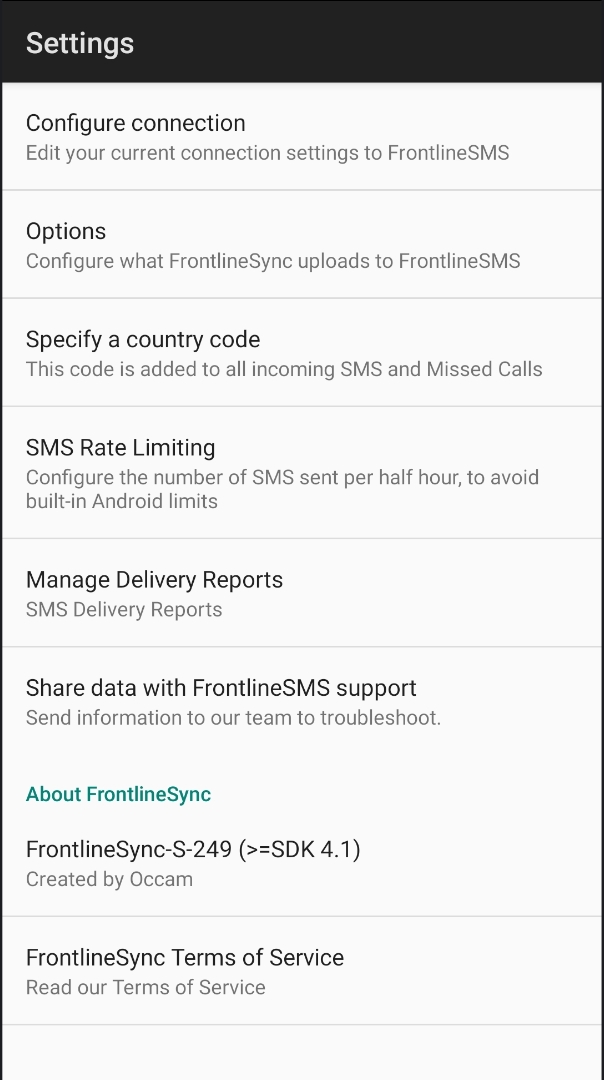
Click "Settings"
You will be taken to a list, tap Options to re-configure your synchronization options.
Now let's get started with FrontlineCloud setup,
Log into your FrontlineCloud account on https://cloud.frontlinesms.com
Open your deployment as well i.e name.ushahidi.io, go to datasource configuration in your setting page then click on FrontlineSMS.
FrontlineSMS has announced its imminent cessation of service, with a subsequent release of the source code for its server. Presumably, users will be able to download the code and install their own servers.
As of this writing (September 2021), to our knowledge, the source code or any of the files necessary for a server installation haven't been made public yet.
If you are still enjoying service from FrontlineSMS, in their cloud instance with the address https://cloud.frontlinesms.com/, you should use that address as your server address below.
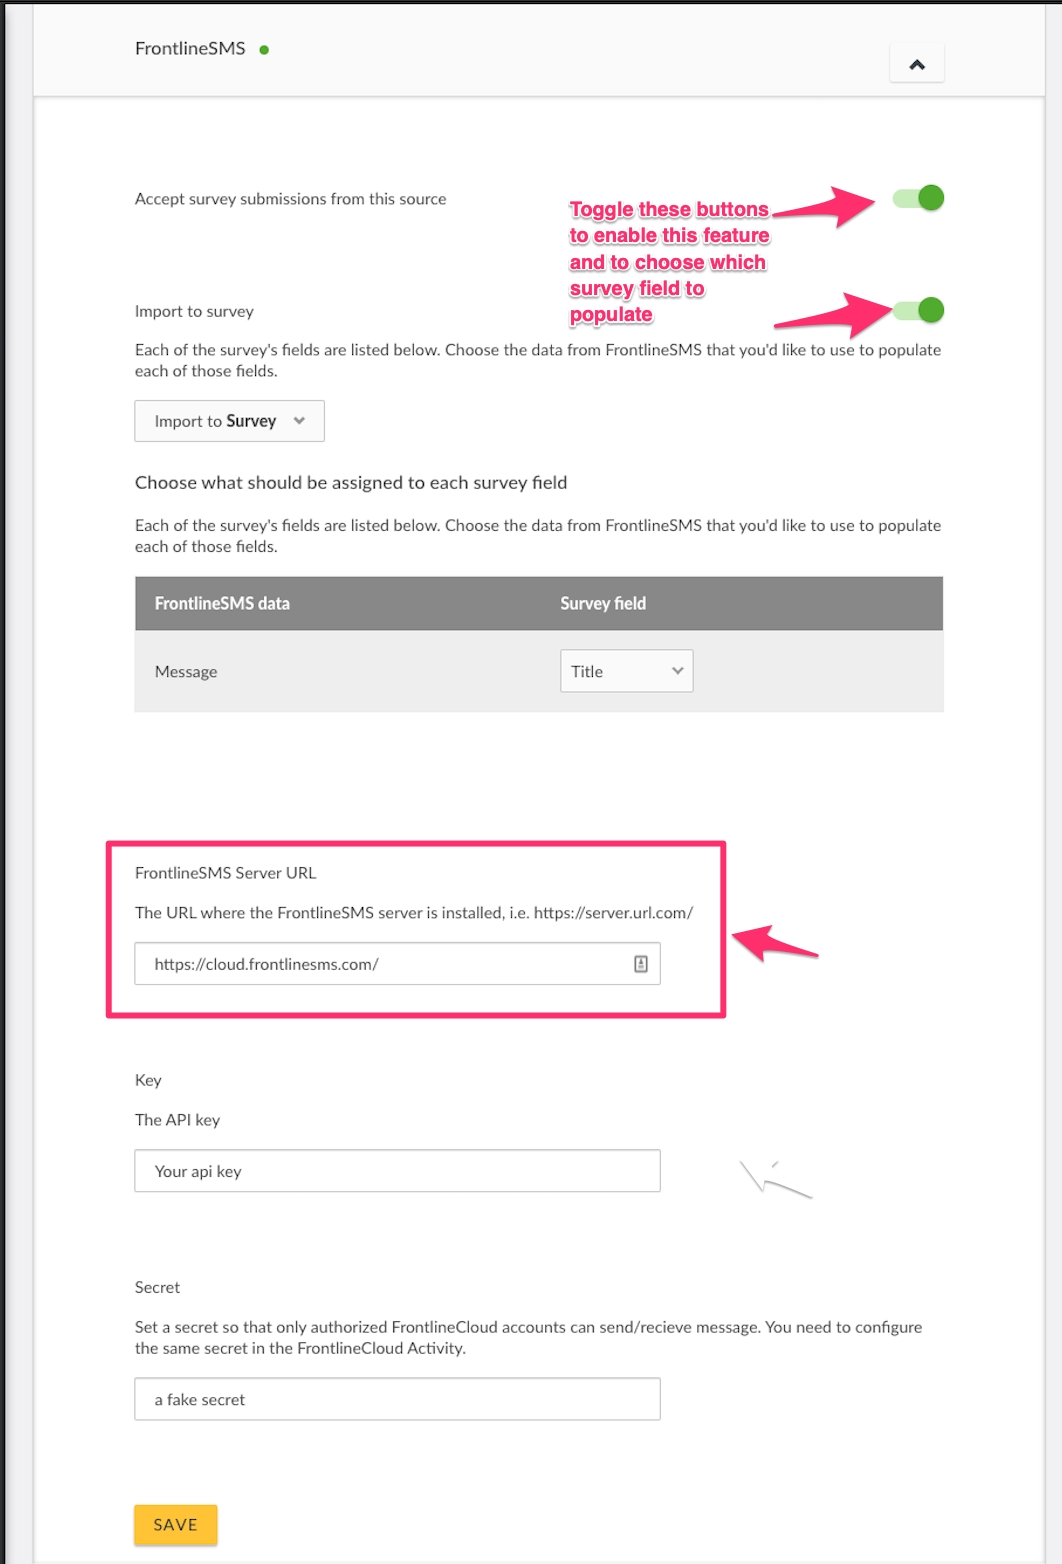
First, you will need to set up your server. Once you do that, copy the server URL and enter it in the 'FrontlineSMS server URL' field in your deployment.
Click on save.
Enable/disable the email data source by clicking on the green toggle that appears.
Click on the toggle to import your messages' response to a survey.
Select the survey you wish to import your messages to.
Select which field should be assigned to populate the data from
Next, you will need to generate an API Key in Frontline SMS. To do so, follow the instructions below
Go back to cloud.frontlinesms.com
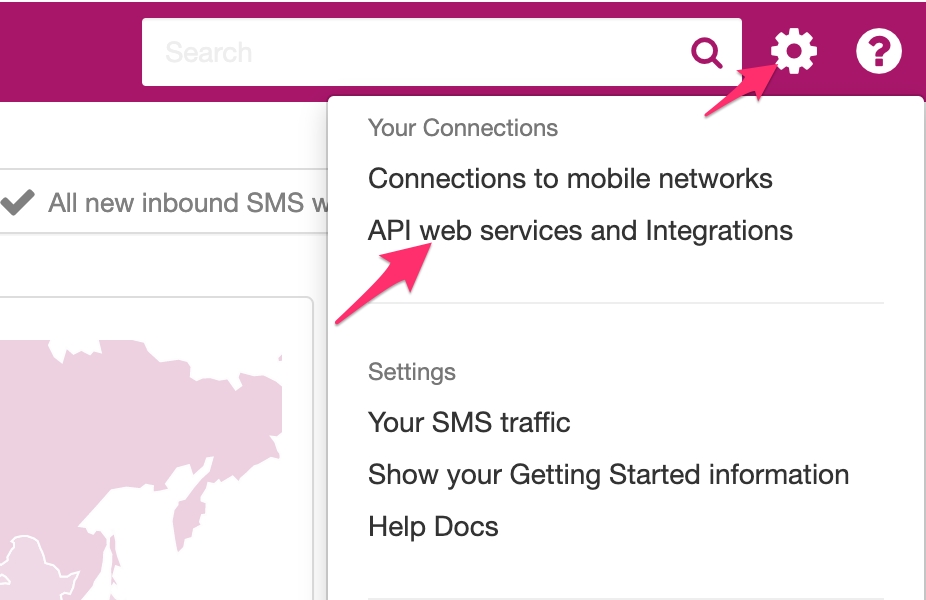
Click on the gear icon at the top right corner of the page
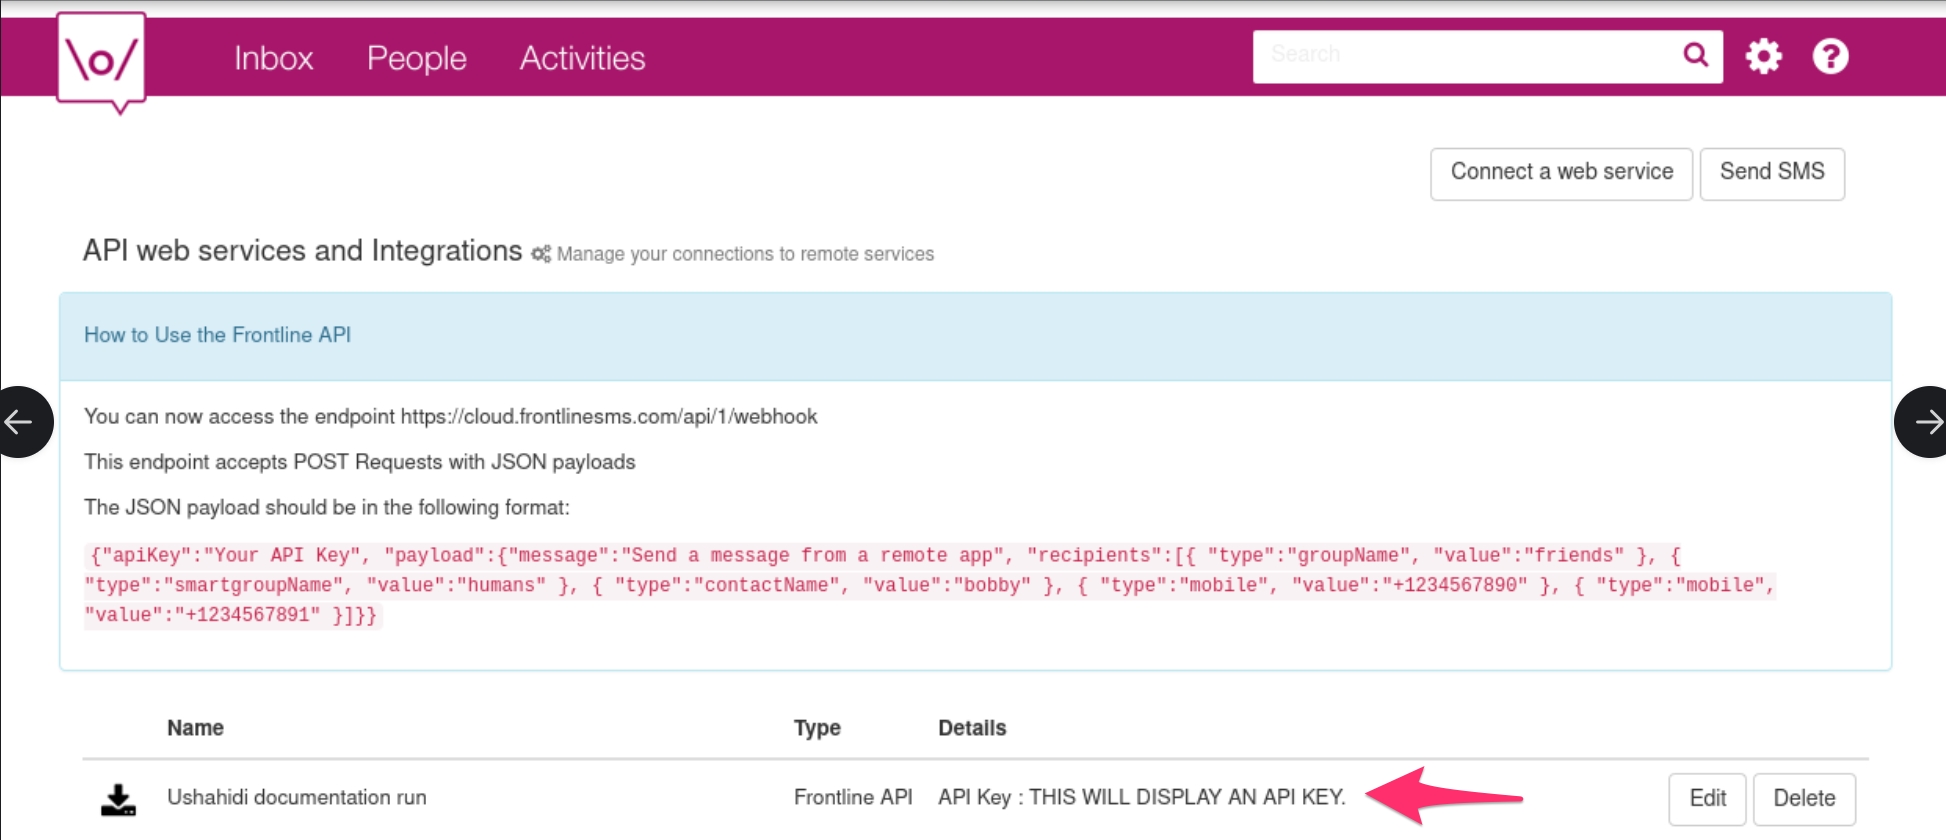
Click on API Web services and integrations.
In the screen that comes up, click Connect a web service
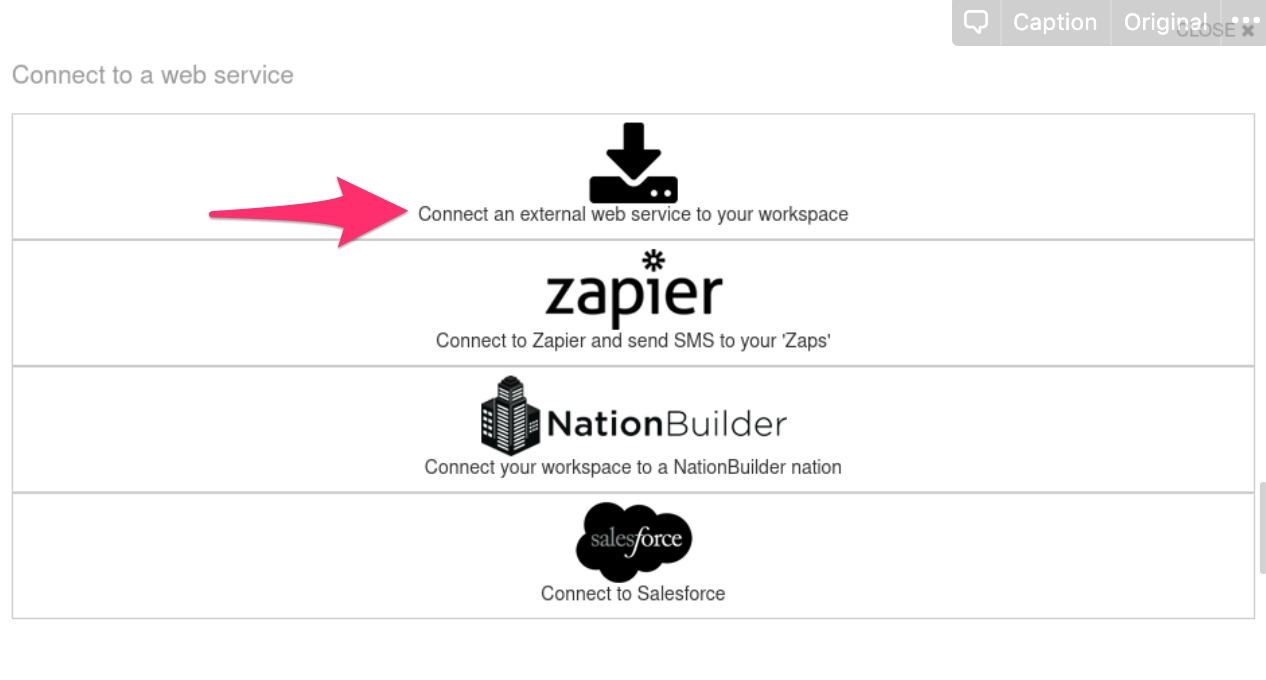
You will be shown a list of service types. Click on Connect an external web service to your workspace.
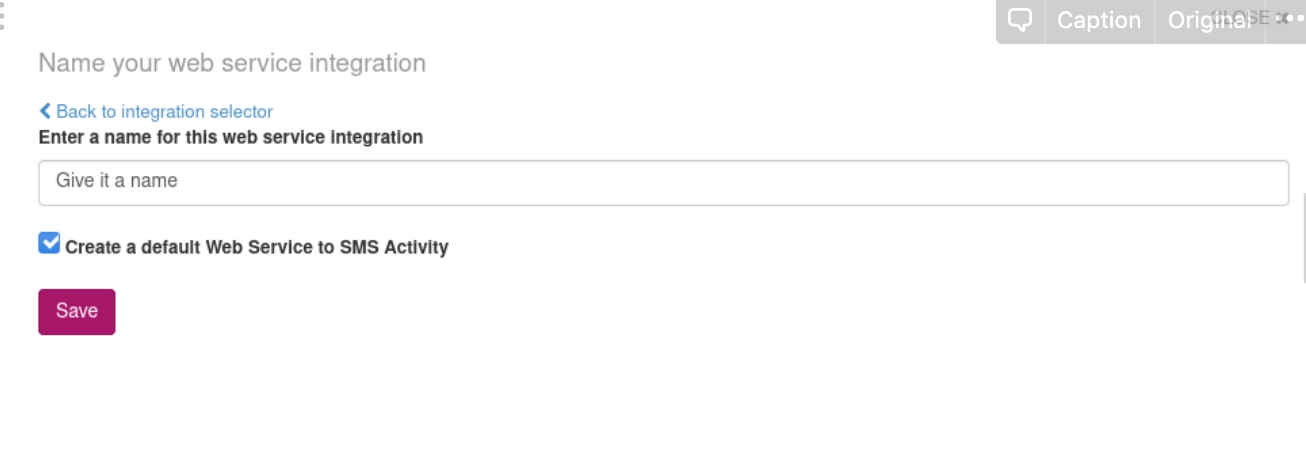
In the popup to create it, just fill in a name for the service. Example: "Ushahidi deployment integration"
Click Save
Once you save this, you will see your API key was created. You can copy it to use it in your integration with Ushahidi Platform.
In the Ushahidi Platform Datasource configuration for Frontline SMS;
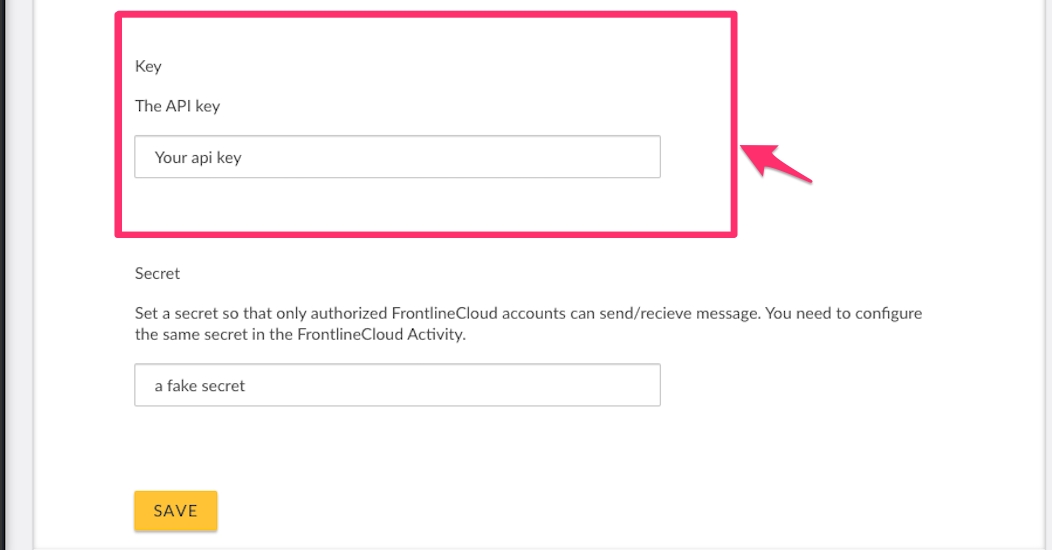
Enter the FrontlineCloud API KEY that you generated in the previous step in the Api Key field.
In the Frontline SMS website, go to Activities
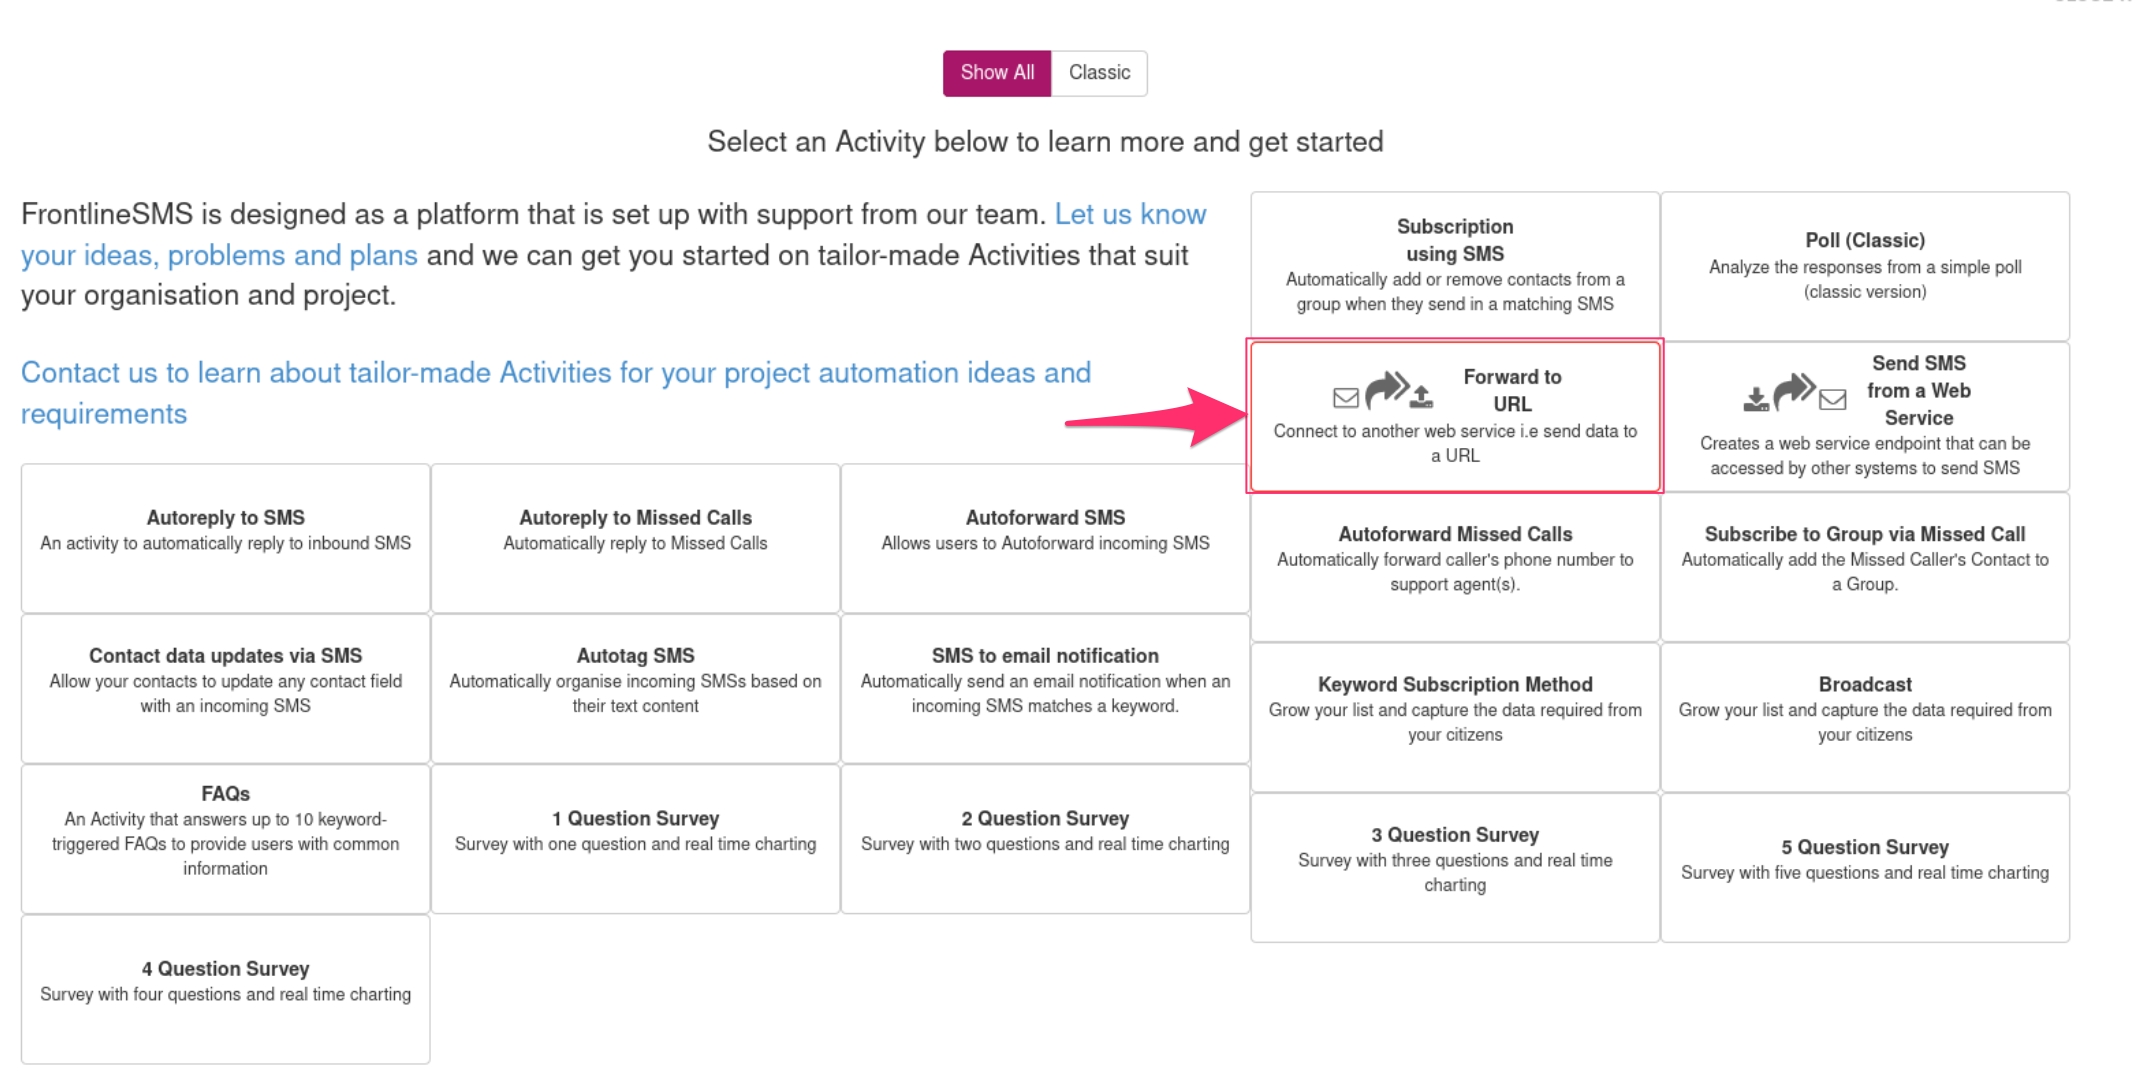
Click Create an Activity
You will get a screen with a lot of activity options. The one you want is Forward to URL as highlighted below
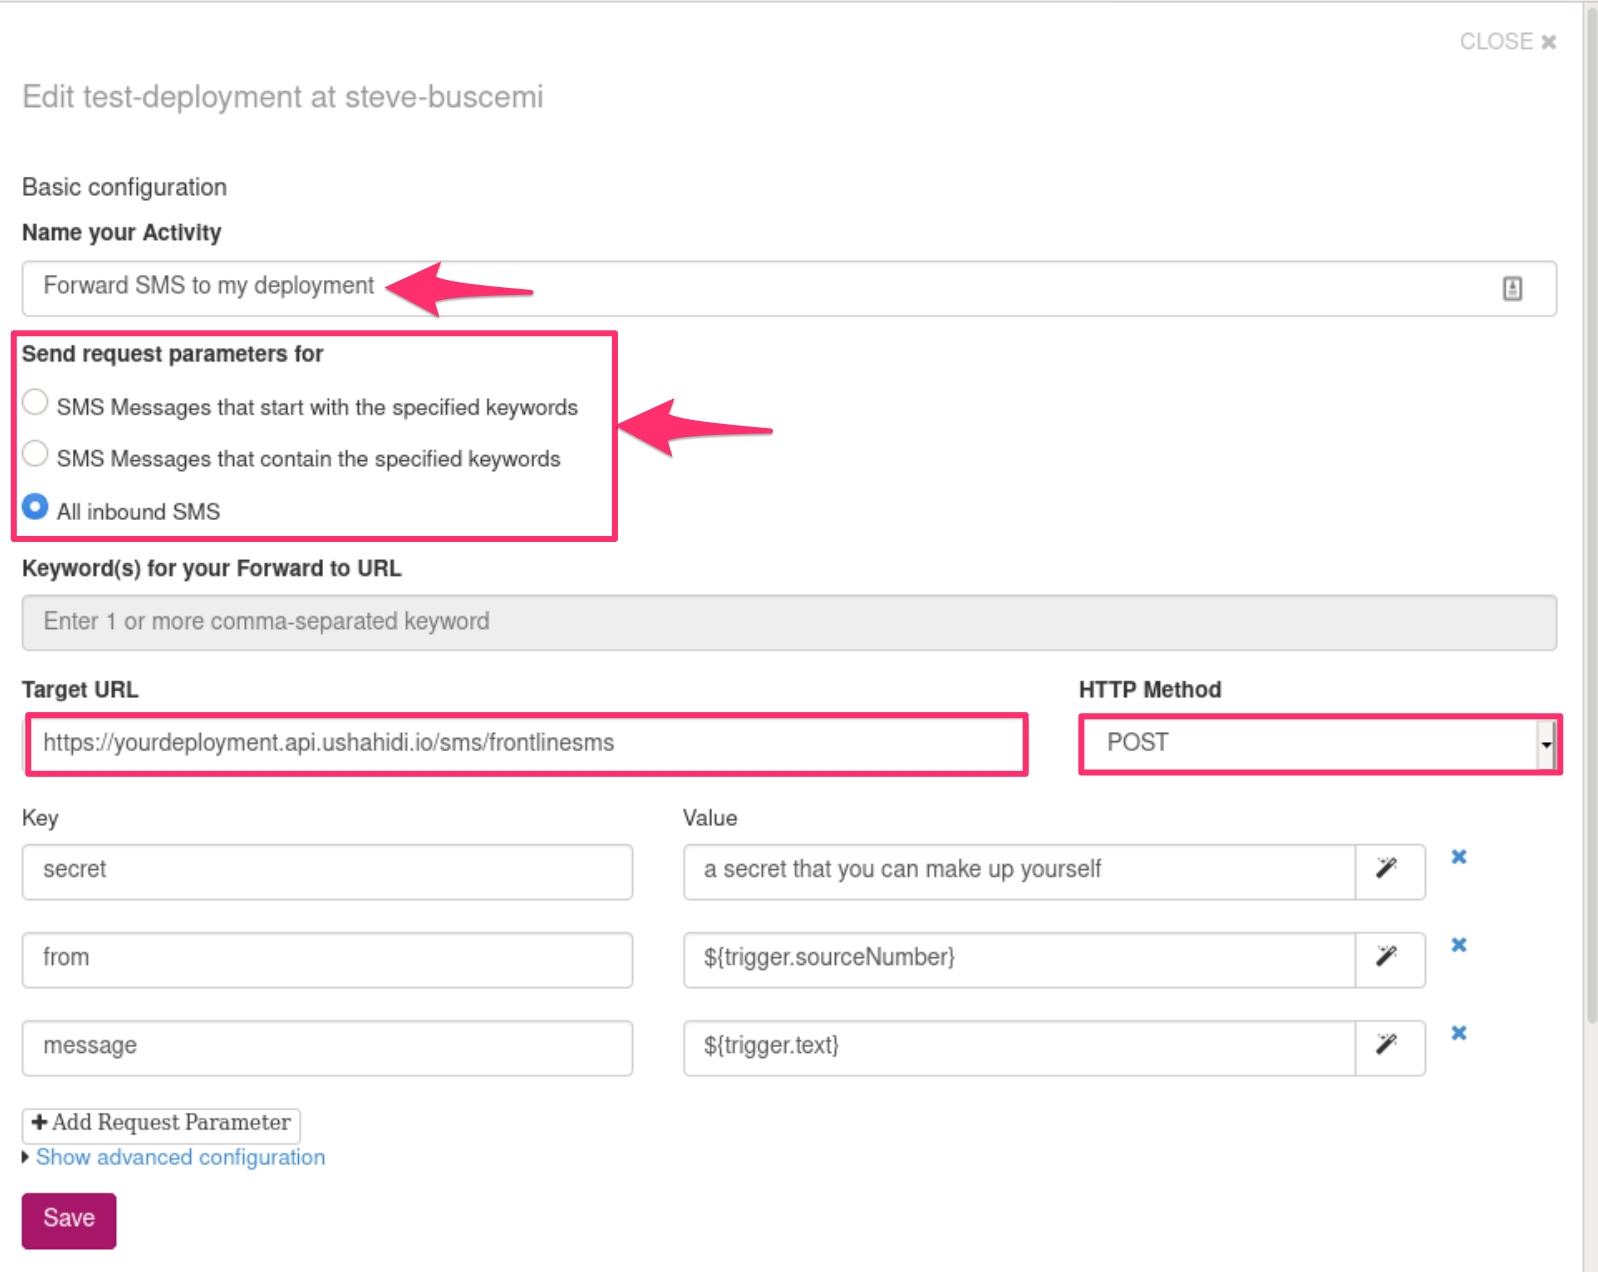
You will get a popup to configure the URL forward activity.
Let's fill in the popup:
Name your activity: use a descriptive name that contains your Ushahidi deployment name + Forward SMS. Example: "Forward SMS to my deployment". This is just so that in the future you know what's done by an activity vs another.
Send request parameters for (You can use the one that fits your needs, by default we are using All inbound SMS in phones that are exclusive for this campaign).
SMS Messages that start with the specified keywords: this can be useful if you are running multiple campaigns and want to route SMS received by a specific issue. For example, you could decide that only SMS starting with "ELECTIONS2020" will be sent to this Ushahidi deployment.
SMS Messages that contain the specified keywords: the same as above but instead of only routing SMS that starts with "ELECTIONS2020" you would route any messages that contain that text anywhere. This can be a tricky configuration and generally, it's better to do specific keywords at the beginning instead if you are filtering.
All inbound SMS: all SMS will be sent to the deployment.
****
Target URL: This is the API Url to your deployment + the endpoint to connect to.
For Ushahidi.io deployments, the rule is always the same. Given a deployment with the following url "https://**yourdeploymentname**.[ushahidi.io](http://ushahidi.io)" + the API Url will be = "https://**yourdeploymentname.api**.[ushahidi.io](http://ushahidi.io)".
Follow this formula to get your Target URL:
Your deployment URL: "https://**yourdeploymentname**.ushahidi.io"
The API URL: "https://**yourdeploymentname.api**.ushahidi.io"
The Target URL then would be "https://yourdeploymentname.api.ushahidi.io/sms/frontlinesms". is what you will enter in the "Target URL" field.
****
HTTP Method: POST
Then you will need to add key and values that Frontline SMS will use when connecting with the Ushahidi deployment. To start;
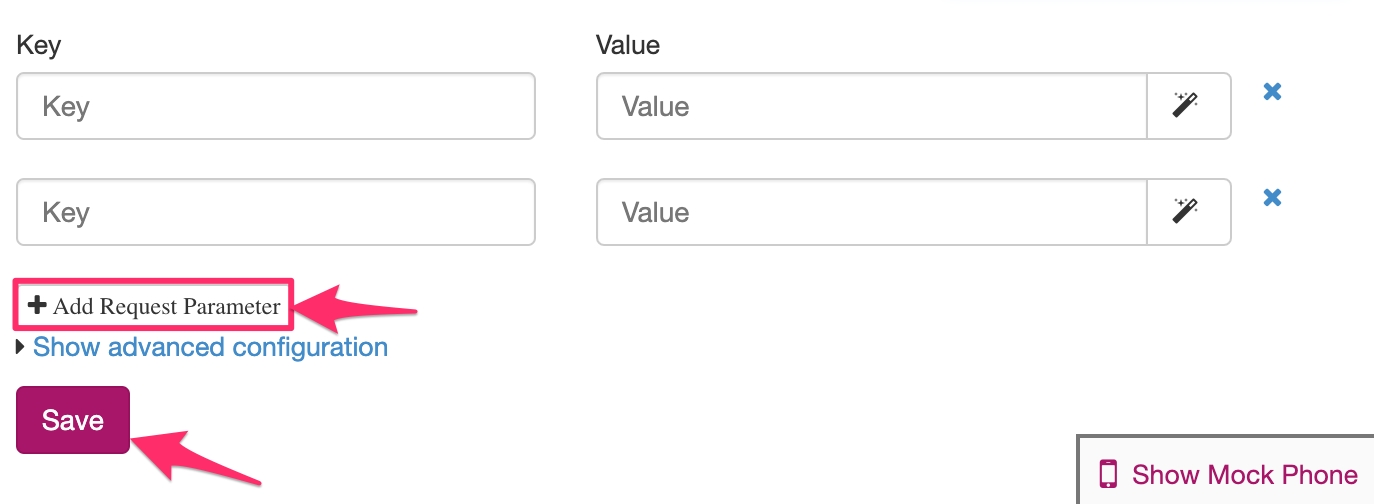
Click on the Add Request parameter button which will add a 3rd key and value fields to the form.
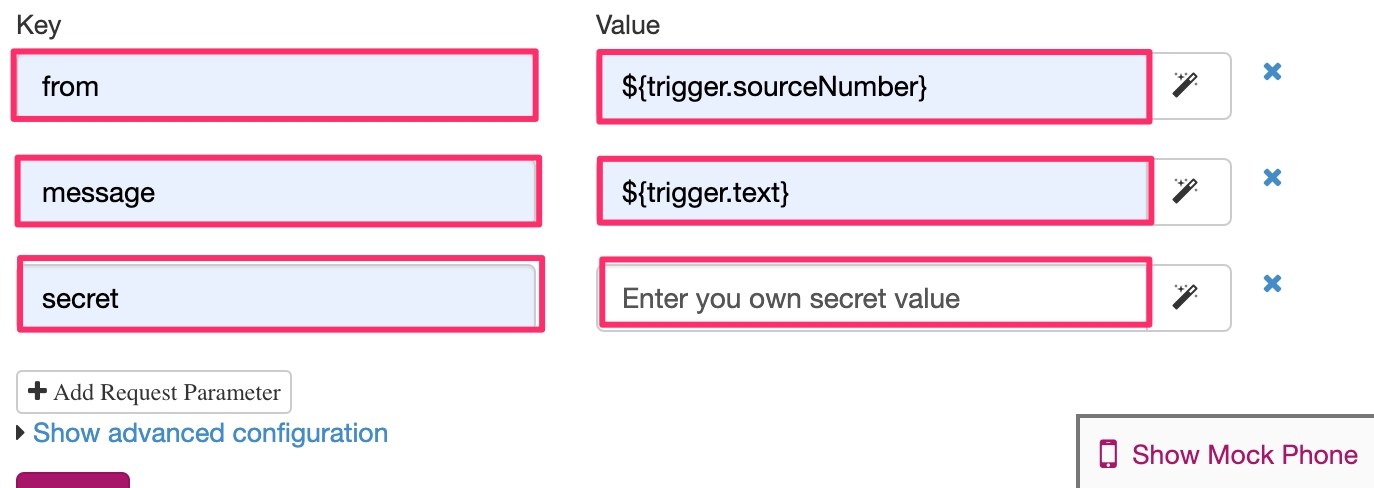
In the first Key field enter from. In the Value field next to it, enter ${trigger.sourceNumber}
This will be saved as the sender for the SMS
In the second Key field enter message. In the Value field next to it, enter ${trigger.text}. This matches the content of the SMS sent.
In the third Key field enter secret. In the value field next to it, enter a phrase or long password. This will be needed in the Ushahidi Platform as well. Example "occupant-gash-gasket-roil" (don't use this! it's just an example). The secret is supposed to be secret, and it validates the communication between Frontline SMS and the Ushahidi API. Copy the secret into the Ushahidi Platform Frontline SMS configuration as well. Remember: it's case sensitive.
Click on the Save button in Frontline SMS to save the activity.
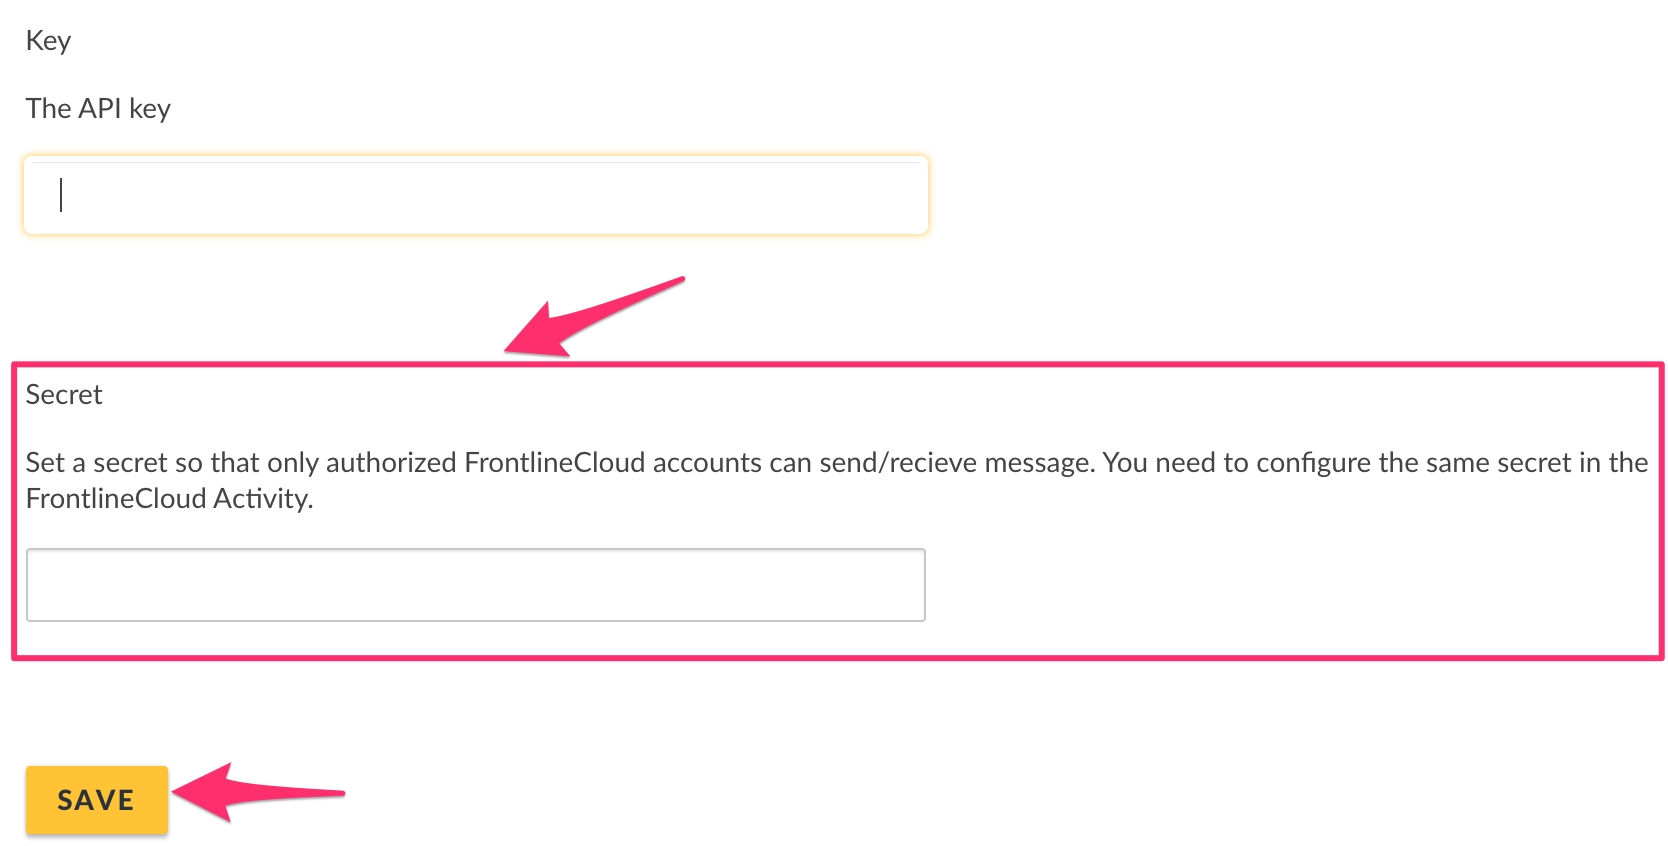
Enter a secret code in the SECRET field. This code will be used by FrontlineCloud to connect to the Ushahidi deployment. You can enter any value you like here. It should ideally contain numbers and letters and be ~20 characters long.
Click save when done.
Finally, test that the system is setup correctly by sending a test sms to your number. The message should be forward to the Ushahidi deployment and appear in your list of posts.
Nexmo is a cloud-based SMS API that lets you send and receive a high volume of messages to mobile phones in any country at wholesale rates.
NB: You need a nexmo account to be able to configure this as a data source. To sign up, go to (https://dashboard.nexmo.com/sign-up)
To get started with Nexmo set up,
Log into your Nexmo Dashboard https://dashboard.nexmo.com
If you haven’t already, you’ll need to buy a number that you will use to receive SMS messages from.
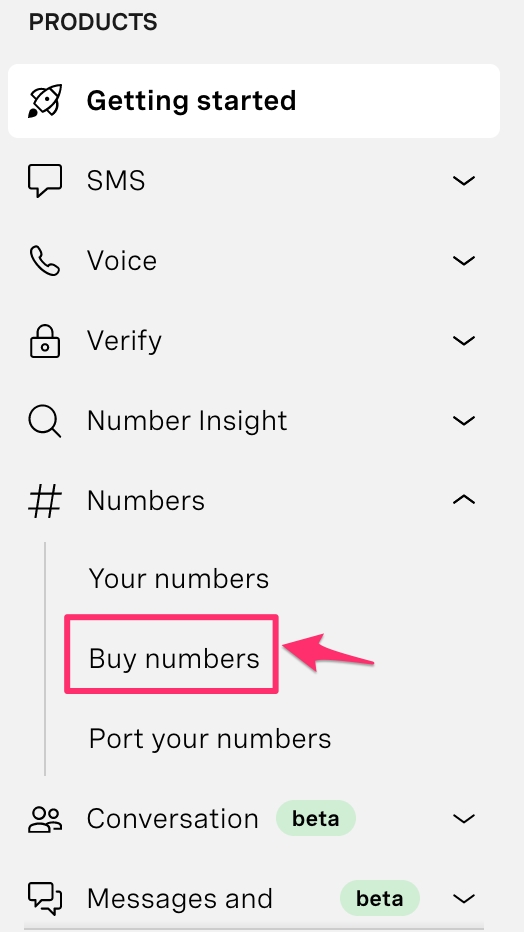
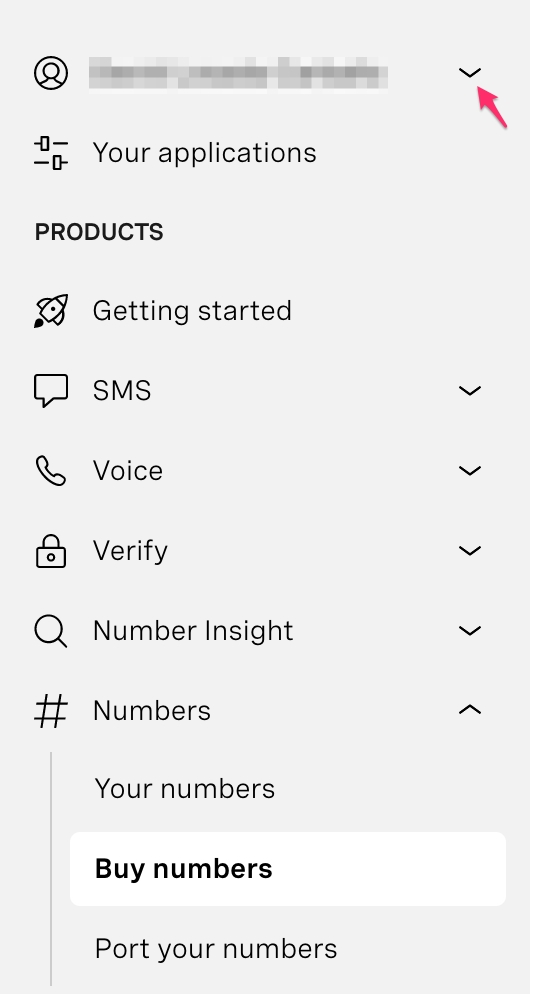
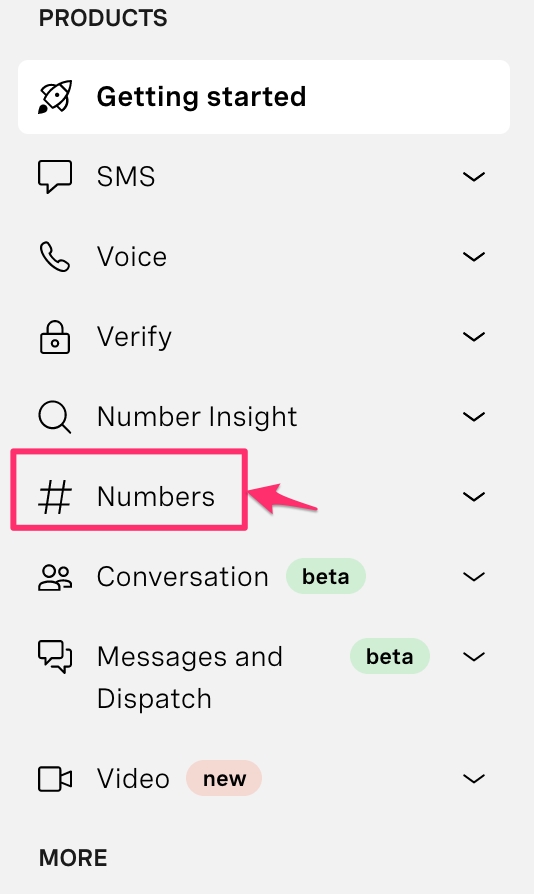
Click on Numbers on the top menu bar on your nexmo dashboard
Click on Buy Numbers
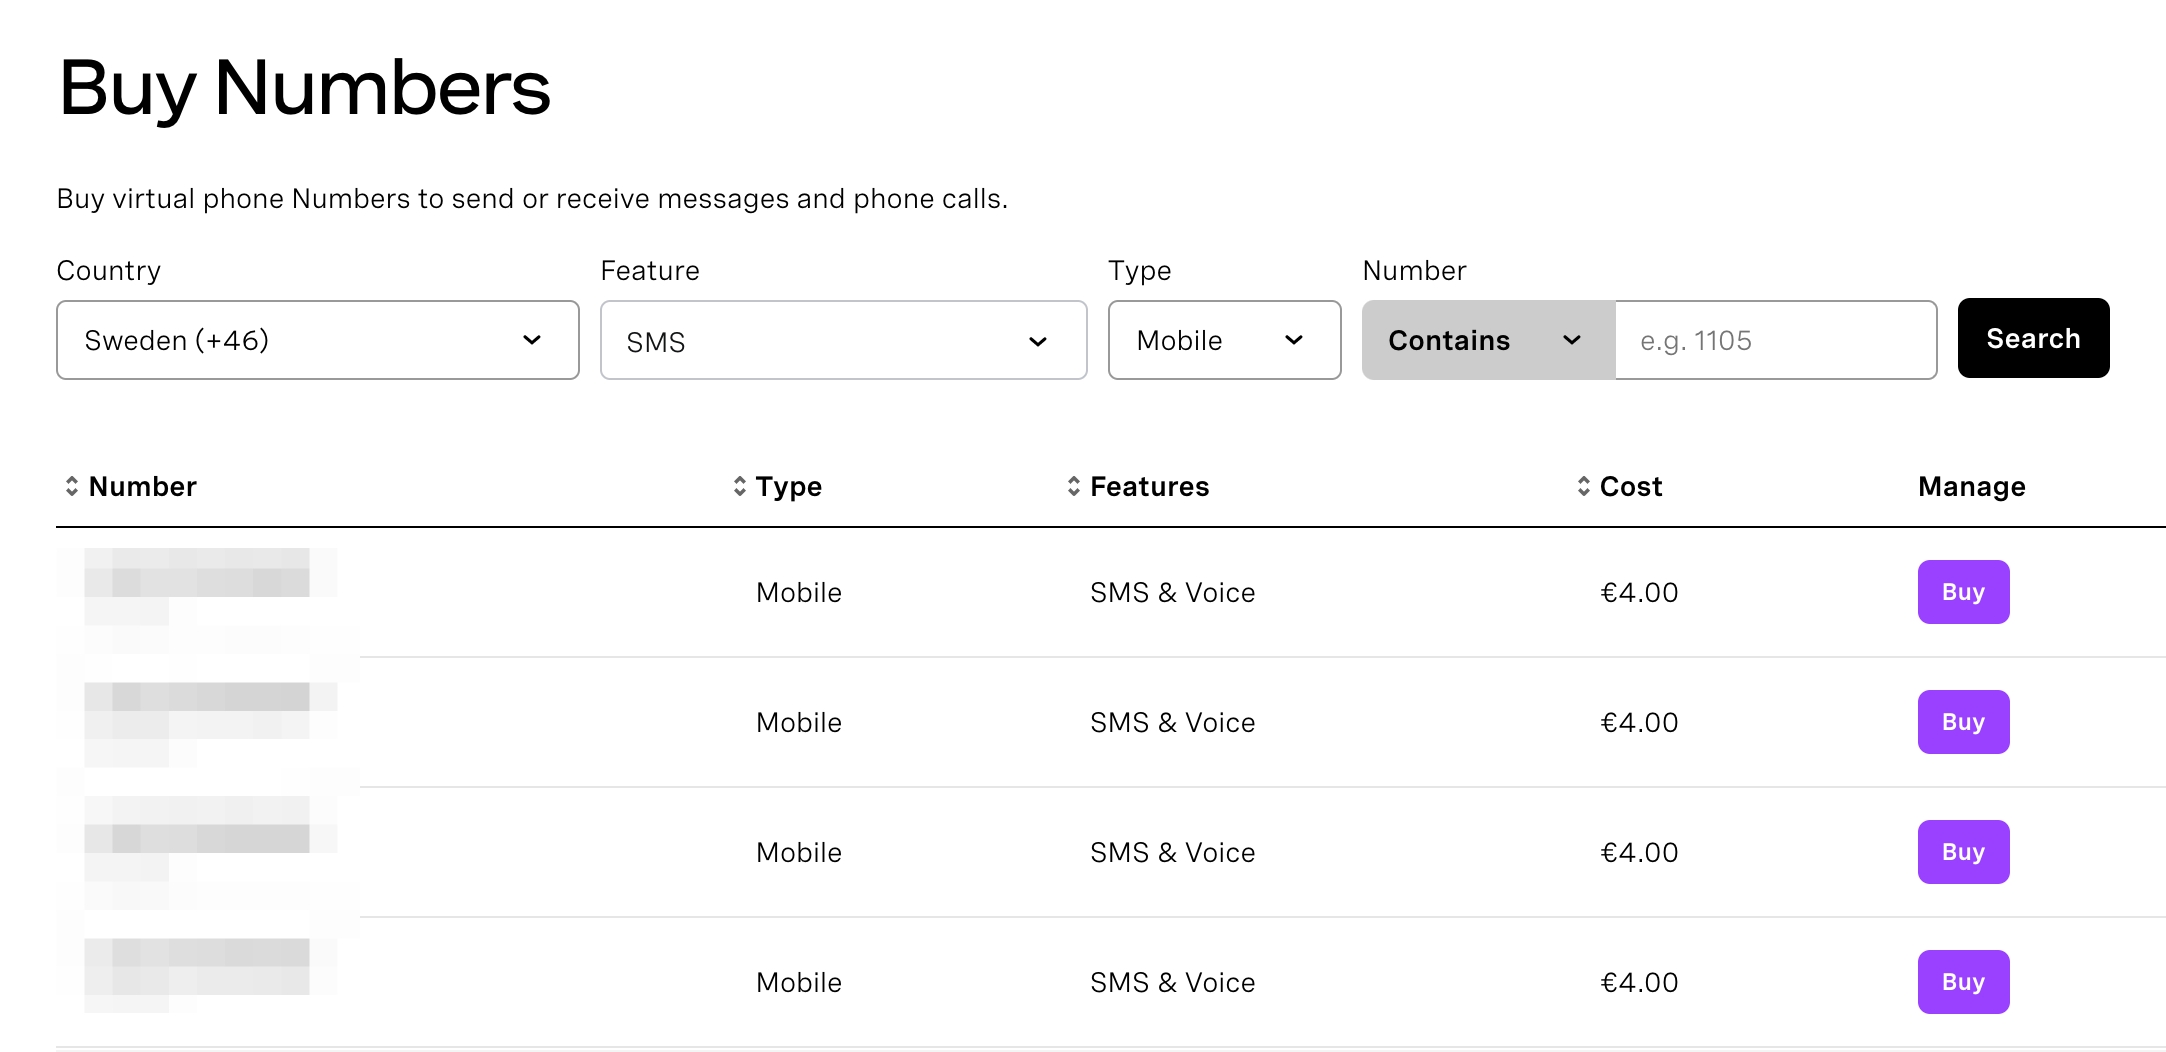
Set the desired criteria of the phone number you’re looking to use
Select the country in which the SMS Number will likely be operating in
Select the features of this phone number(SMS only, Voice only or SMS & Voice)
Select the type of phone number it will be (Mobile, Landline, Toll free)
Click on search. A list of available numbers based on the criteria set above will appear.
Click Buy on the number you’d like to use.
Once you have a phone number, note it down as you’ll need it to configure your data source later on.
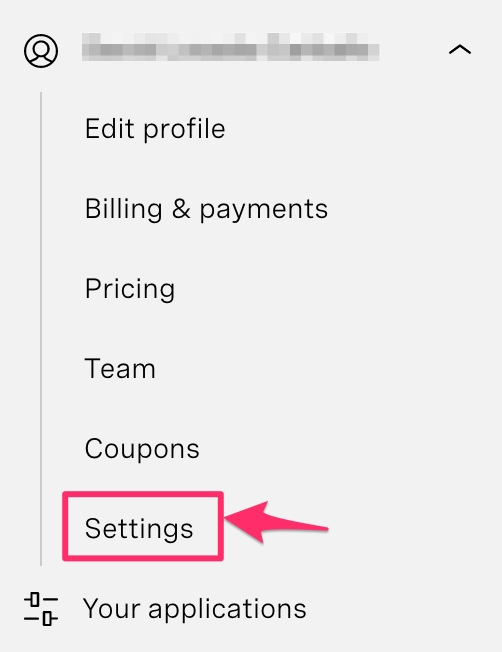
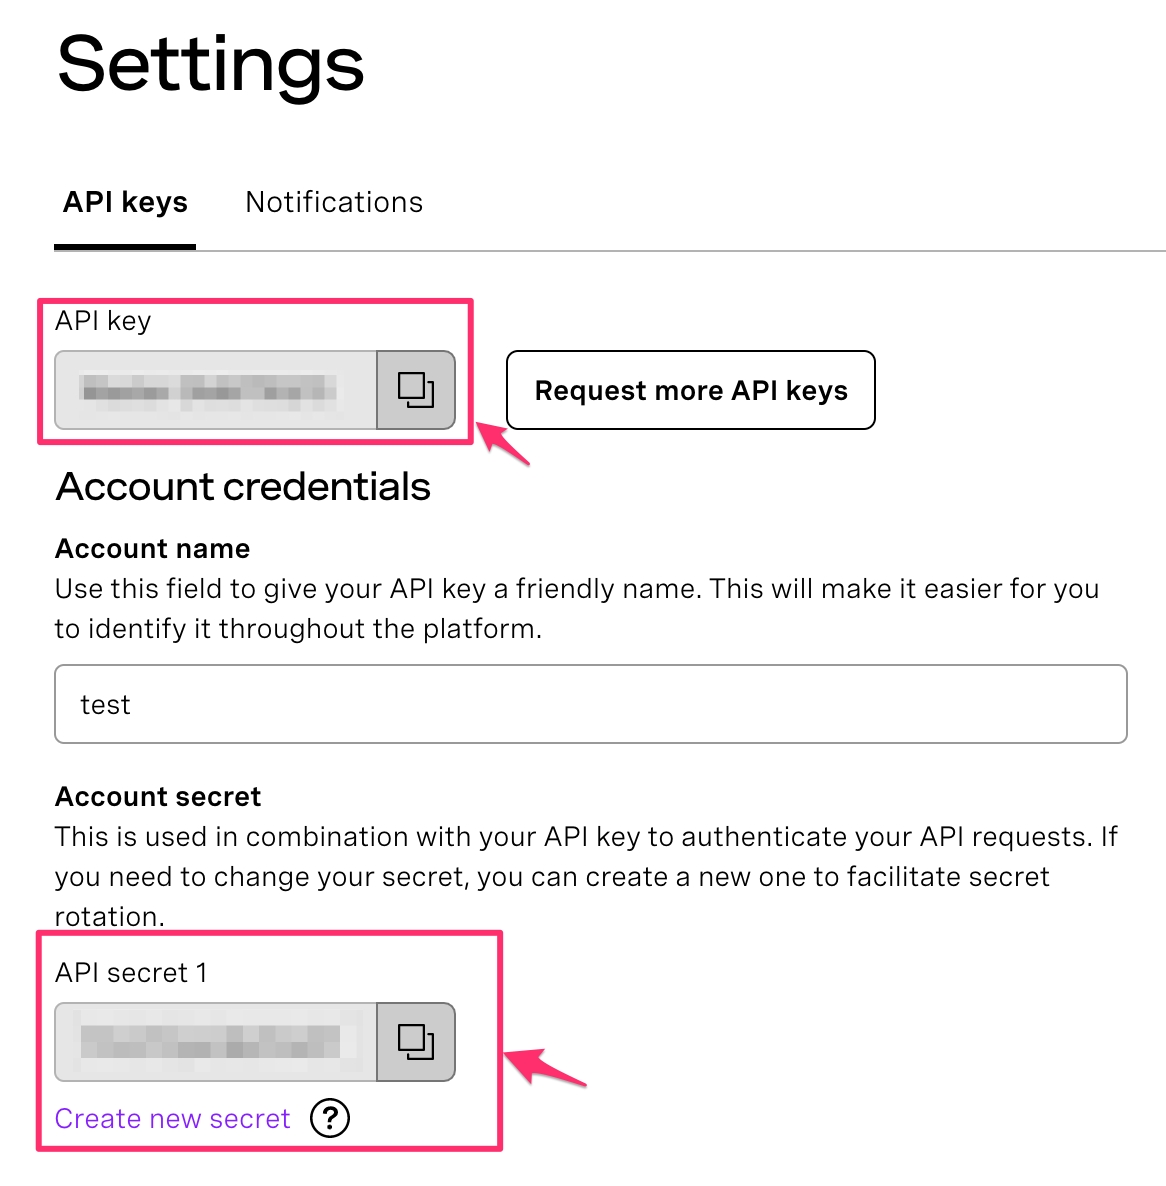
You’ll need to grab your API credentials from your nexmo settings page.
Pick your API KEY and API SECRET from the API Settings section.
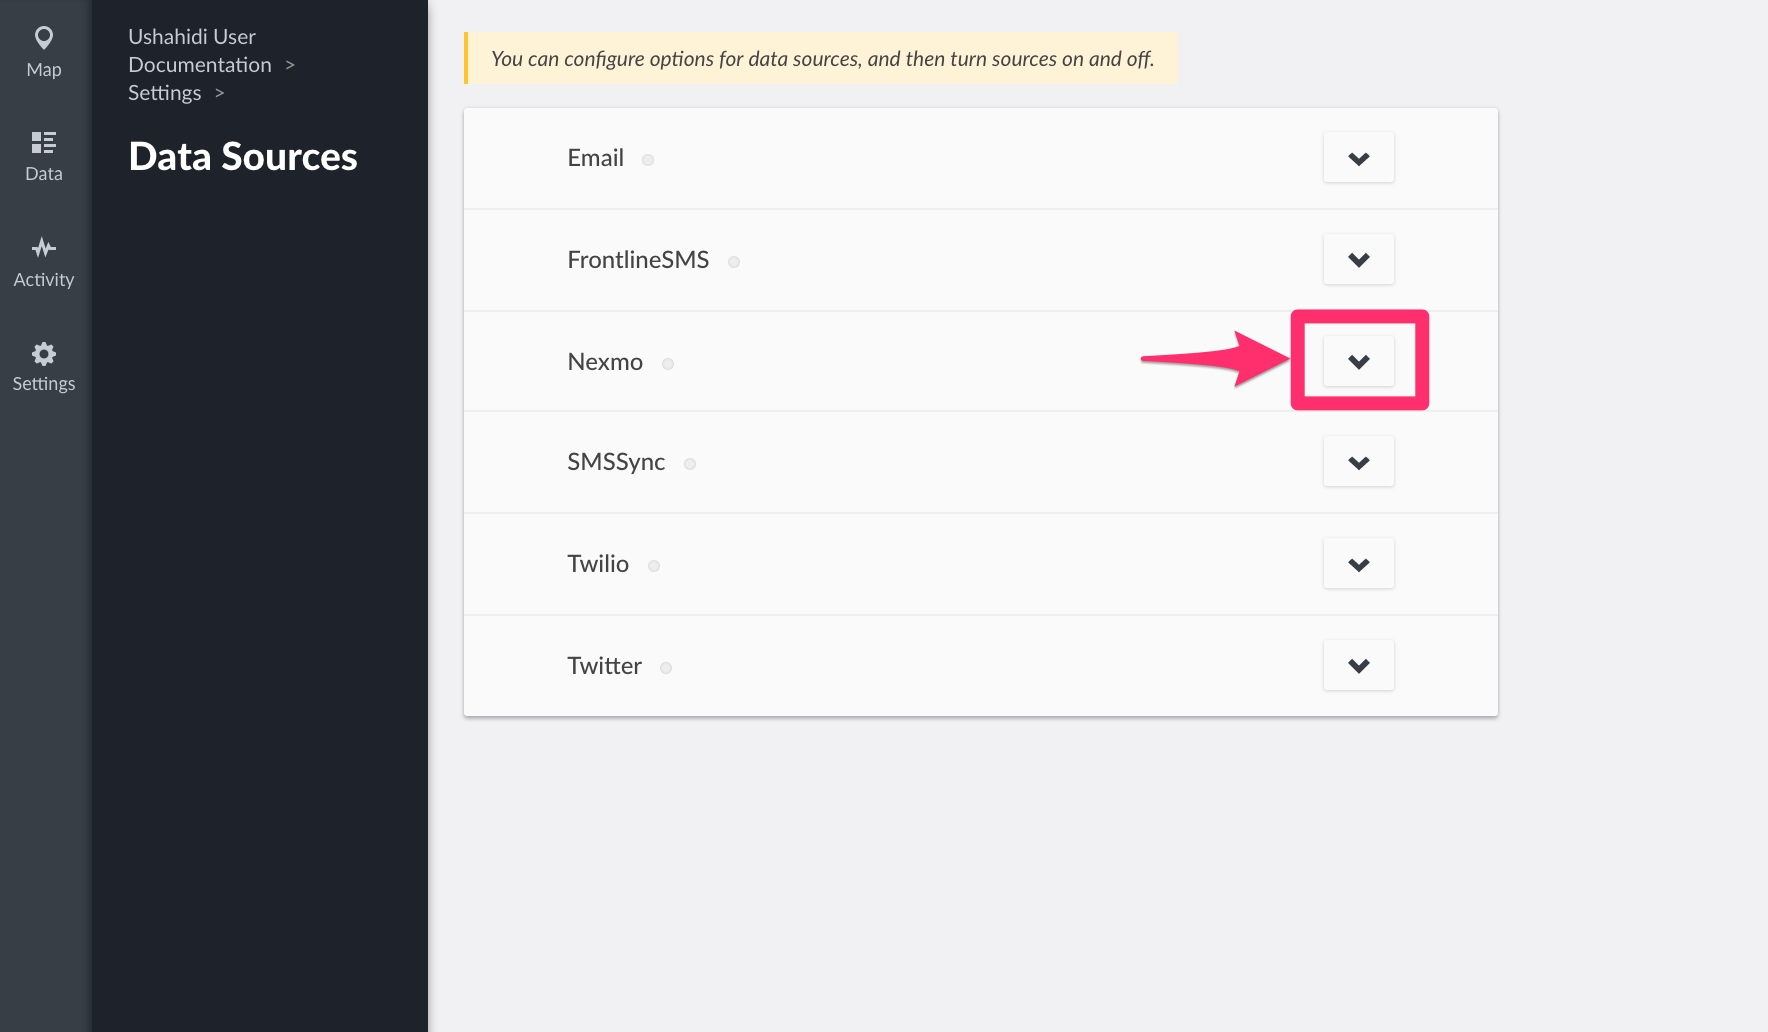
Go back to your Data source settings page on your deployment
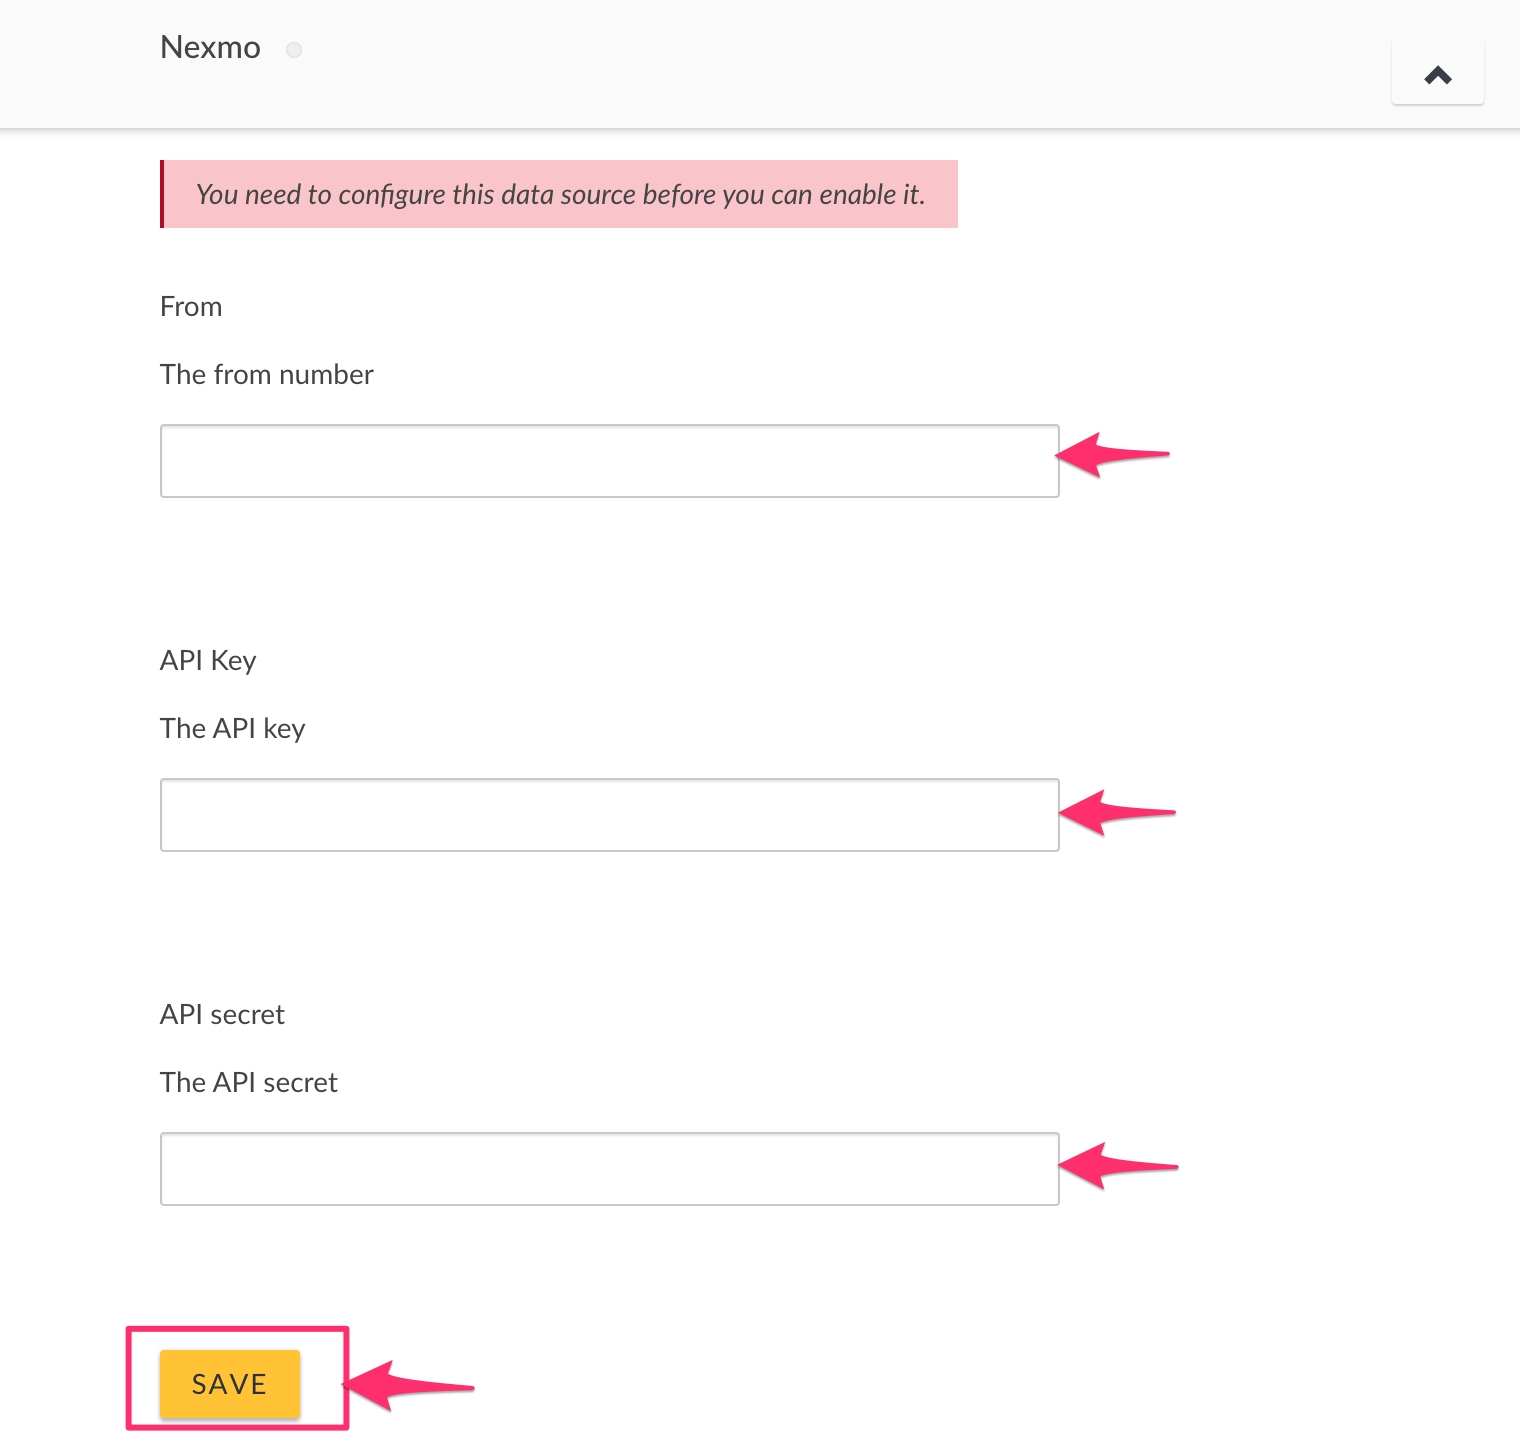
Click on the drop down icon on the right to get to your Nexmo configuration page
Enter the following details, which you got earlier from your Nexmo Dashboard
From: Enter the phone number you will use to receive SMS messages from your nexmo account
API KEY: Enter the API key retrieved from your nexmo settings page.
API SECRET: Enter the API secret retrieved from your nexmo settings page.
Click on Save **and this data source’s settings will be saved. Unstructured posts from SMS will now be pulled into the platform from Nexmo.
To enable/disable the Nexmo data source, simply click on the green toggle.
If you’d like to edit your Nexmo configuration, simply click on the drop down icon on the right while on the data sources list page and make your changes.
Go to https://dashboard.nexmo.com/settings where you can set up the webhook. This is where we can make Nexmo aware of the existence of your Ushahidi deployment and help them connect with each other. Enter the sync URL i.e “https://yourdeploymentname.api.ushahidi.io/sms/nexmo” on the inbound SMS webhook field as shown below and save changes.
We are having some issues with the play store at the moment, you can download the SMS Sync app at https://github.com/ushahidi/SMSSync/releases/download/v3.1.1/smssync-withAnalyticsRelease-v3.1.1-RELEASE.apk
SMSsync is a simple, yet powerful SMS to HTTP sync utility that turns any Android phone into a local SMS gateway by sending incoming messages (SMS) to a configured URL (web service).
Please note that SMSsync works on any SMS-enabled device running Android 2.1 and above.
Once you have downloaded it, click on install to save it on your phone.
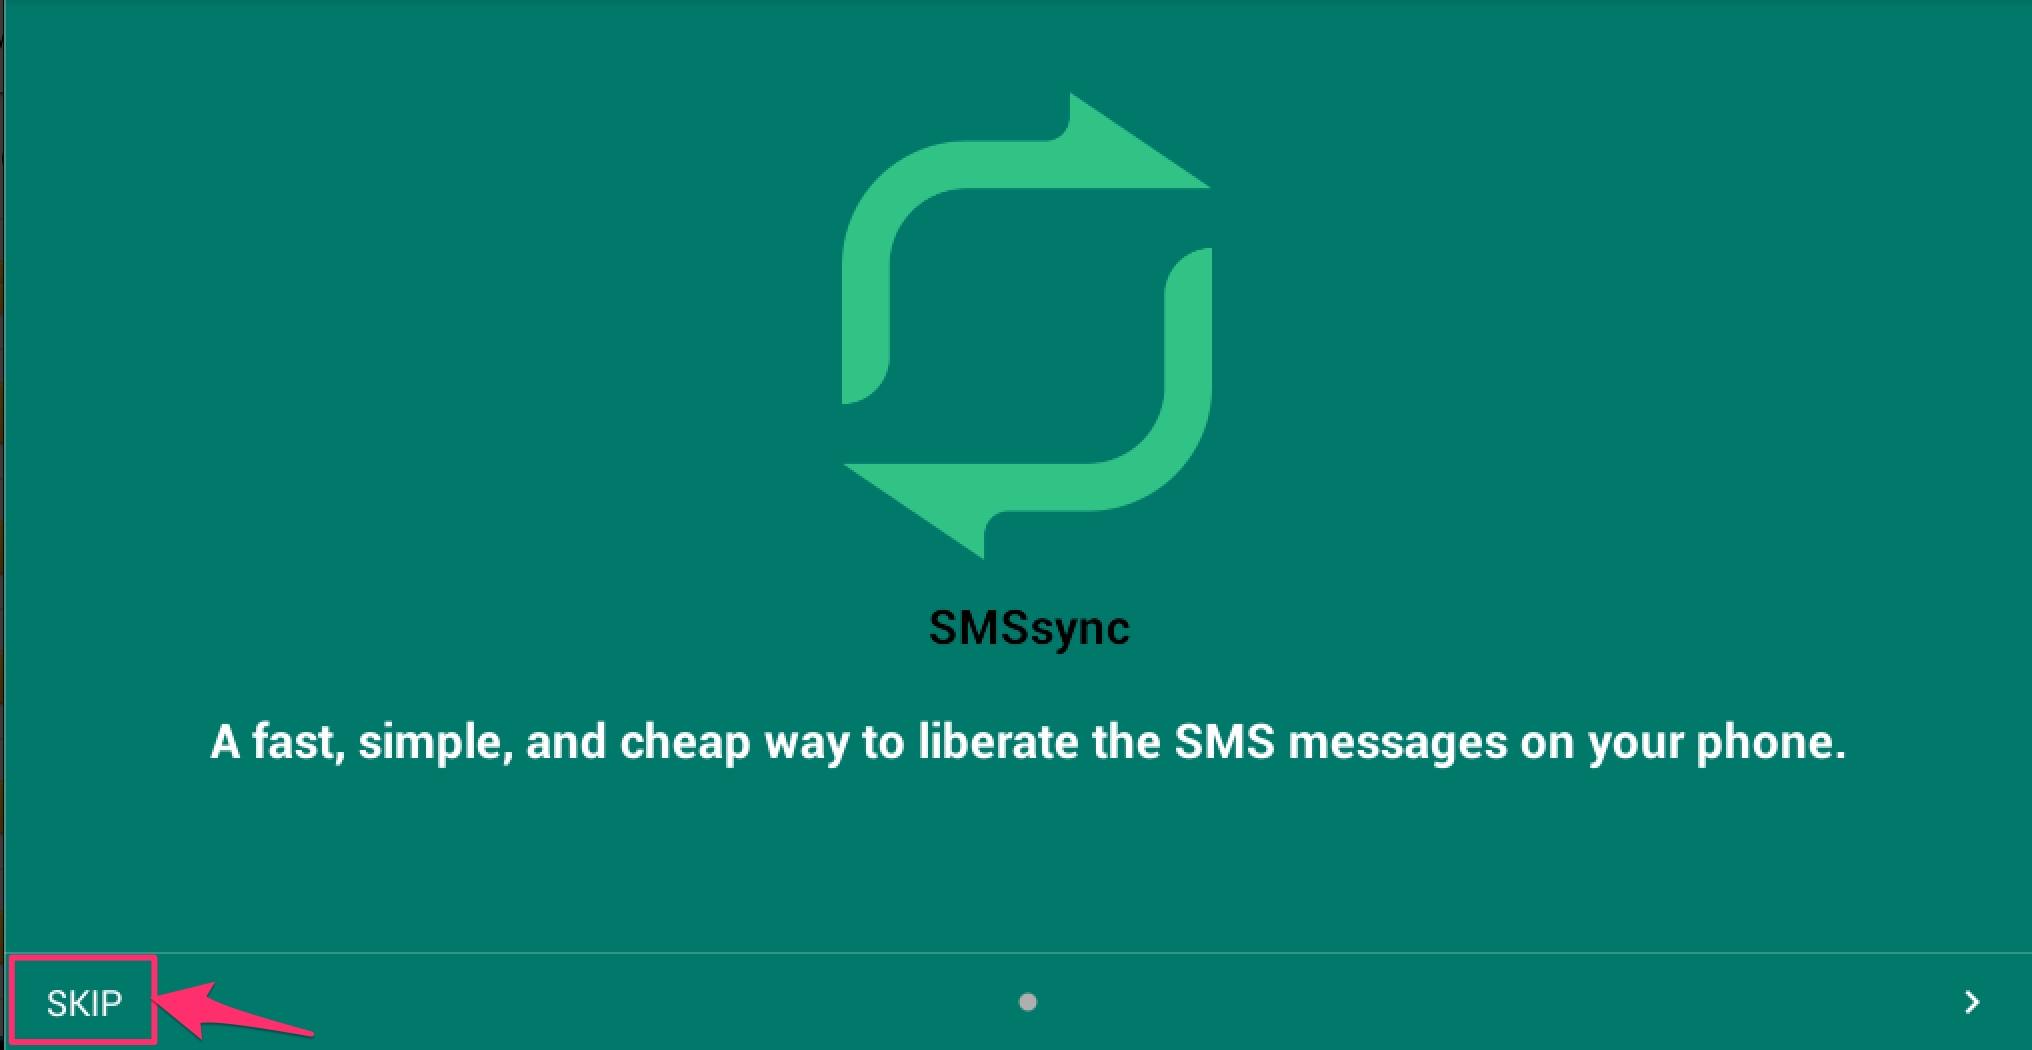
Open up the SMSSync Application on your android device, click skip or swipe left, and click done to continue.
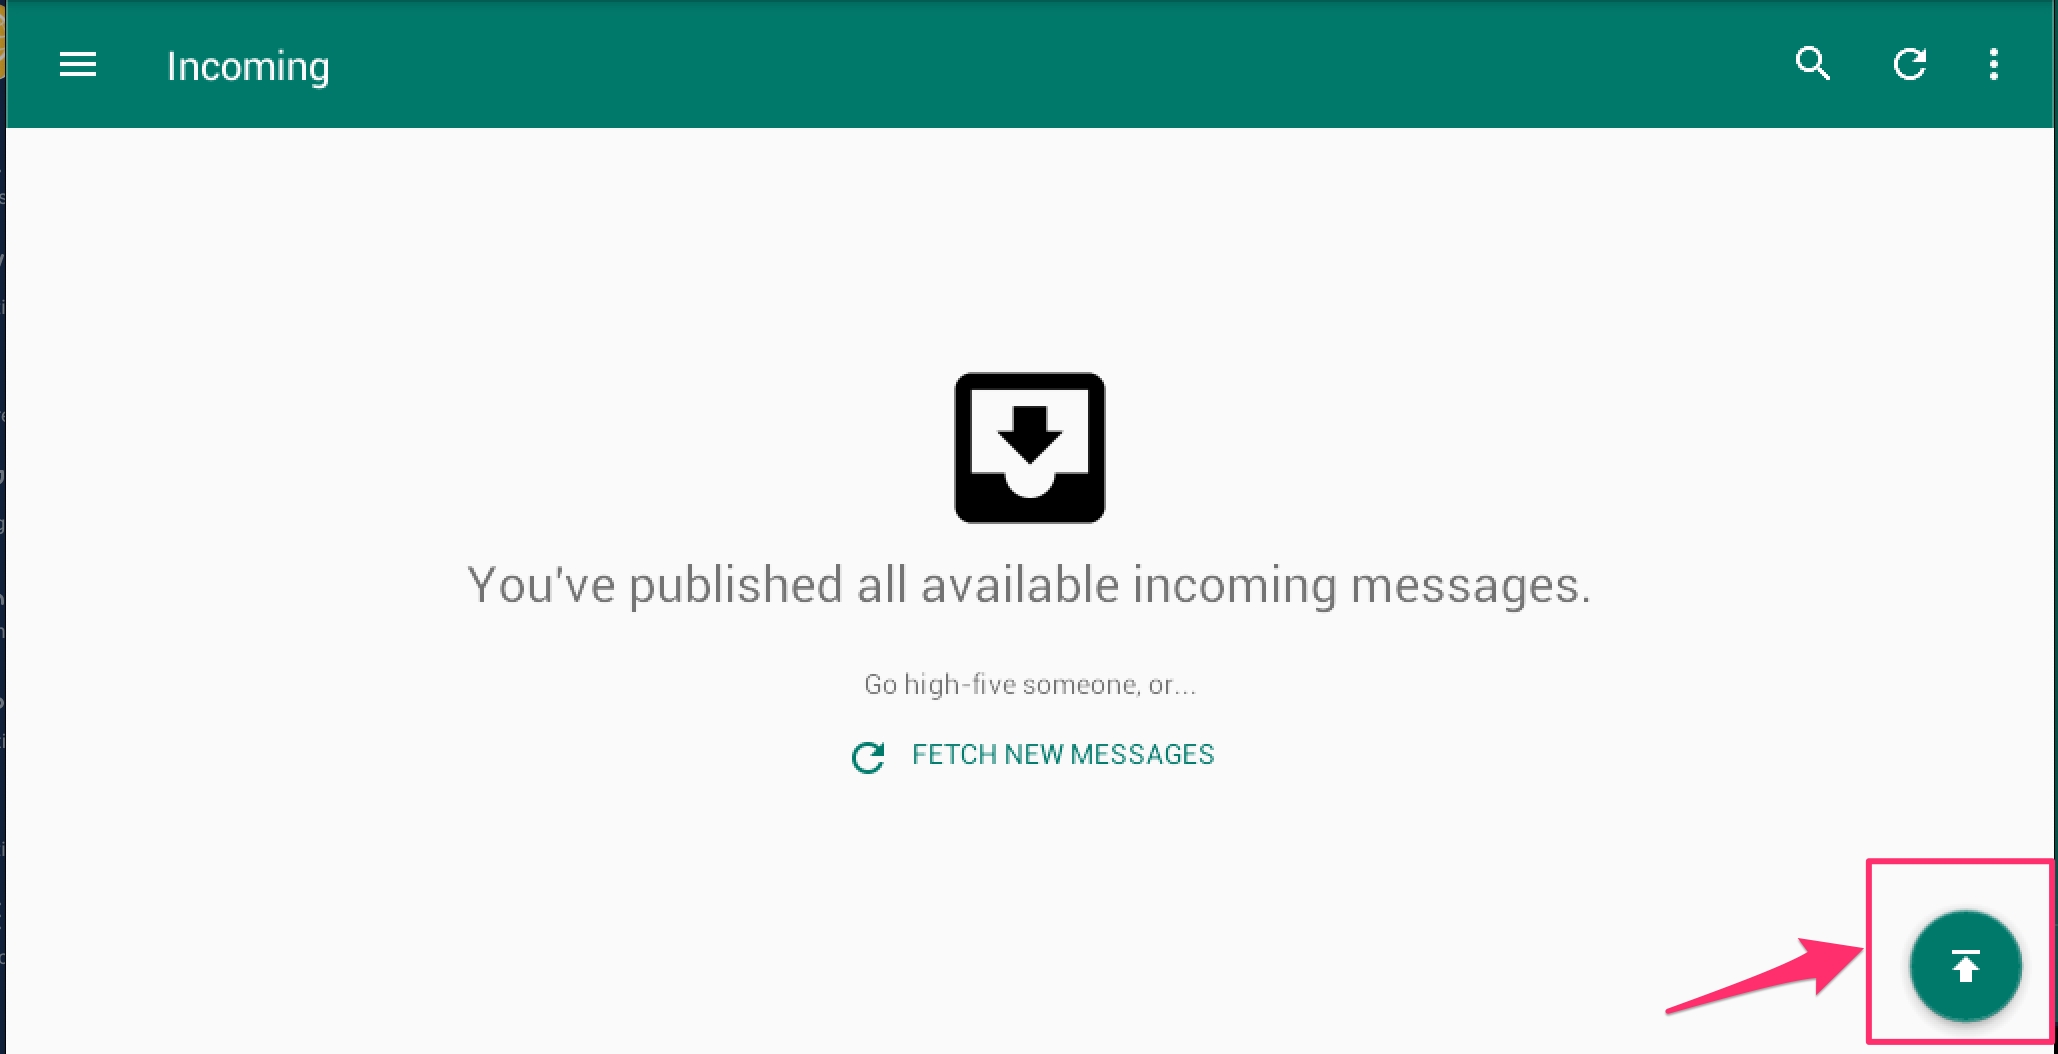
On the incoming messages screen, click on the arrow at the bottom right corner to enable SMSsync.
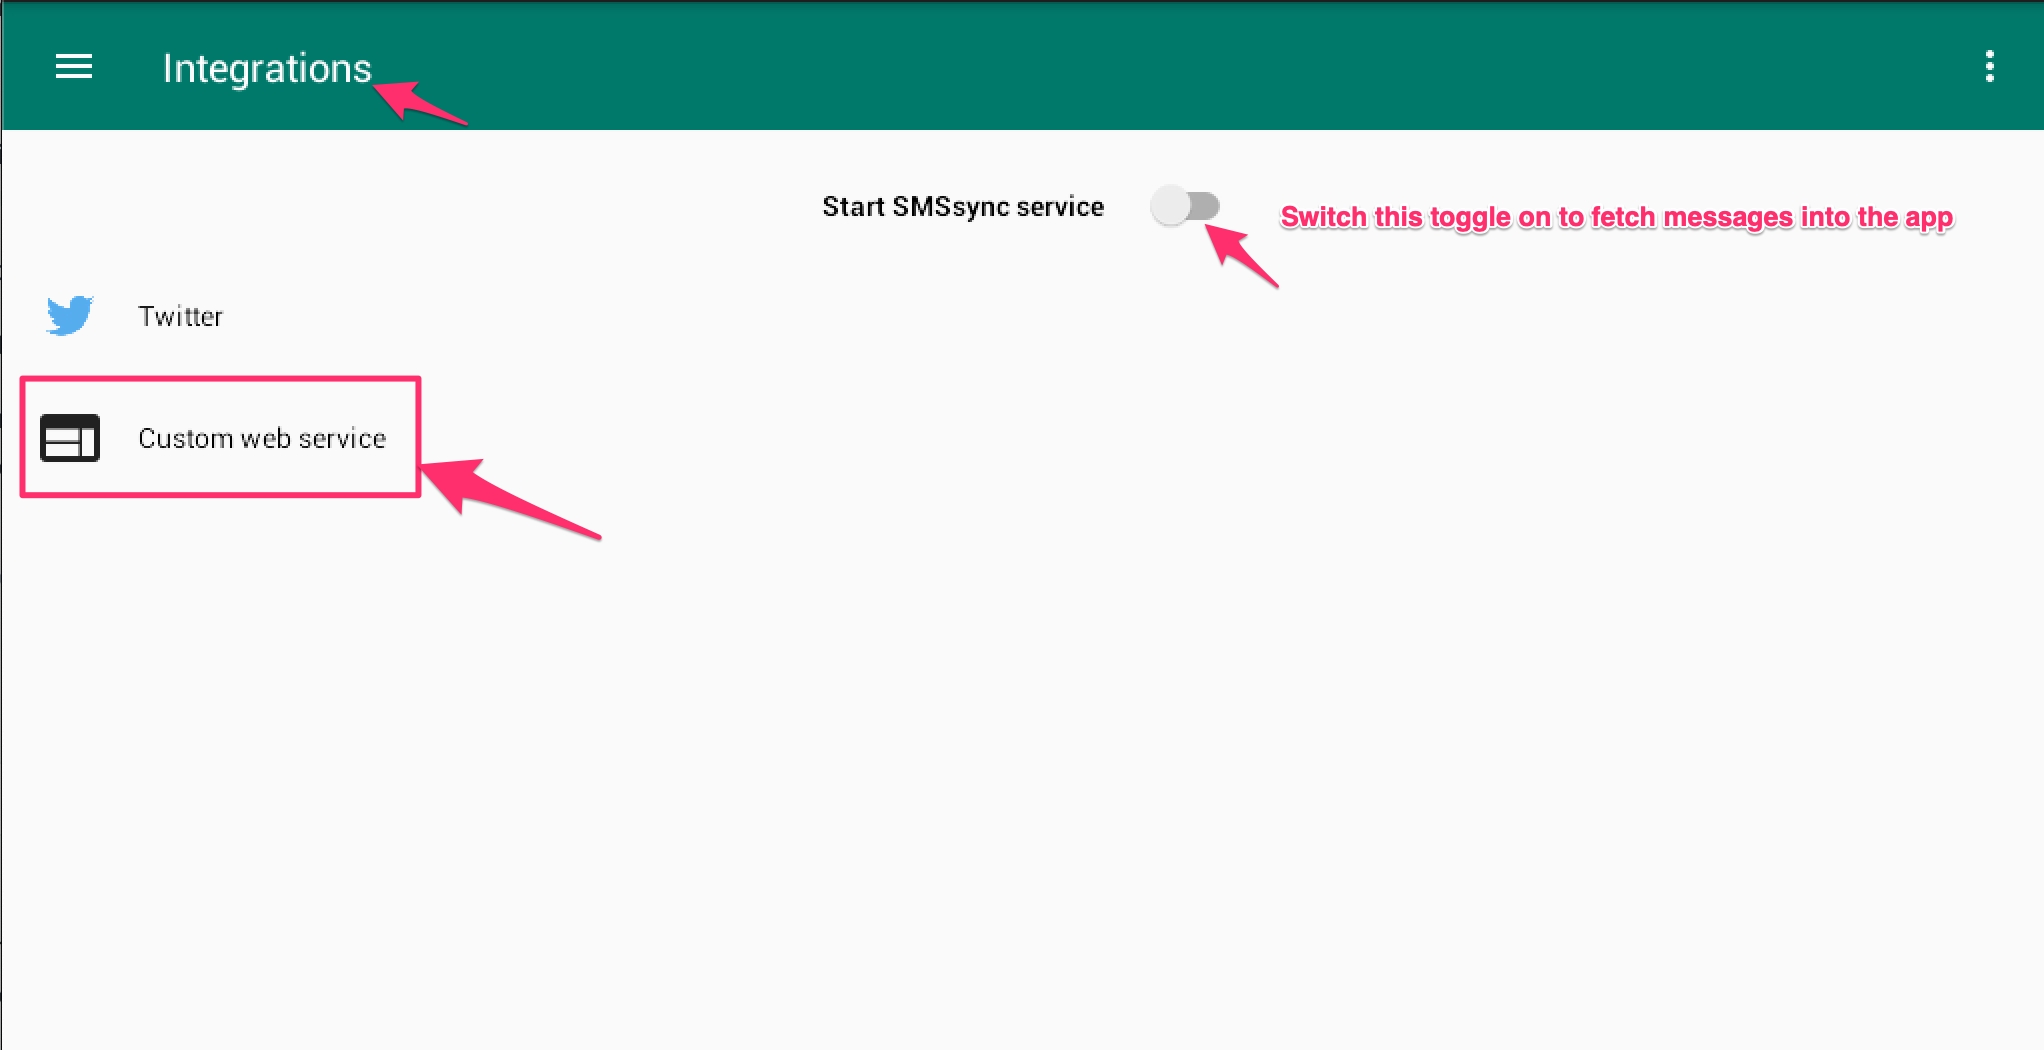
Once you have enabled SMSsync, you will be redirected to the integrations screen. Start the SMSSync Service to start fetching messages in your app.
Click on the custom web service to configure SMSsync with your deployment.
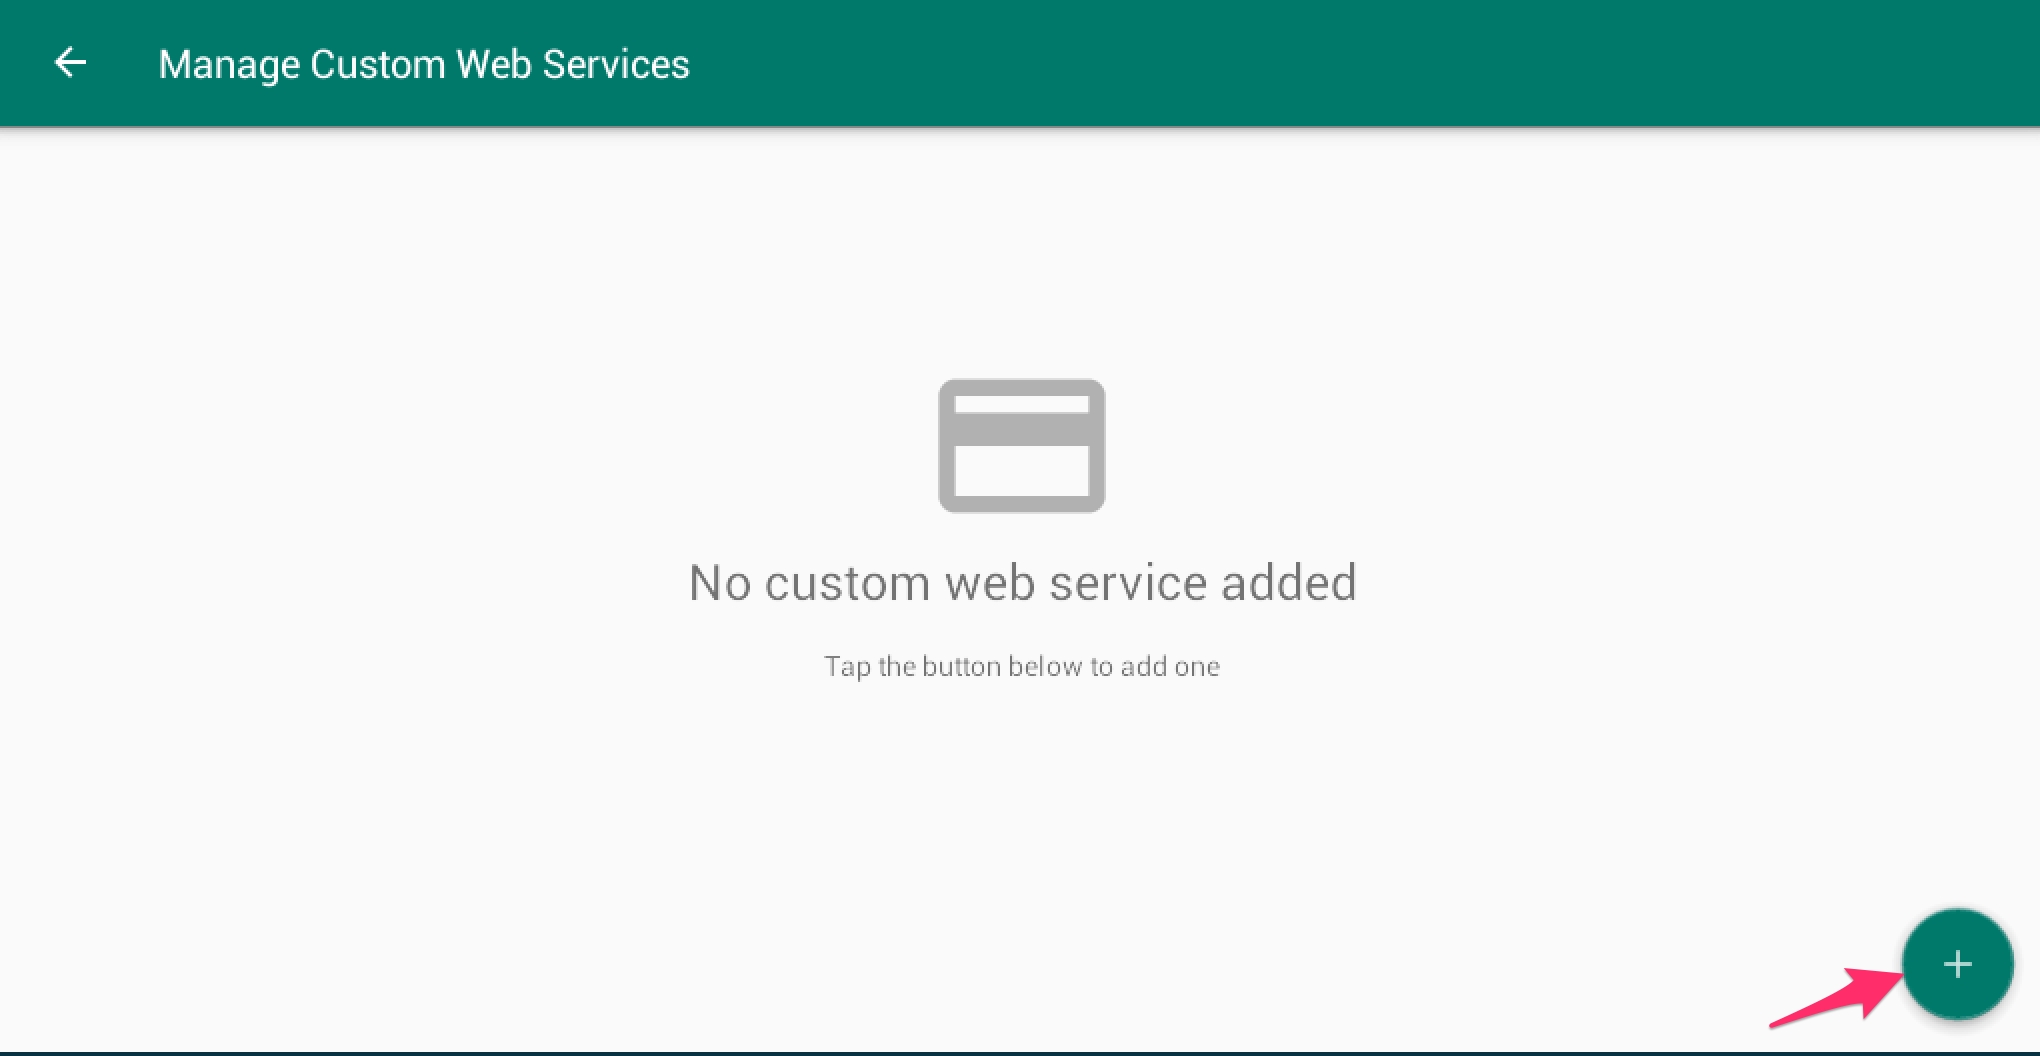
Manage custom web services screen will open, you’ll note that you can manage multiple Sync URLs on the app.
To add a new Sync URL, tap on the Add icon on the actionbar. An input dialog should open.
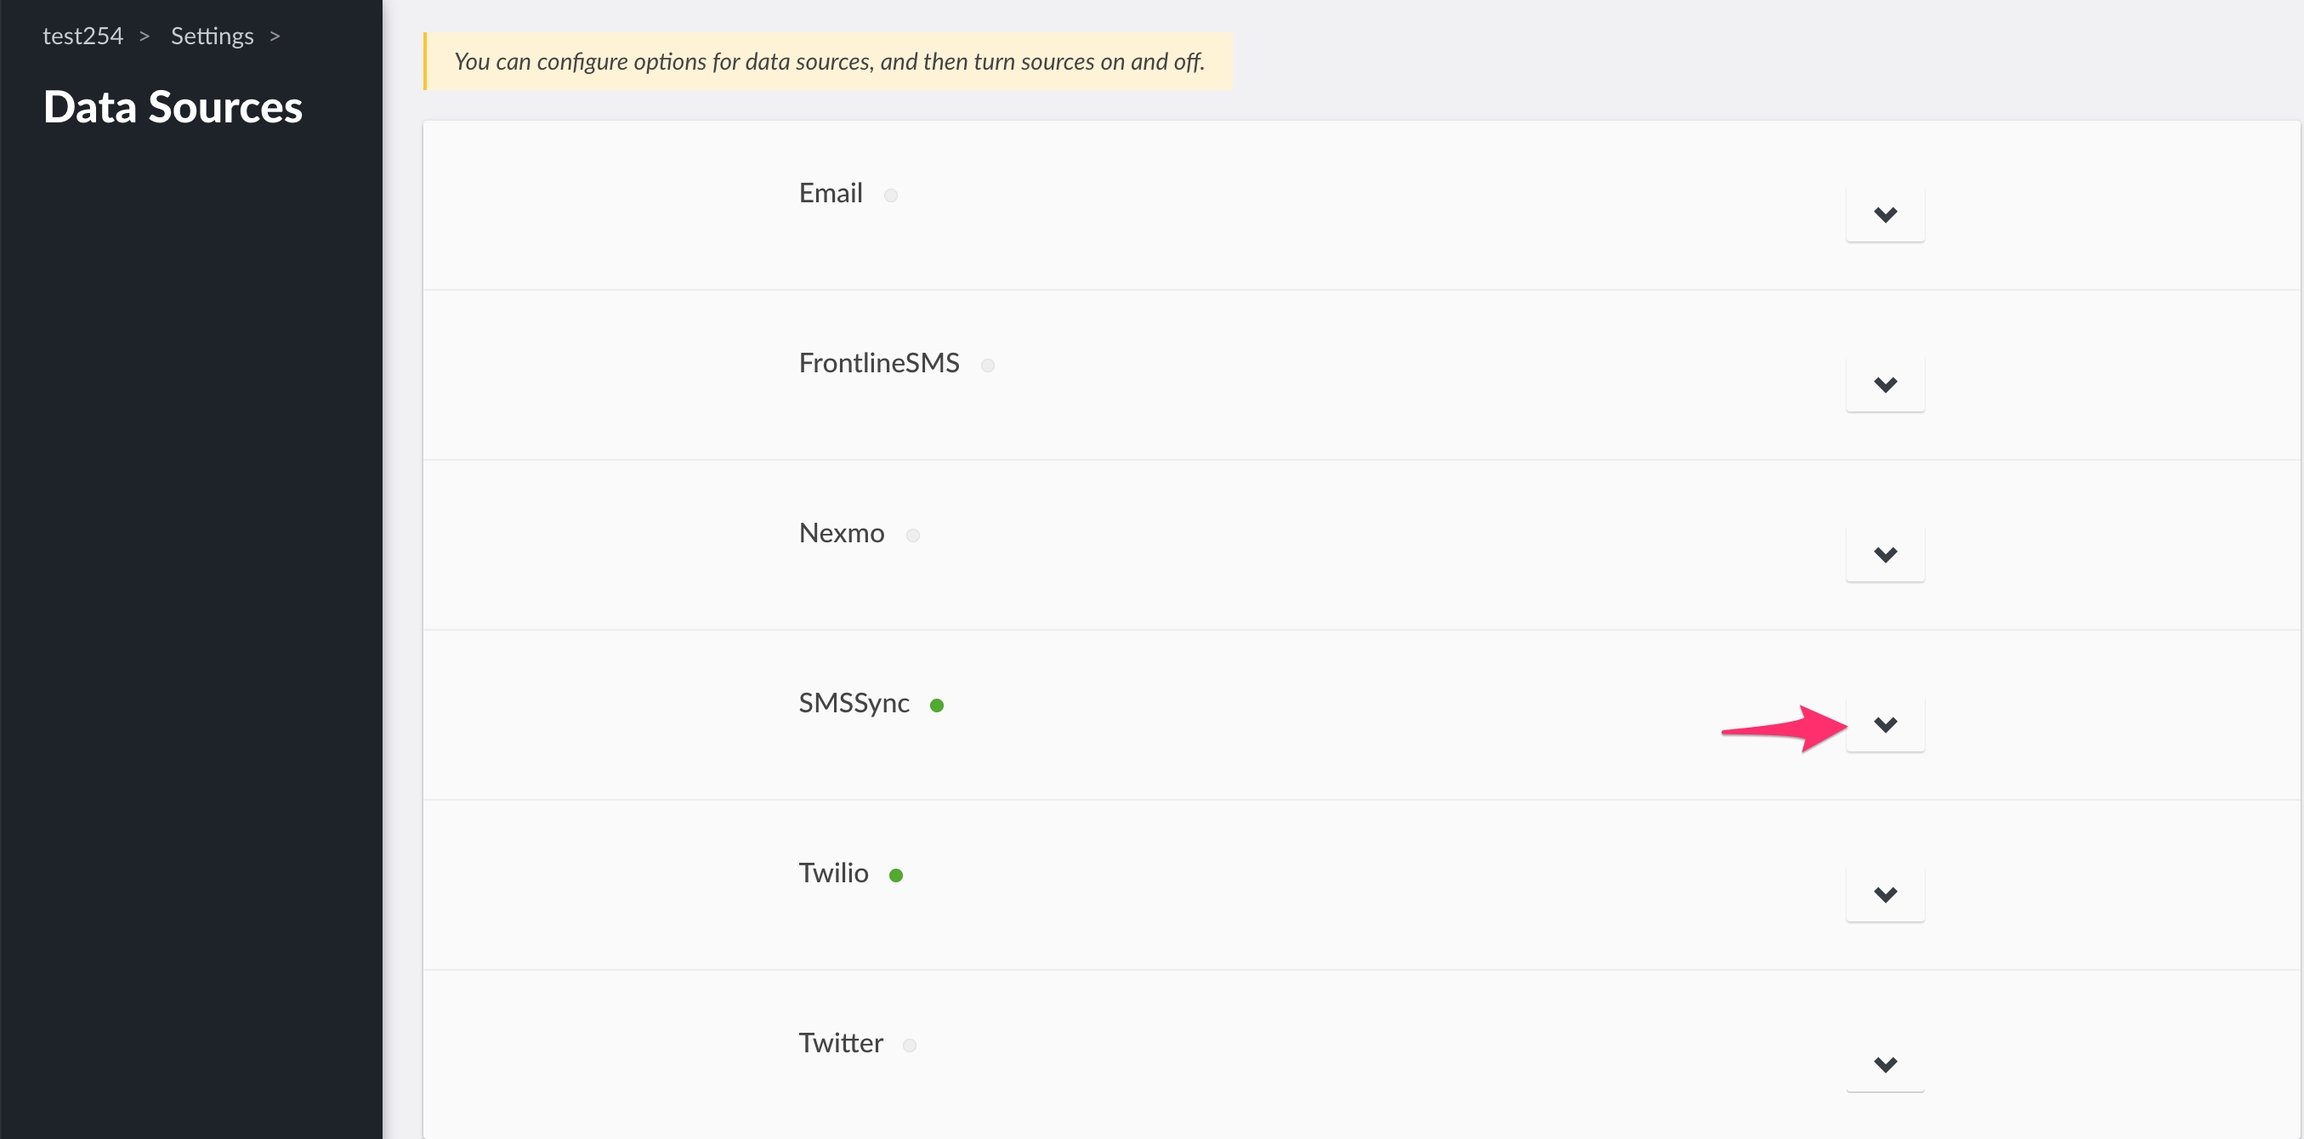
Open your deployment i.e name.ushahidi.io, go to datasource configuration in your setting page.
Click on the drop down icon on the right as shown
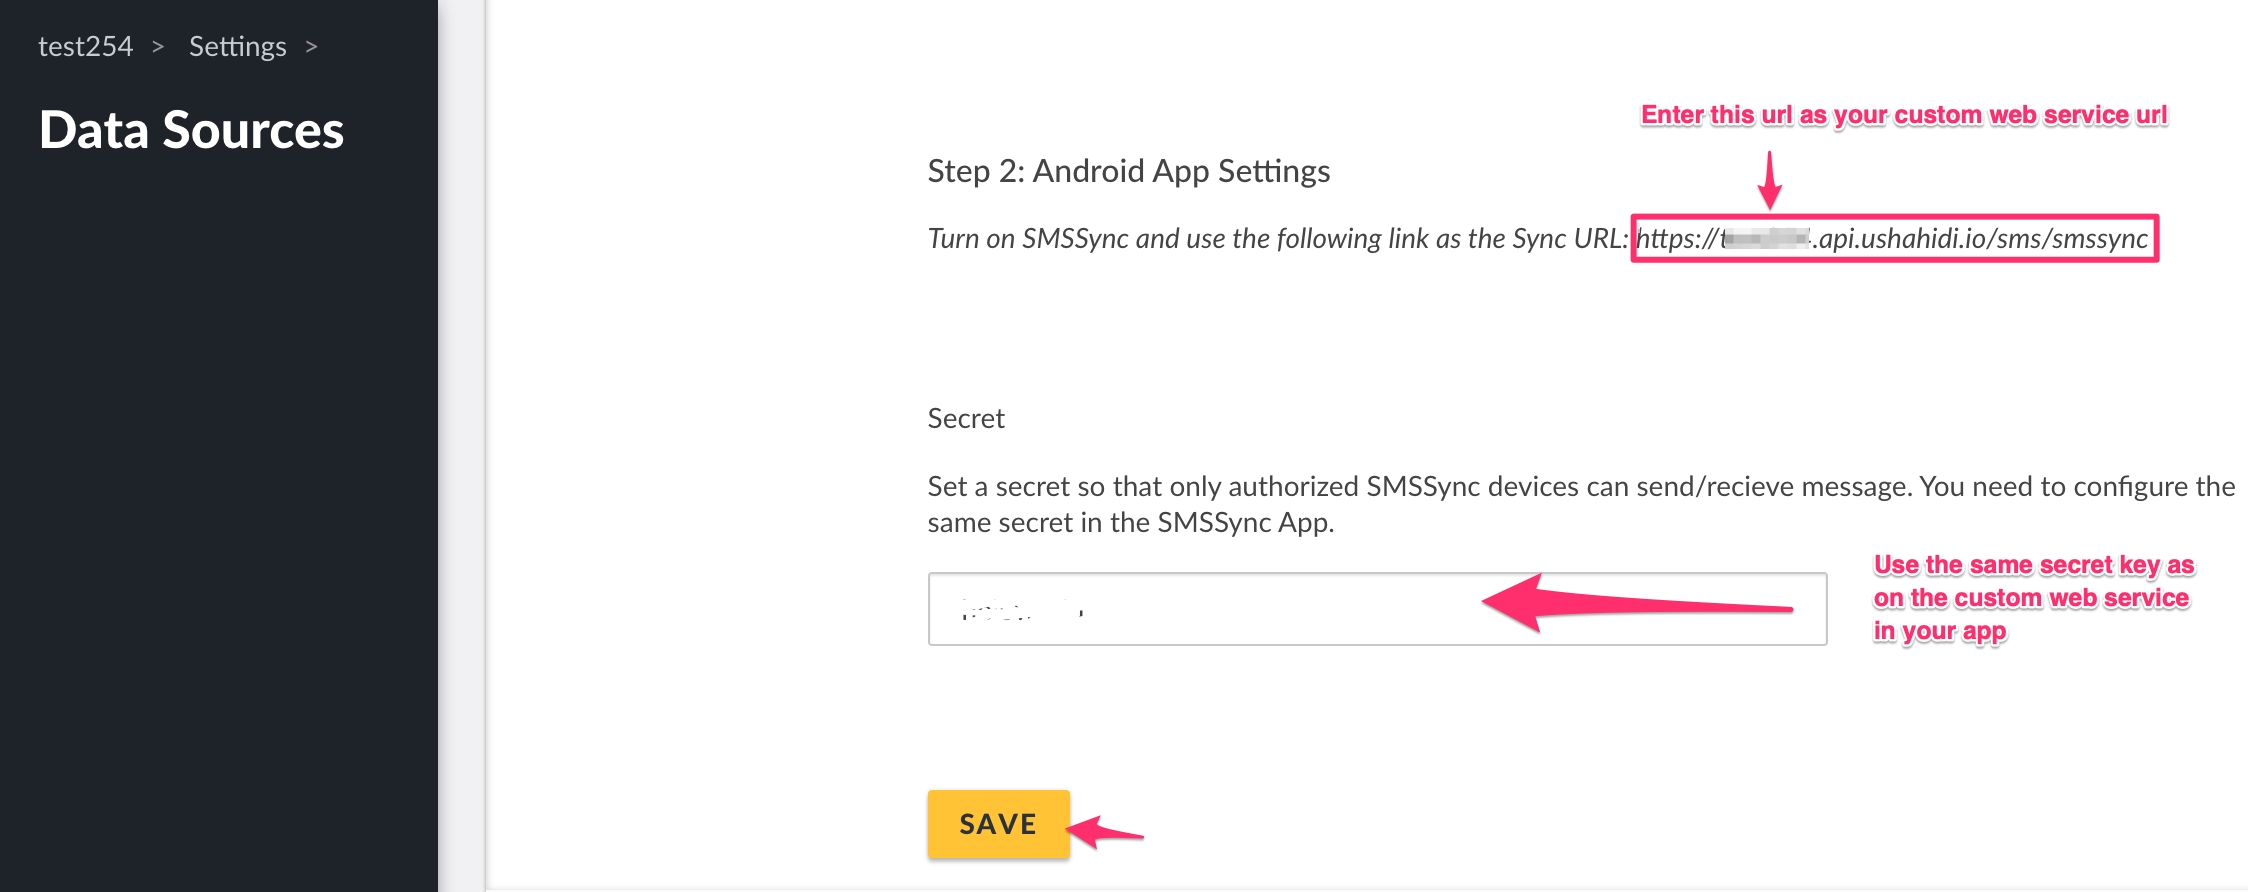
Follow the instructions given to you below.
You will need the Sync URL to configure SMSSync.
Set a SMSSync secret key for security purposes.
Click on Save.
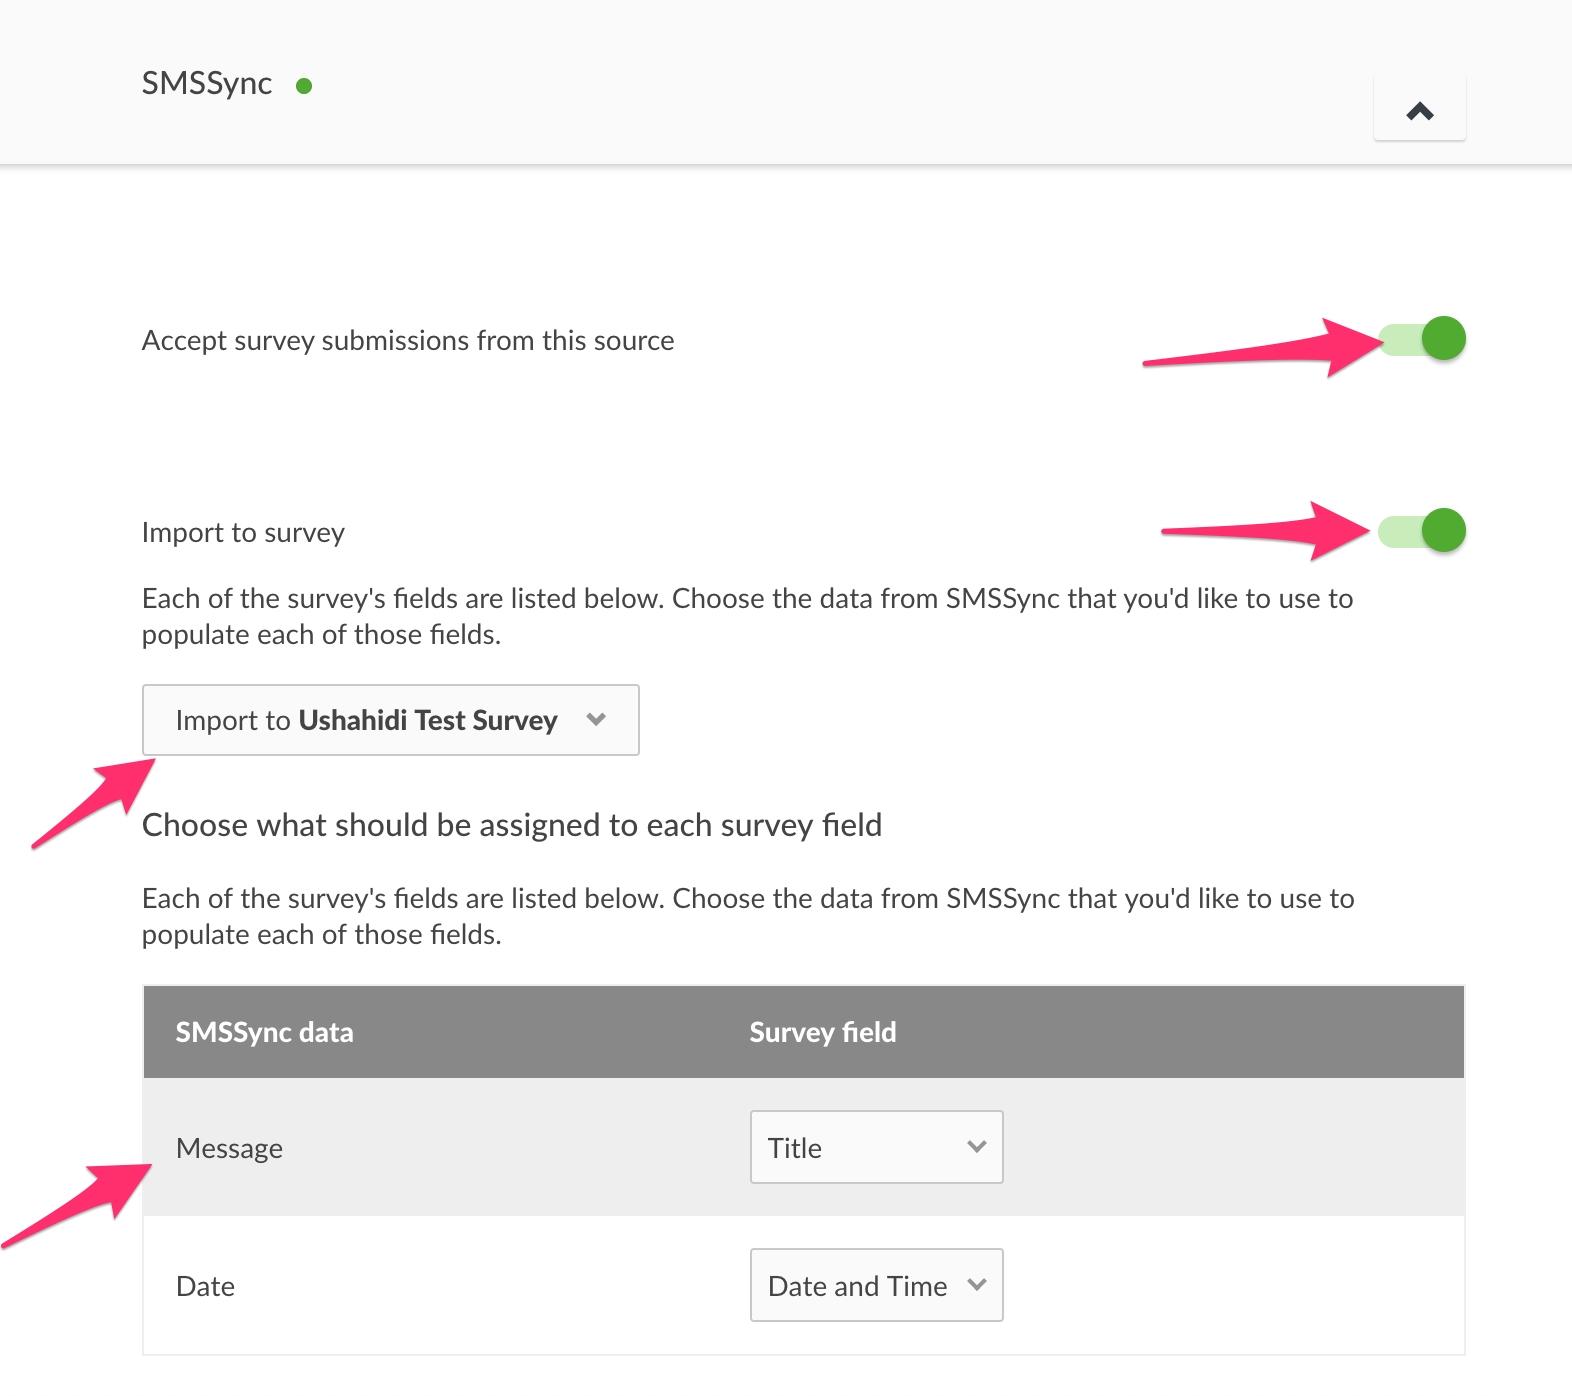
To enable/disable this datasource , simply click on the green toggle to accept survey submissions.
Click on the toggle to import your messages' response to a survey.
Select the survey you wish to import your messages to.
Select which field should be assigned to populate the data from SMSsync.
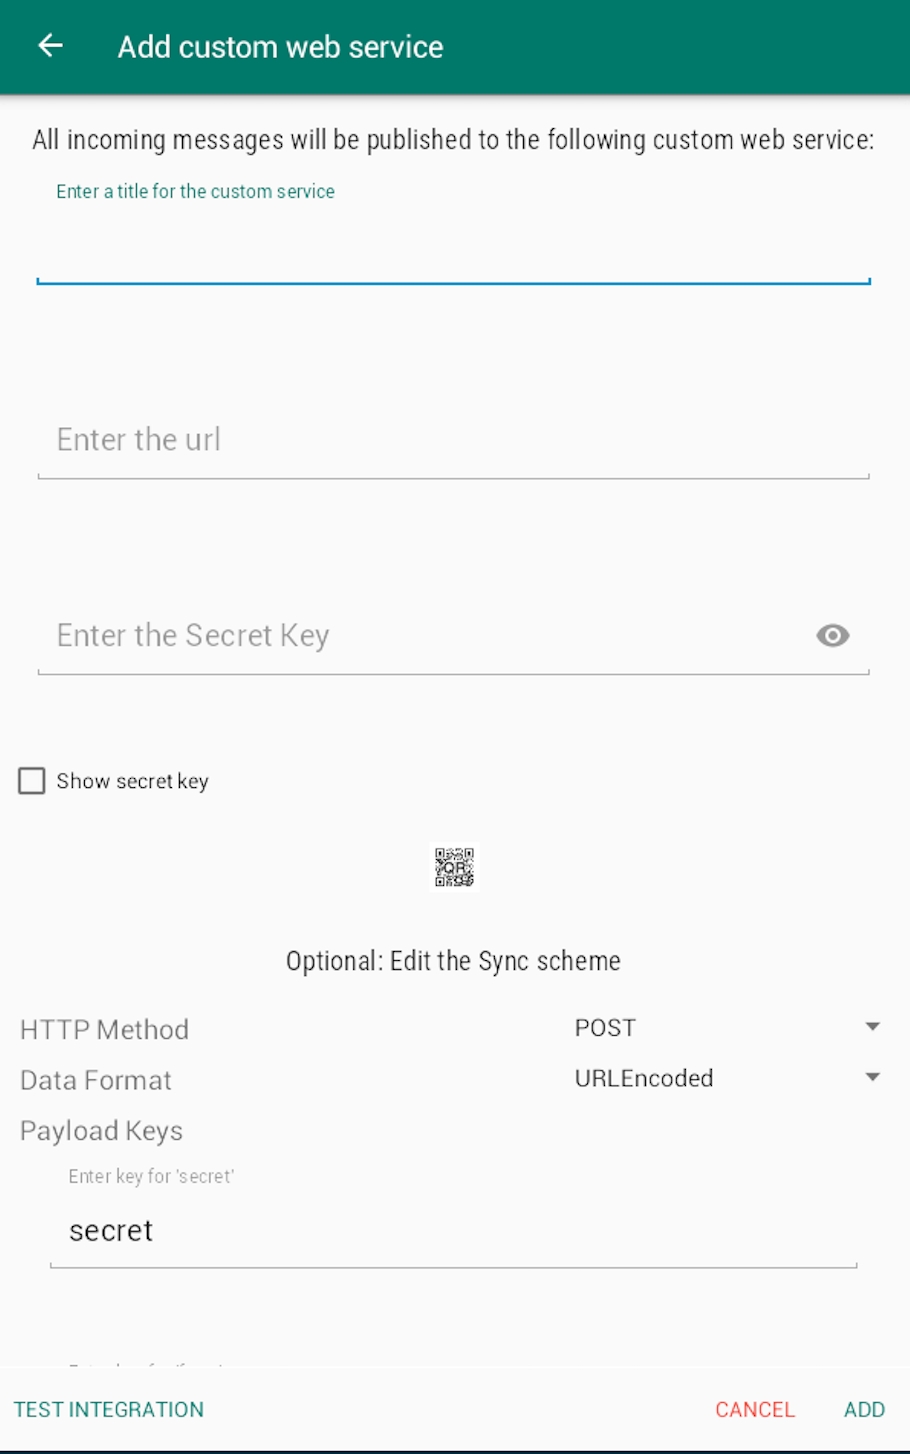
Go back to the input dialog on your SMSsync App and add the following details;
Title for the custom service: This can be the name of your deployment or any title you see fit
Custom web service Url: Enter the Sync URL in step 2 from your deployment as shown in the 'Android settings' image above i.e "https://yourdeploymentname.api.ushahidi.io/sms/smssync".
Secret key: Make sure you enter the exact key as the one you entered in your deployment android setting as shown in the 'Android settings' image above.
Once you enter your secret key, you are done with the configuration, do not change the rest of the settings.
Click ADD or test integration to save the new entry.
Nb:The secret key should be presented as string of any characters without spaces. Enter a comma separated value for the keyword(s). These keywords will be used by SMSsync to filter incoming SMS and pending messages to the Sync URL you are adding. As of v2.0.2. You can now add Regular Expression code for filtering. This means, it can either be CSV or RegExp. It cannot be both.
Note: Version 2.5 or higher supports basic auth credentials in the URL, e.g. https://username:pass@example.com/api-v1/add-record/.
You will now need to start the SMSSync Service to start forwarding messages to the platform. To start the SMSSync service
Make sure that you have added and enabled(checked) the Sync URL you added above.
On the integration screen, tap on the Start SMSsync service to start the service if you had not enabled it.
You should be all set to work with SMSSync and Ushahidi now. Unstructured posts via SMS will now be pulled into the platform.
If you’d like to edit your SMSSync configuration, simply click on the drop down icon on the right while on the data sources list page and make your changes.
For more details on how to manage messages within SMSSync, see configuration instructions on the SMSSync Website
Twilio allows you to programmatically make and receive phone calls and send and receive text messages using its web service APIs.
NB: You need a Twilio account to be able to configure this as a data source. To sign up, go to **[_https://www.twilio.com/try-twilio**_](https://www.twilio.com/try-twilio)
To get started with Twilio set up,
Log into your twilio account.
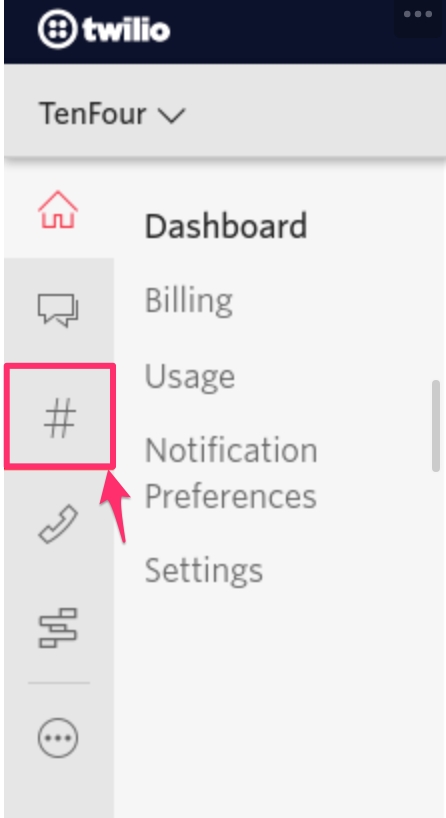
You’ll need to buy a number to use. Click on the hashtag icon
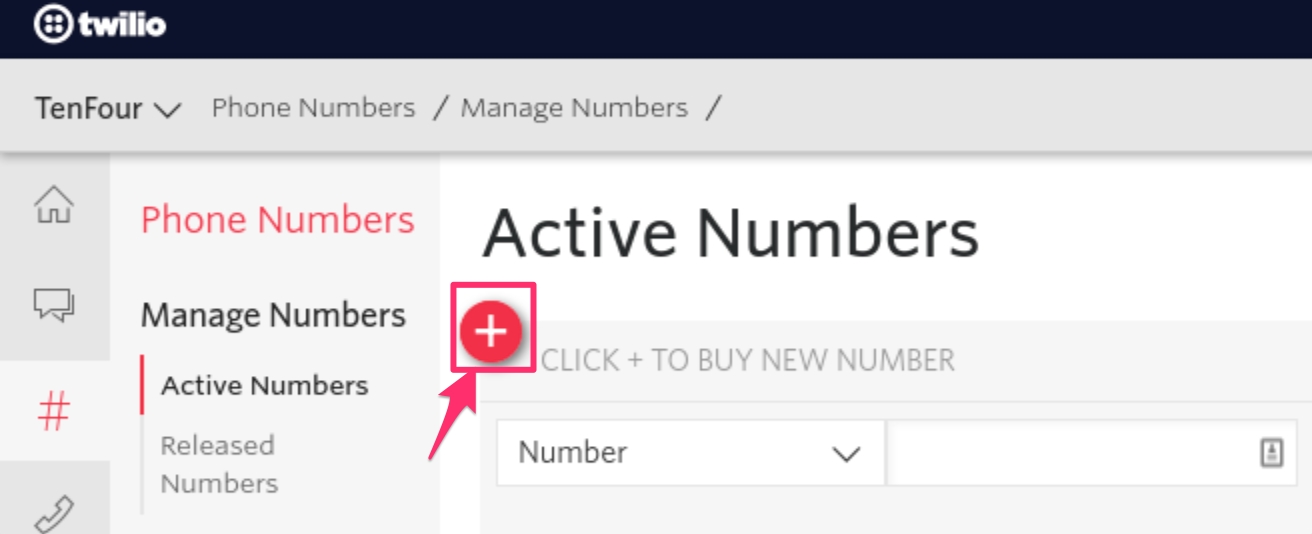
Click on the red "Plus" icon.
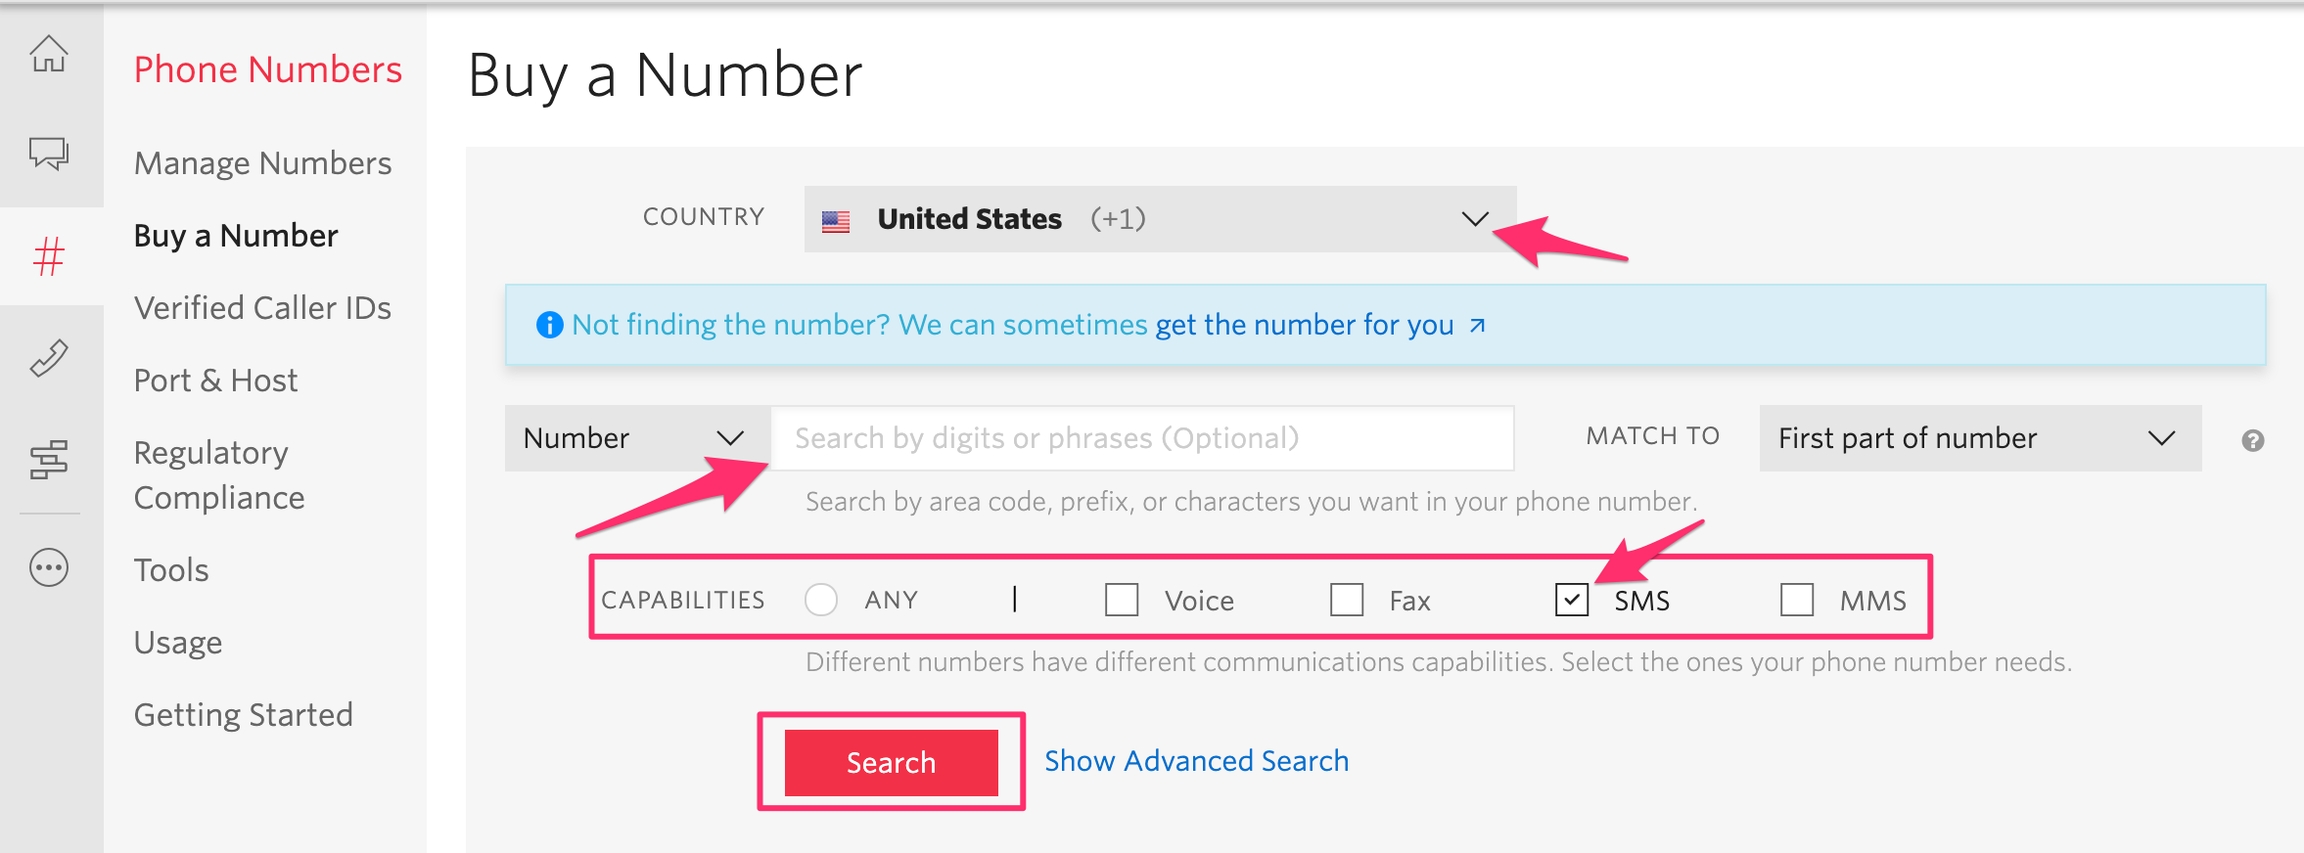
Select the desired criteria for your phone number In the number selection/purchase screen
Select the country where you need a phone number. This is the number that people will use when sending a report through SMS.
Location/Number: You can search numbers by digits/phrases or by location. This is optional.
Capabilities (Voice, SMS, Fax, MMS): Make sure you tick the "SMS" checkbox. We want to make sure Twilio only shows us numbers with SMS capabilities. If it can't be ticked/clicked, then it means that Twilio doesn't have any numbers with SMS capabilities in that country.
Click on **_Search**_. A list of available numbers with their rates based on the criteria set above will appear
Click Buy on the number you’d like to use.
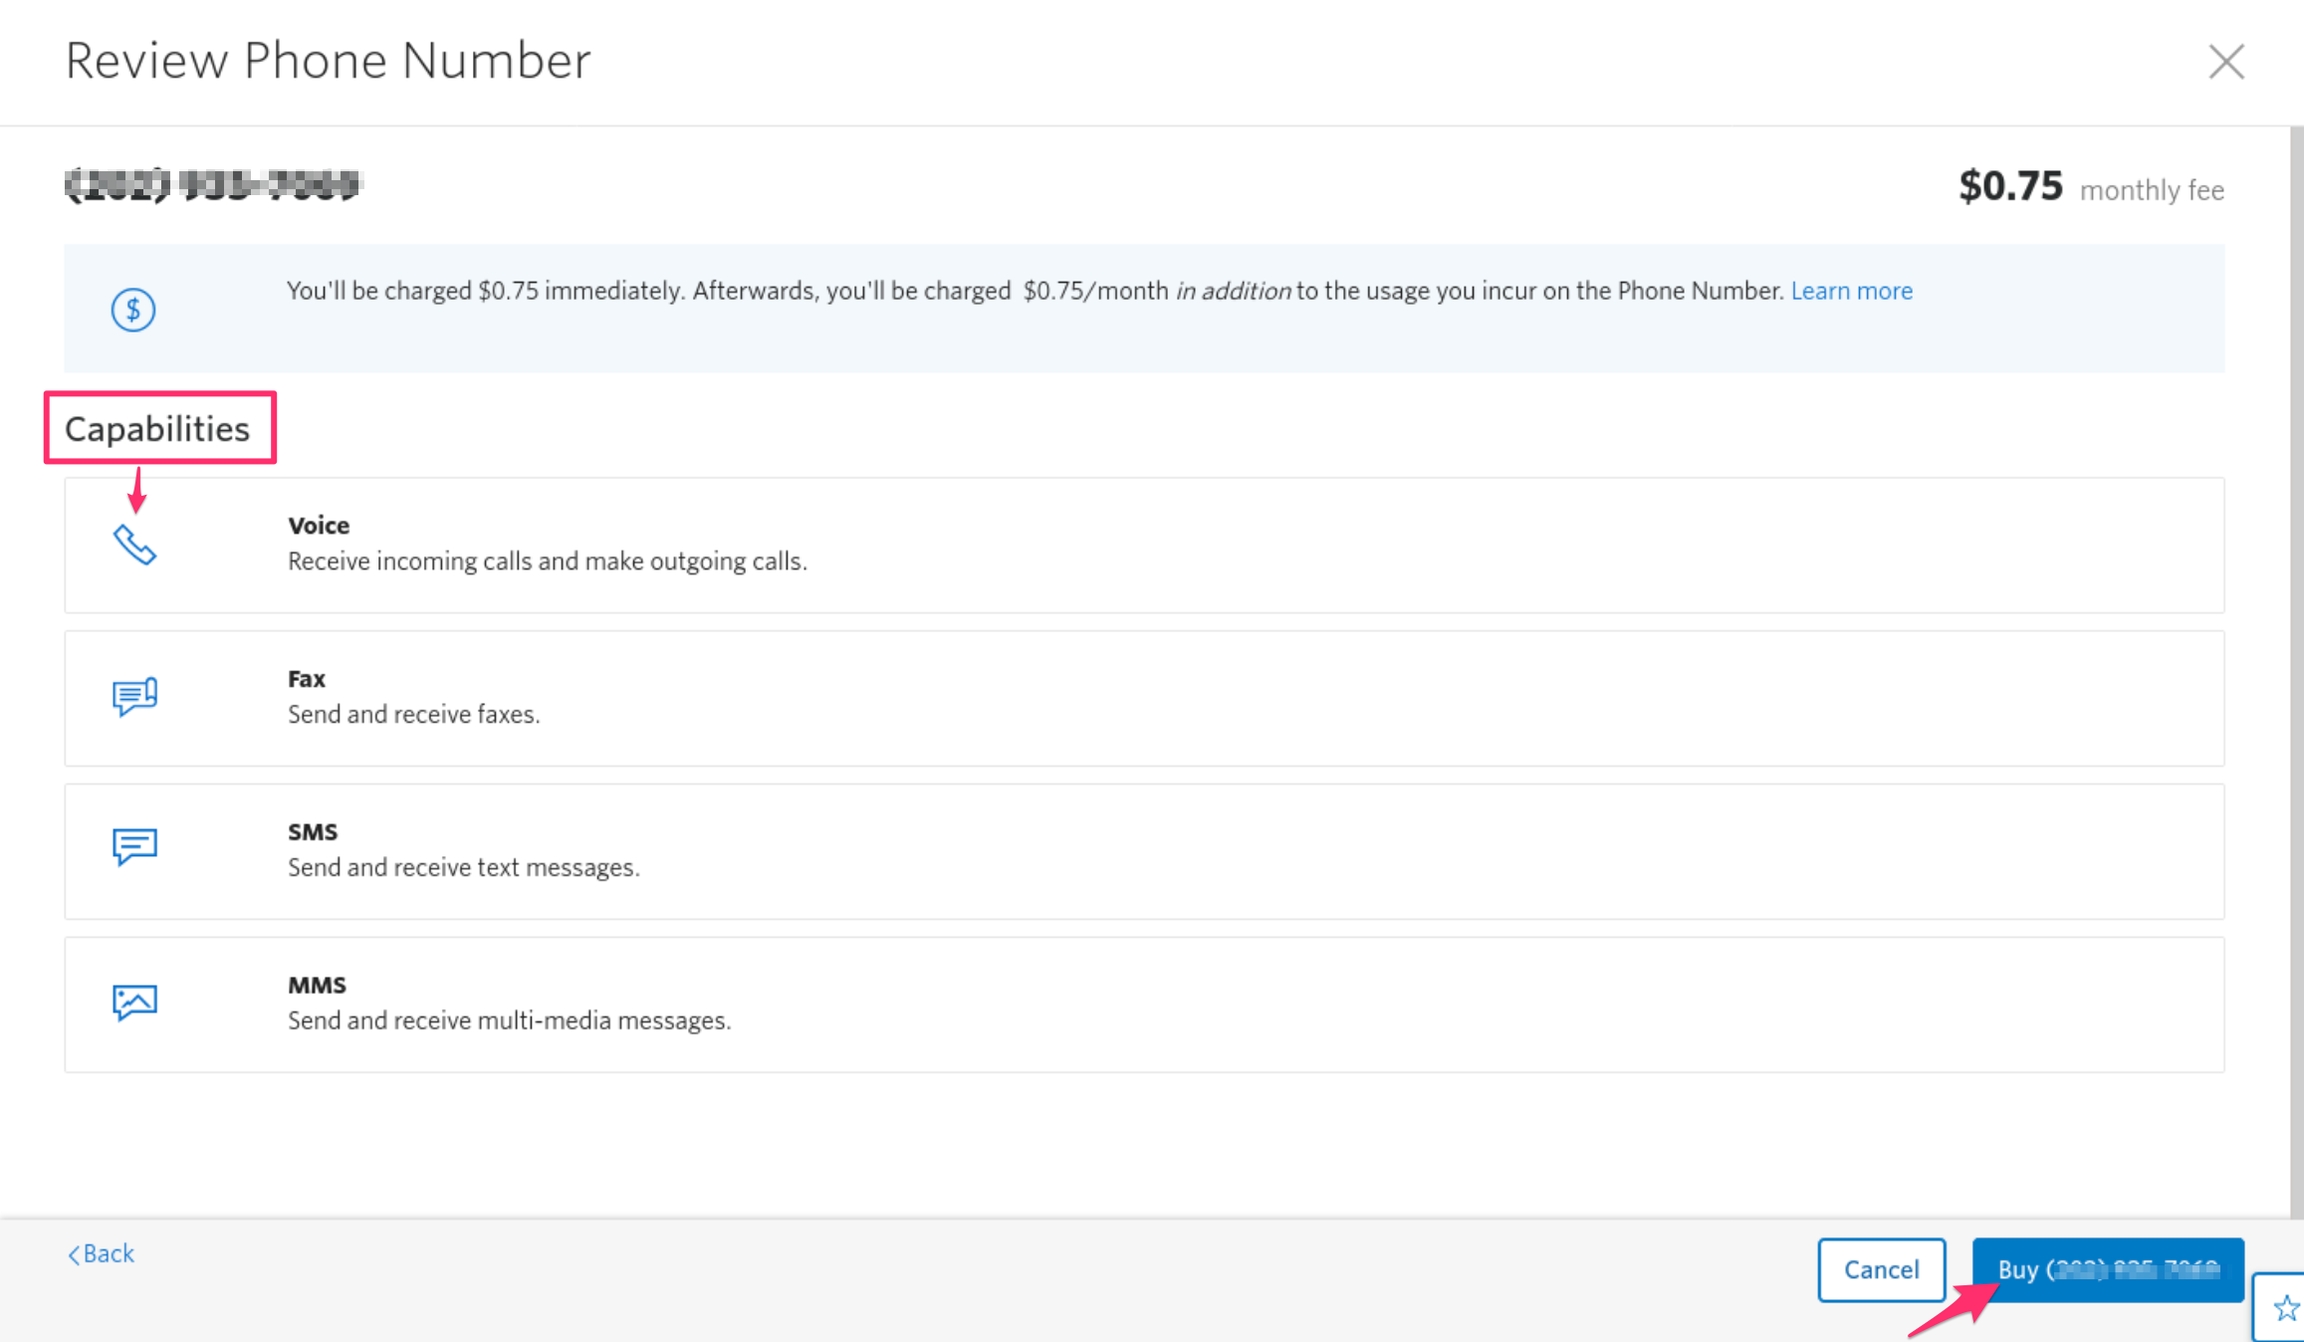
You will be shown a screen like this one below where they confirm all capabilities, the number, and other details.
Click the buy button at the bottom right hand of the screen to purchase your number.
Once you have a phone number, note it down as you’ll need it to configure your data source later on.
First, we need to get the following information from your Twilio account:
Phone Number: the number you just purchased. If you forgot it, you click the "Hashtag" icon in Twilio again to see your available numbers.
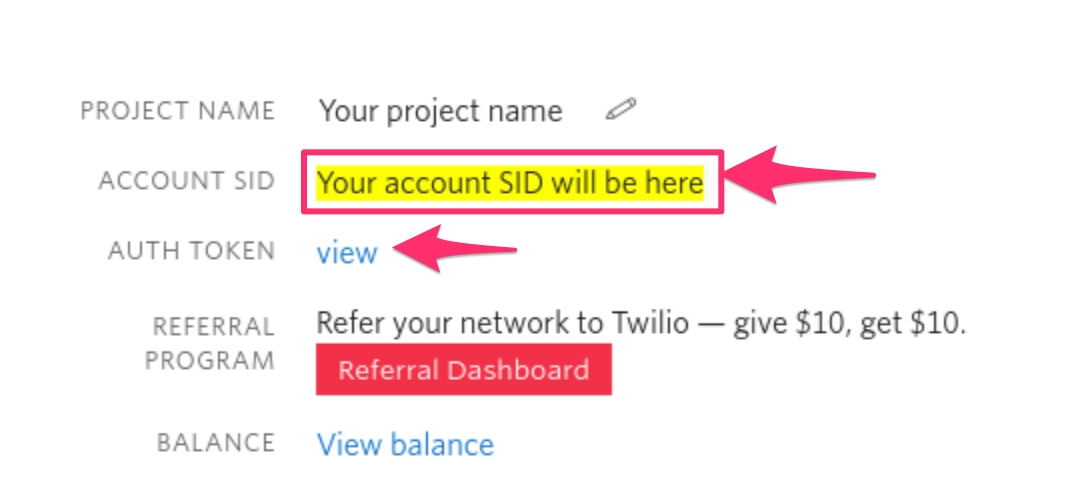
Account SID
You will see a panel like the one below with details about your project. Get the Account SID from it (we've highlighted it in the screenshot as a reference)
Auth Token
In the same panel as the account SID, you will see a "view" link next to "Auth token" as shown on the diagram above.
Click it, and it will display your account's auth token.
Next, with the Account SID, Auth Token and Phone number you just obtained:
Go to your Datasources settings page on your Ushahidi deployment.
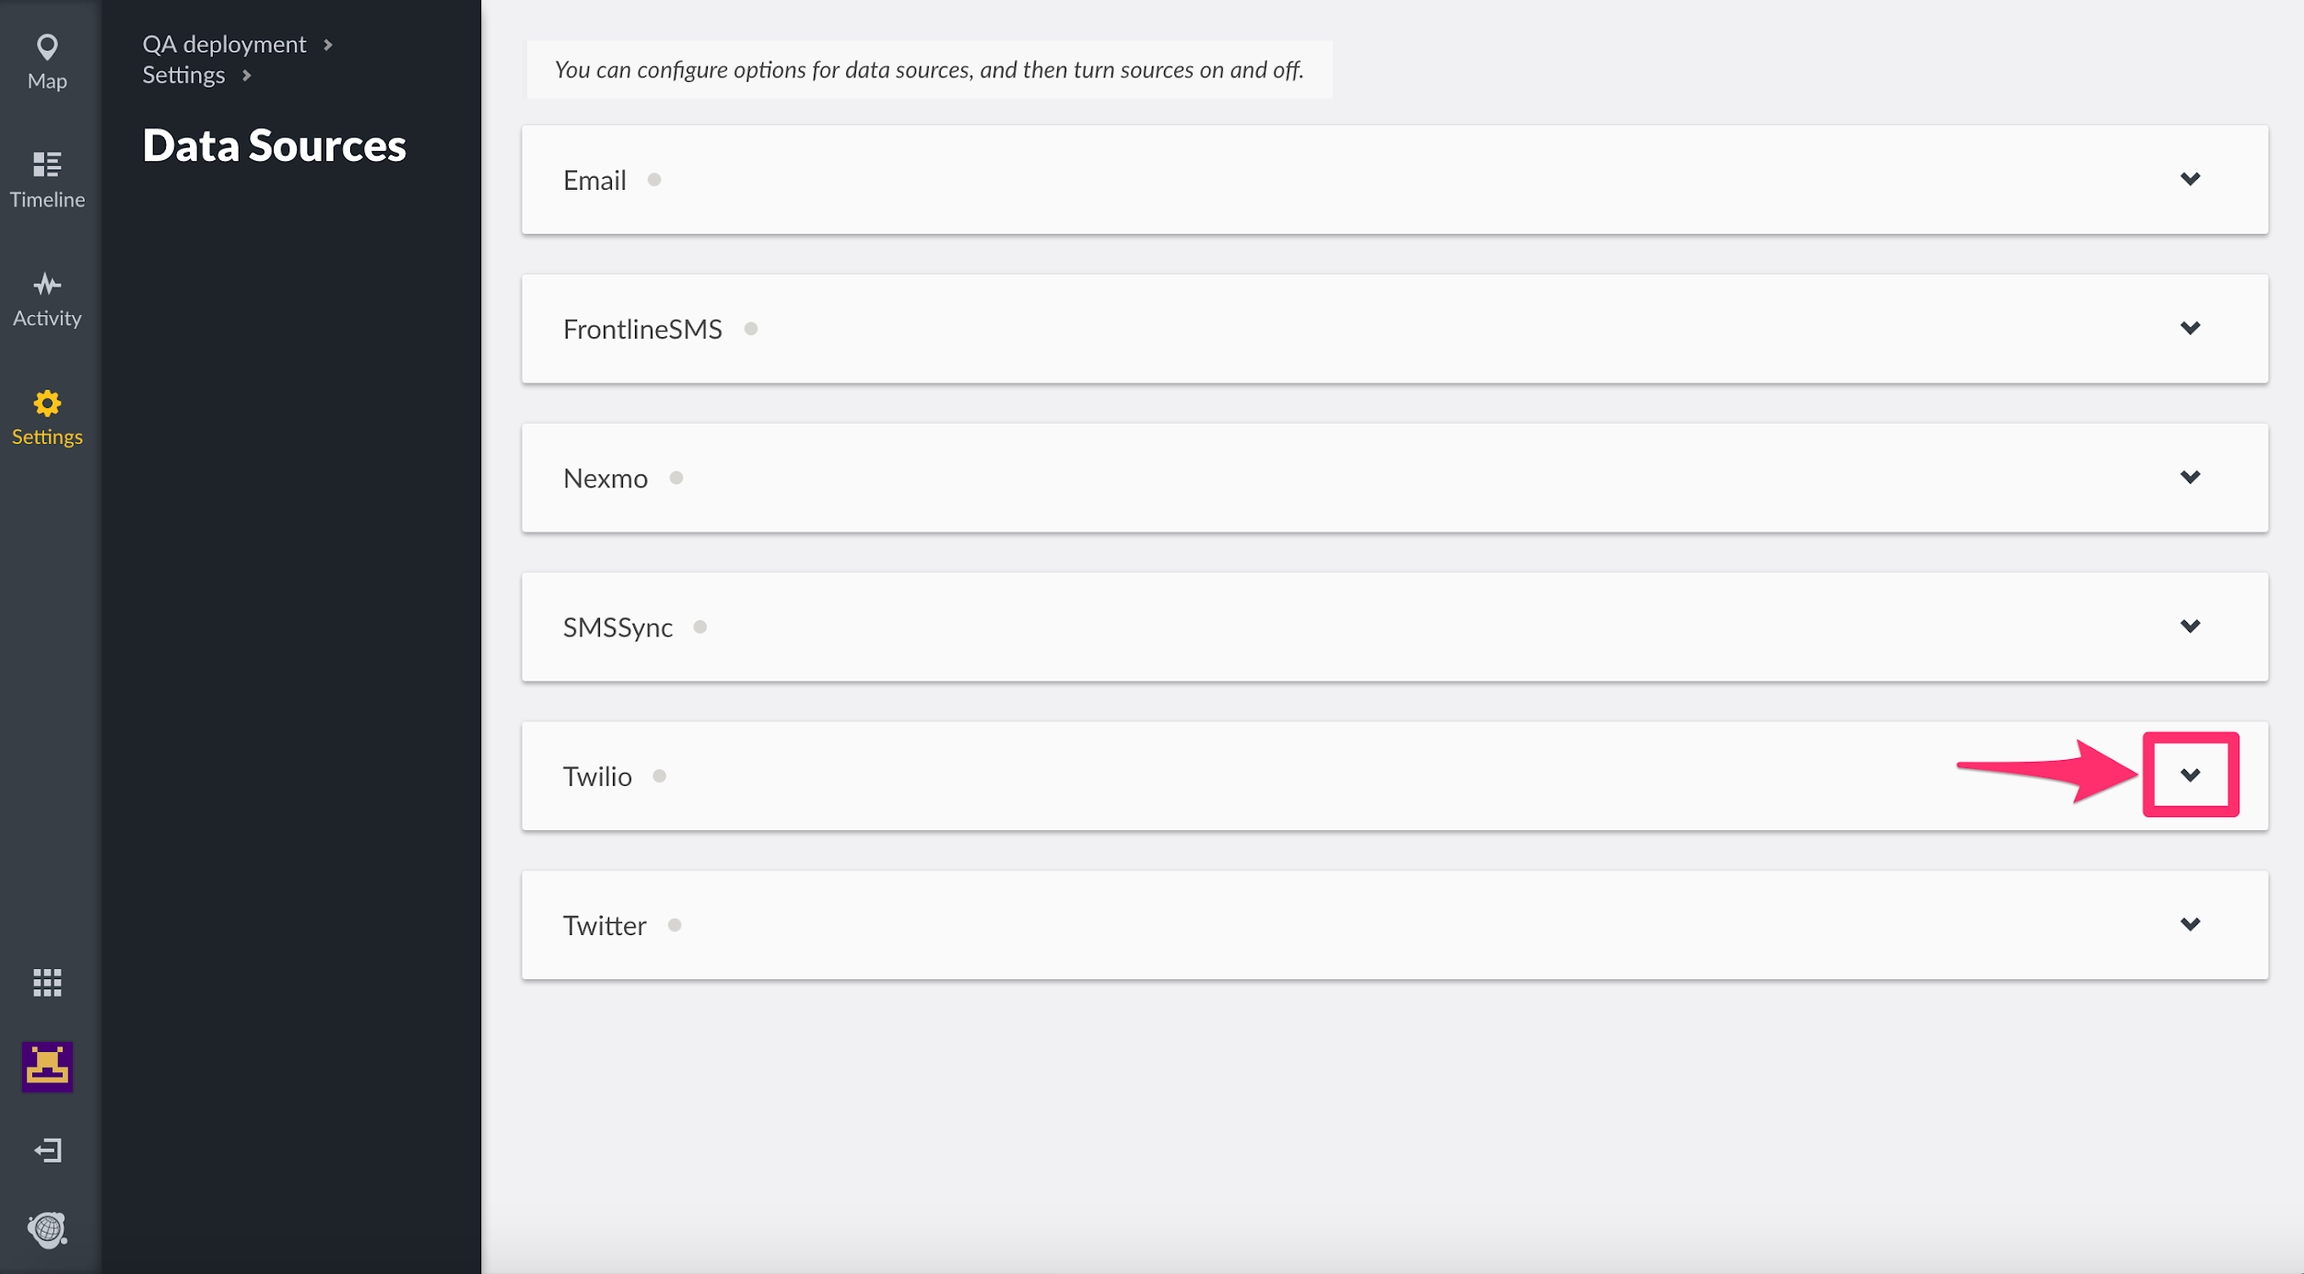
Click on the drop down icon on the right as shown
You will see a list of fields like this one
Enter the following details, which you got earlier from your Twilio Account
From: Enter the phone number you got from Twilio.
ACCOUNT SID: Enter the account SID of your Twilio account
AUTH TOKEN: Enter the Auth Token retrieved from your Twilio account Dashboard page
SMS Auto Response: This will be sent automatically when a user sends a message to your Twilio number. You could use it to provide reference information, like thanking the user or just confirm receipt.
Click on Save **and this data source’s settings will be saved. Unstructured posts from SMS will now be pulled into the platform from Twilio.
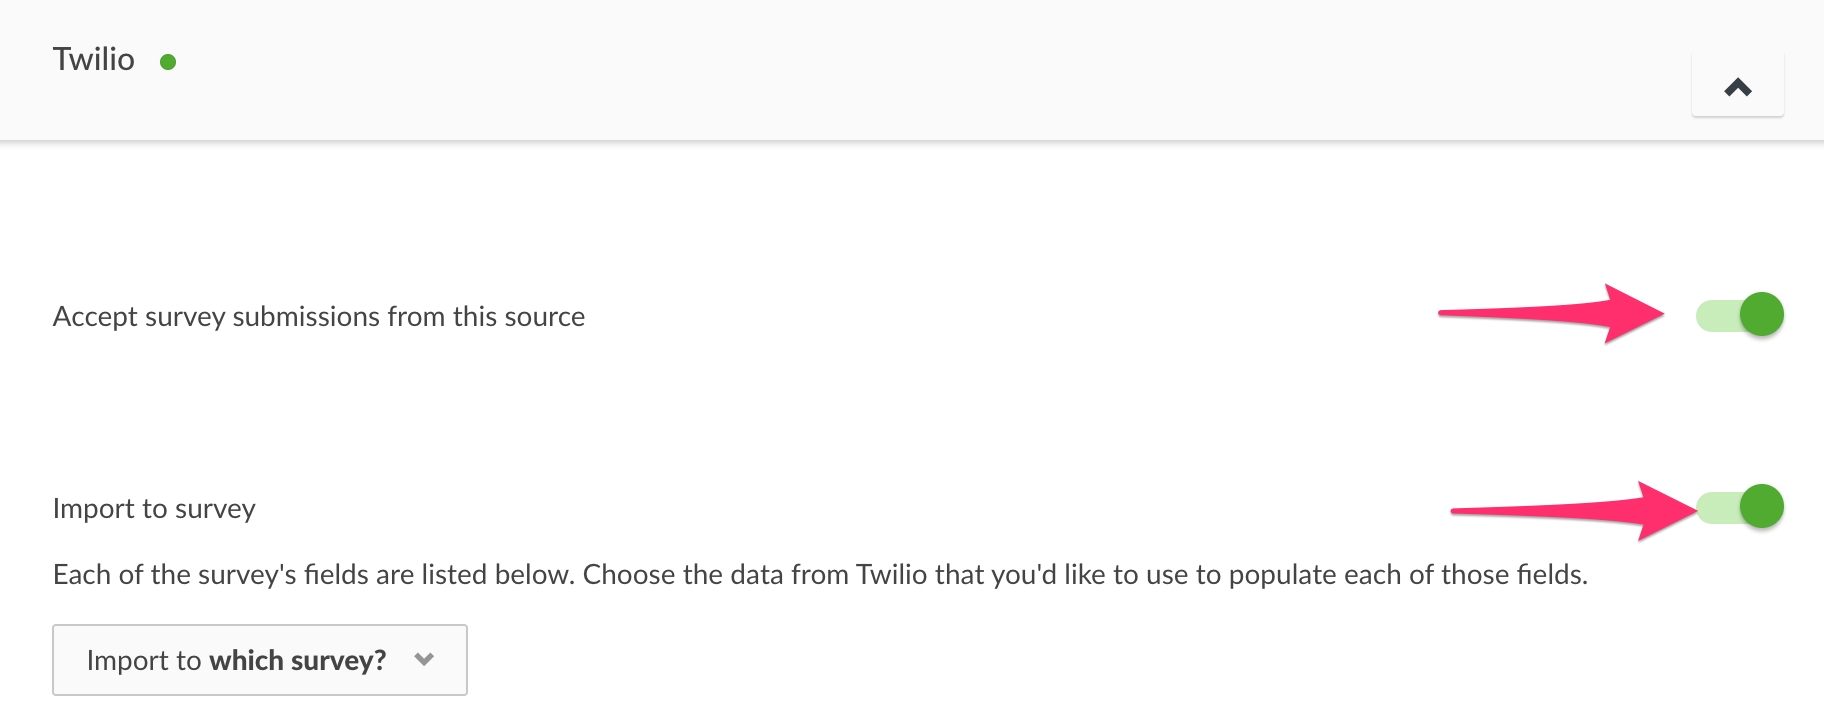
To enable/disable the Twilio data source and choose which survey to import to, simply click on the green toggles.
At this point, your Twilio setup in Ushahidi Platform is ready to use but we need to do some follow up tasks in Twilio to connect both of them.
Go to https://www.twilio.com/console/phone-numbers/runtime/twiml-apps where you can create Twiml apps. This is where we can make Twilio aware of the existence of your Ushahidi deployment and help them connect with each other.
Click on the red "+" button to create a new app. You will see a screen like the one below.
Fill in these details;
Friendly name: Write down a name that helps you remember what this app does. We usually choose the deployment name as the "friendly name" in Twilio.
Messaging: In this **section you will need to add your deployment's Twilio endpoint URL. This is the API Url to your deployment + the endpoint to connect to.
For Ushahidi.io deployments, the rule is always the same. Given a deployment with the following url "https://**yourdeploymentname**.[ushahidi.io](http://ushahidi.io)" + the API Url will be = "https://**yourdeploymentname.api**.[ushahidi.io](http://ushahidi.io)".
Follow this formula to get your Request URL:
Your deployment URL: "https://**yourdeploymentname**.ushahidi.io"
The API URL: "https://**yourdeploymentname.api**.ushahidi.io"
The Request URL then would be "https://yourdeploymentname.api.ushahidi.io/sms/twilio". is what you will enter in the "Request URL" field.
After you are done with adding Messaging and friendly name, you can click the red "Save" button.
Go to your list of active phone numbers and click on the number you purchased https://www.twilio.com/console/phone-numbers/incoming
Click on your number.
Scroll down and you will see a form like this one.
In the configure with field: Select TwiML App
in the TWIML APP field: Enter the Friendly name you created above for your deployment. This will ensure that when you get an SMS, Twilio sends a request to Ushahidi platform to save the message.
Send an SMS to the phone number you purchased and configured (ie from your own phone).
You can validate that messages are getting to Twilio by going to the Programmable SMS logs https://www.twilio.com/console/sms/logs
You will see the messages your Twilio number has received and sent in the list
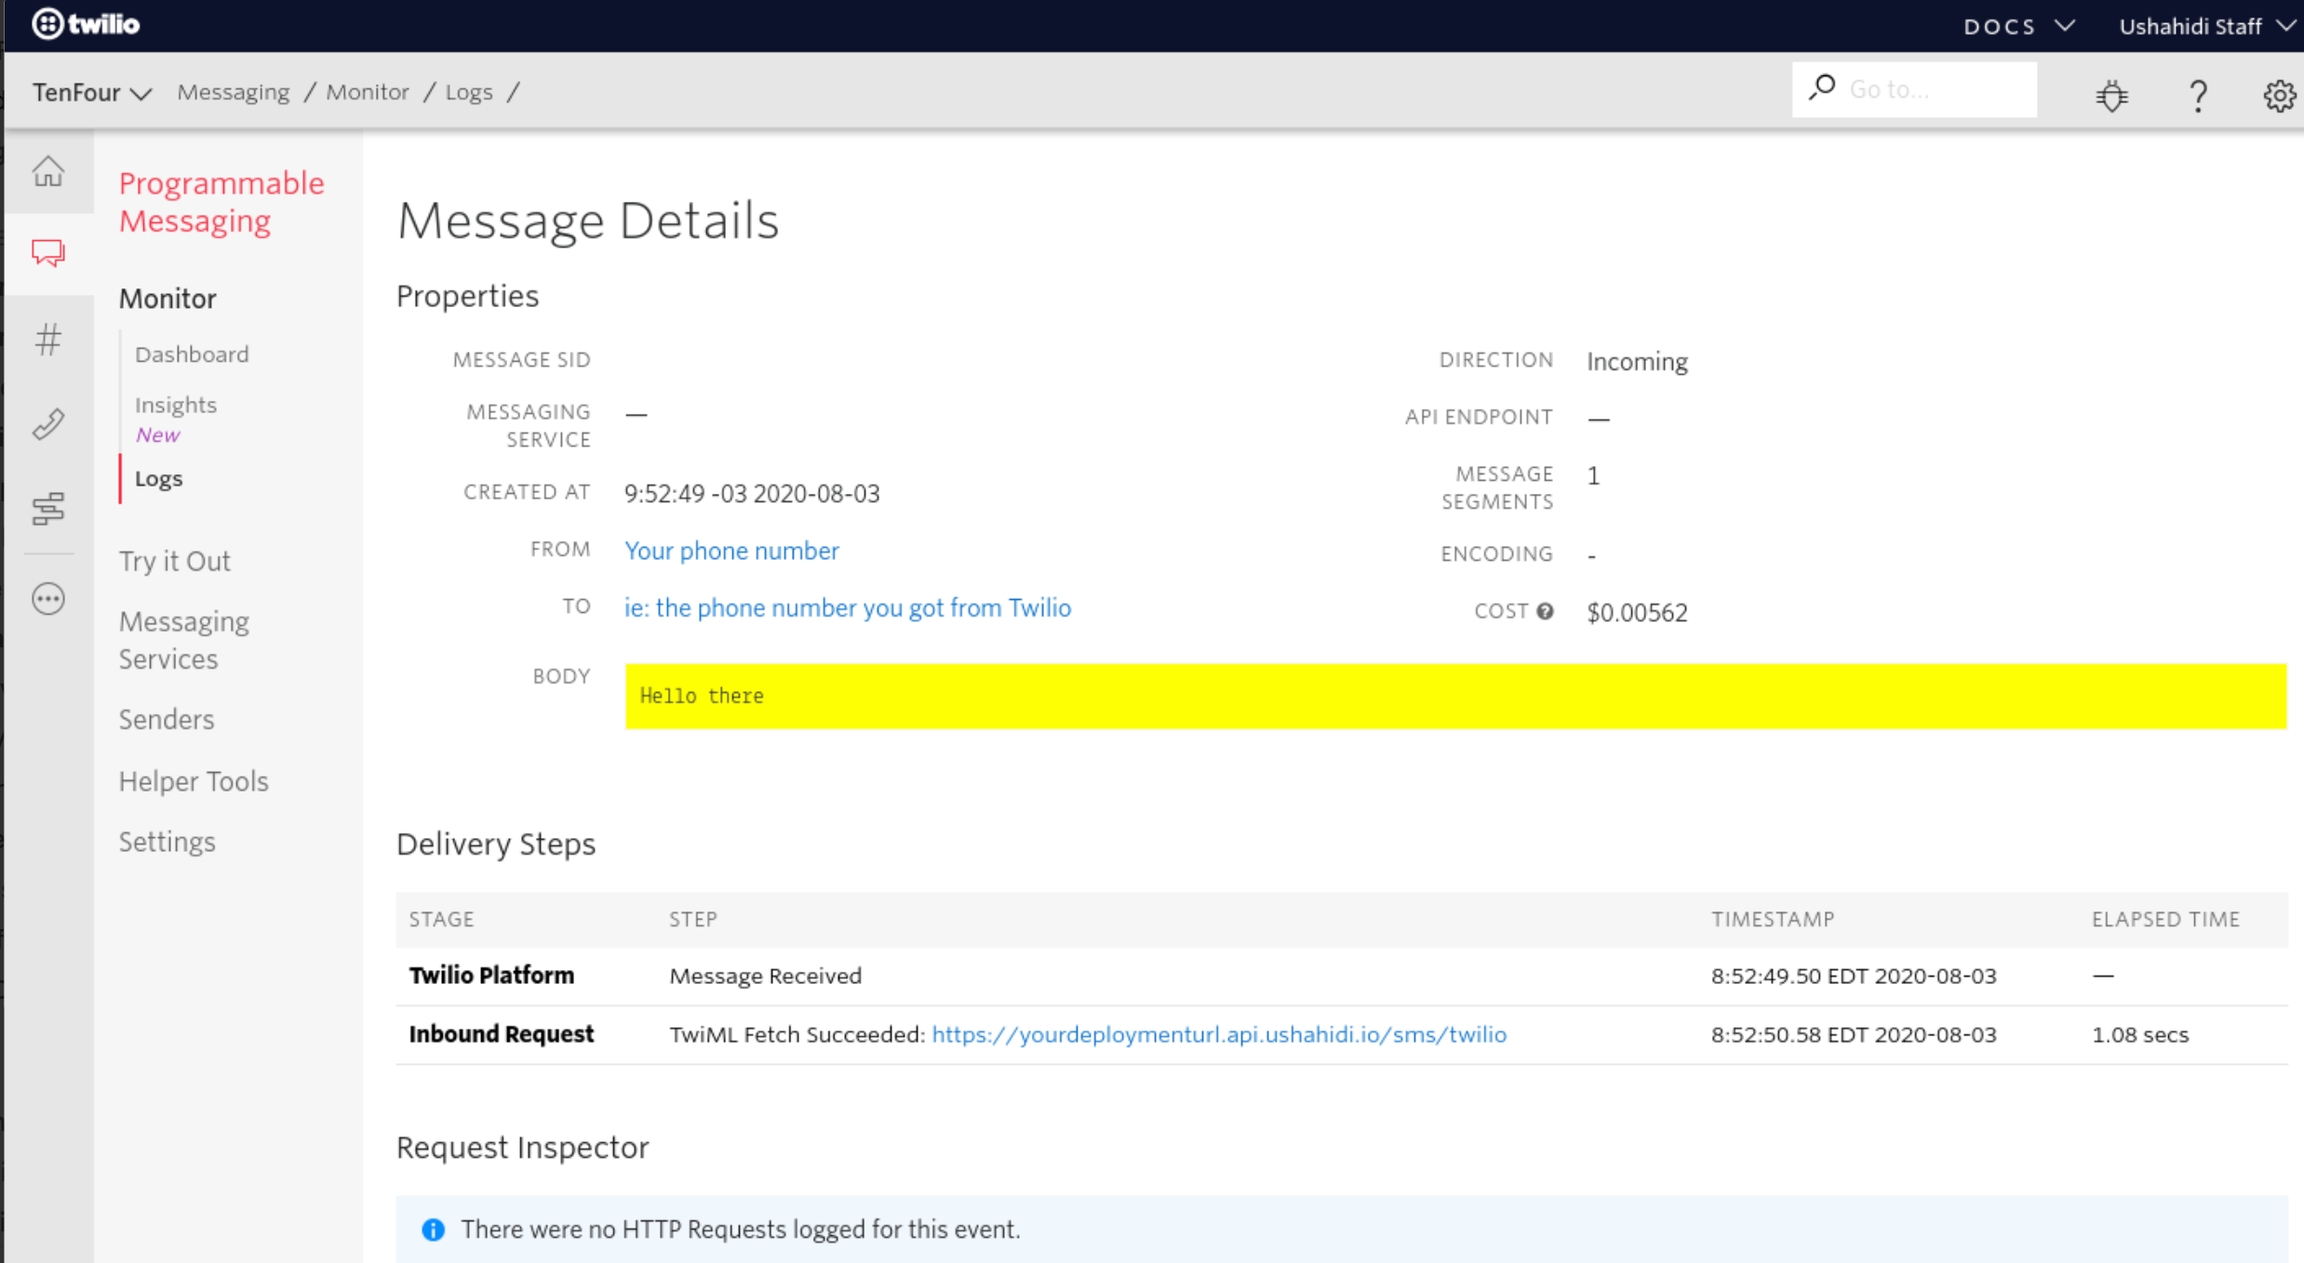
The list will look like this. You can click on the red link under "Date" to see the details of each message.
Example of a single message below.
Go to the Ushahidi Platform
Go to the data view
You should see the messages you sent in the data view list
This section allows you to configure Twitter as a data source, and subsequently pull unstructured posts from specific Twitter hashtags.
For you to be able to pull tweets based on hashtags, you will need to set up your Ushahidi deployment as an application on Twitter. To get started,
Click on the drop down icon on the right as shown
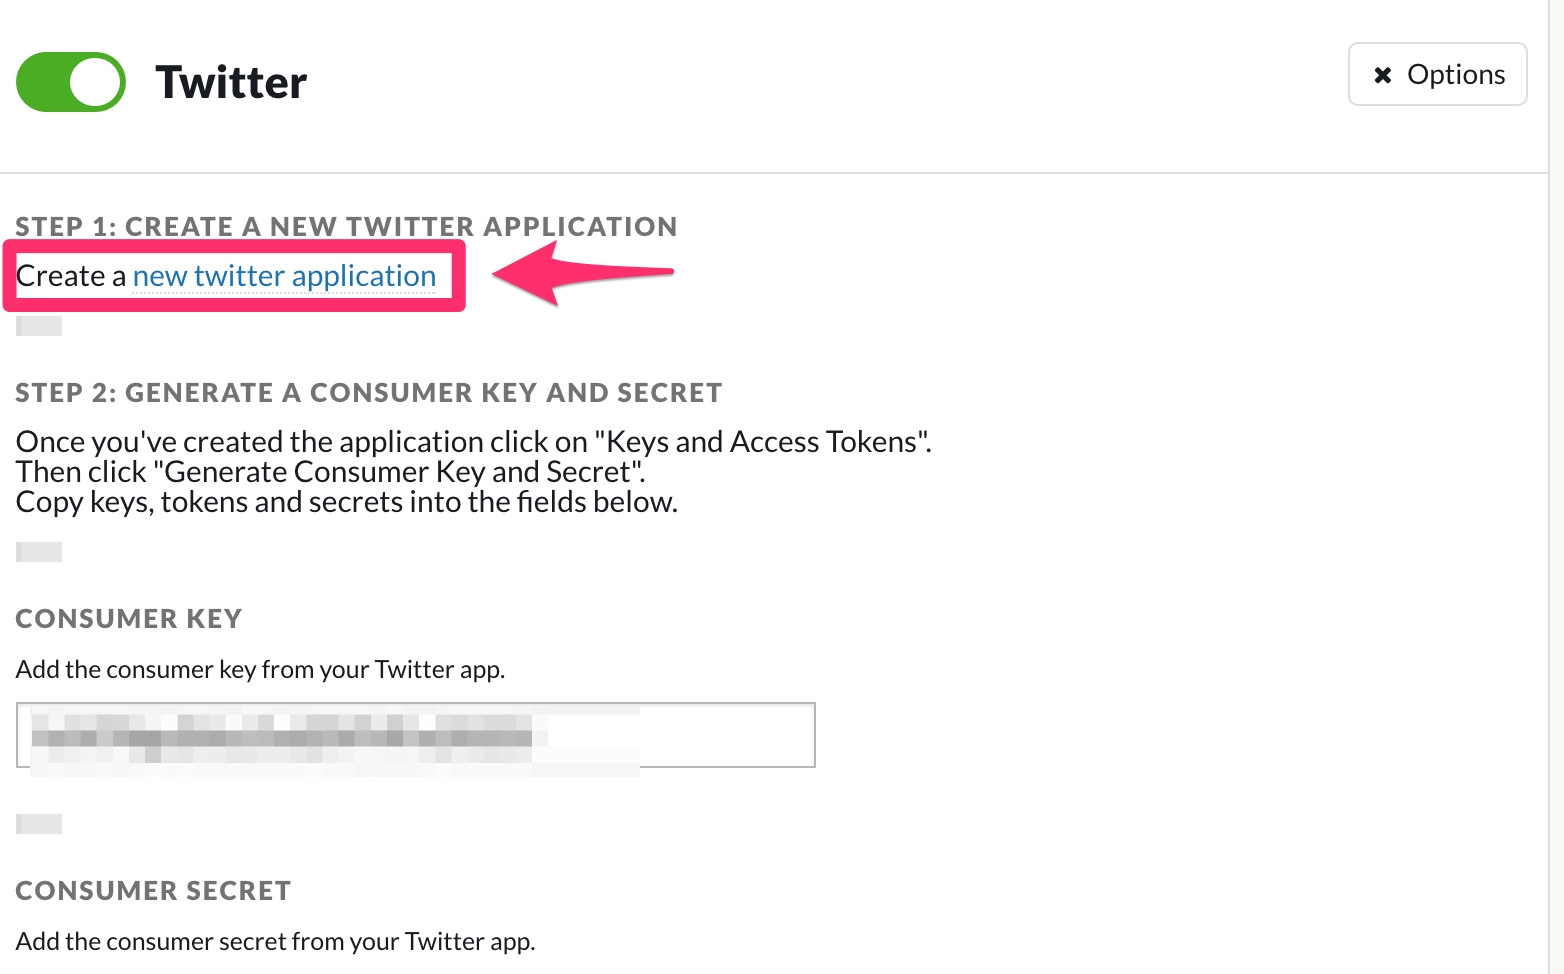
Click on Create a new Twitter application. This will redirect you to https://apps.twitter.com
Sign into https://apps.twitter.com using your Twitter username and password.
Click on Create New App to get an API key.
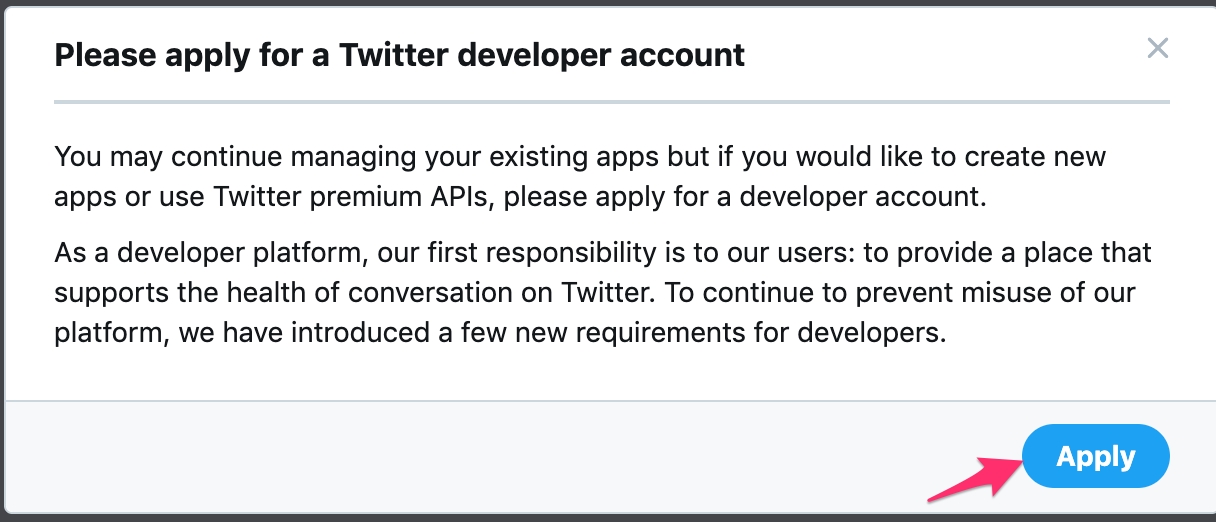
On the module that will pop up, click on Apply to sign up for a developer account.
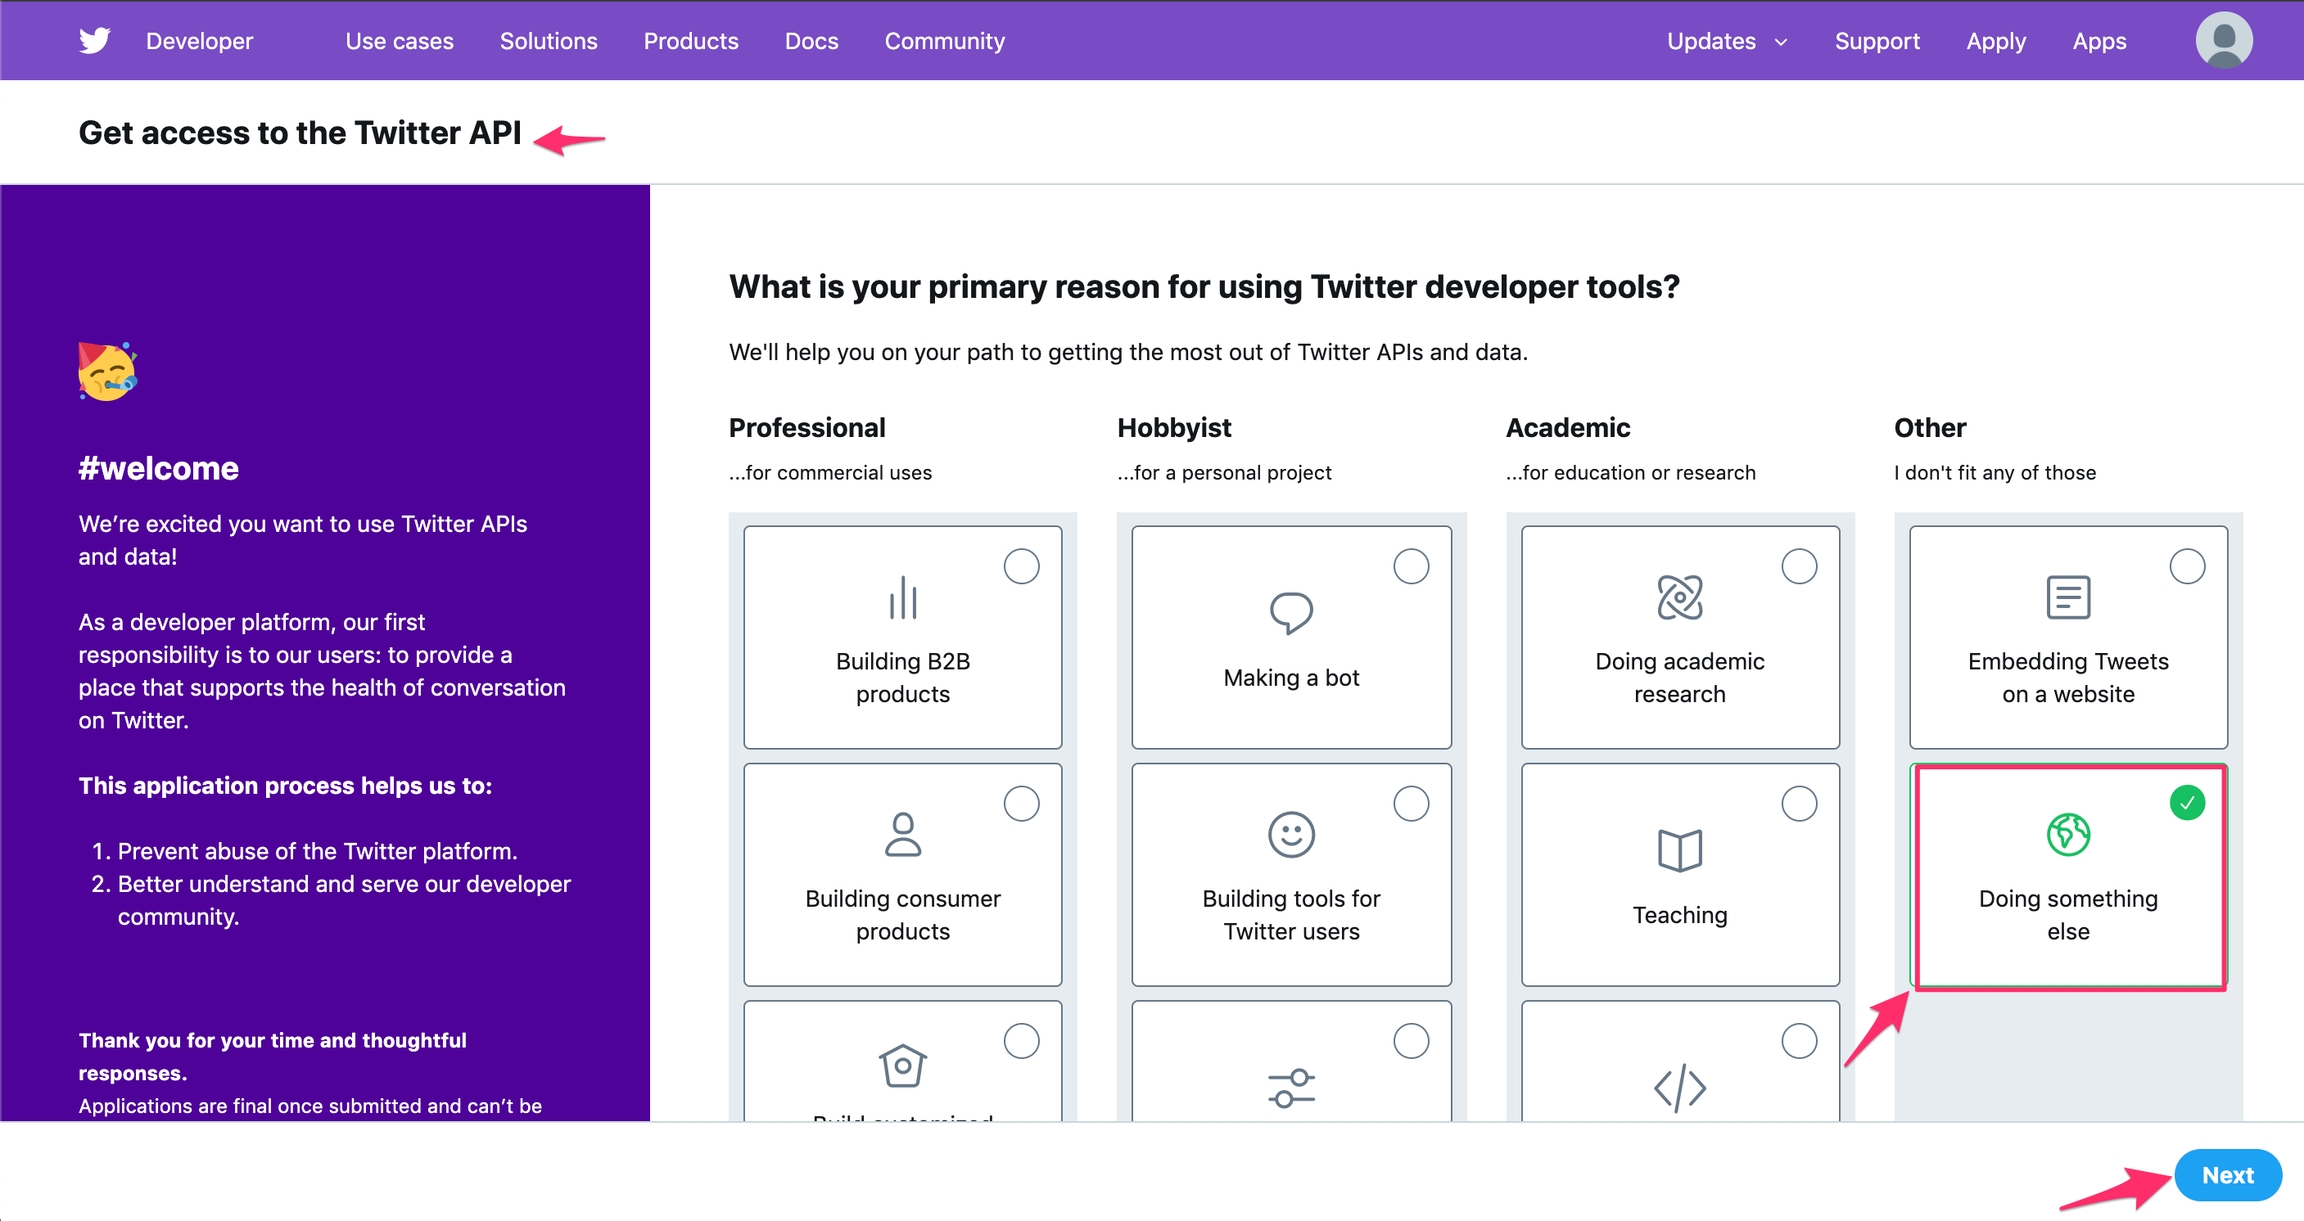
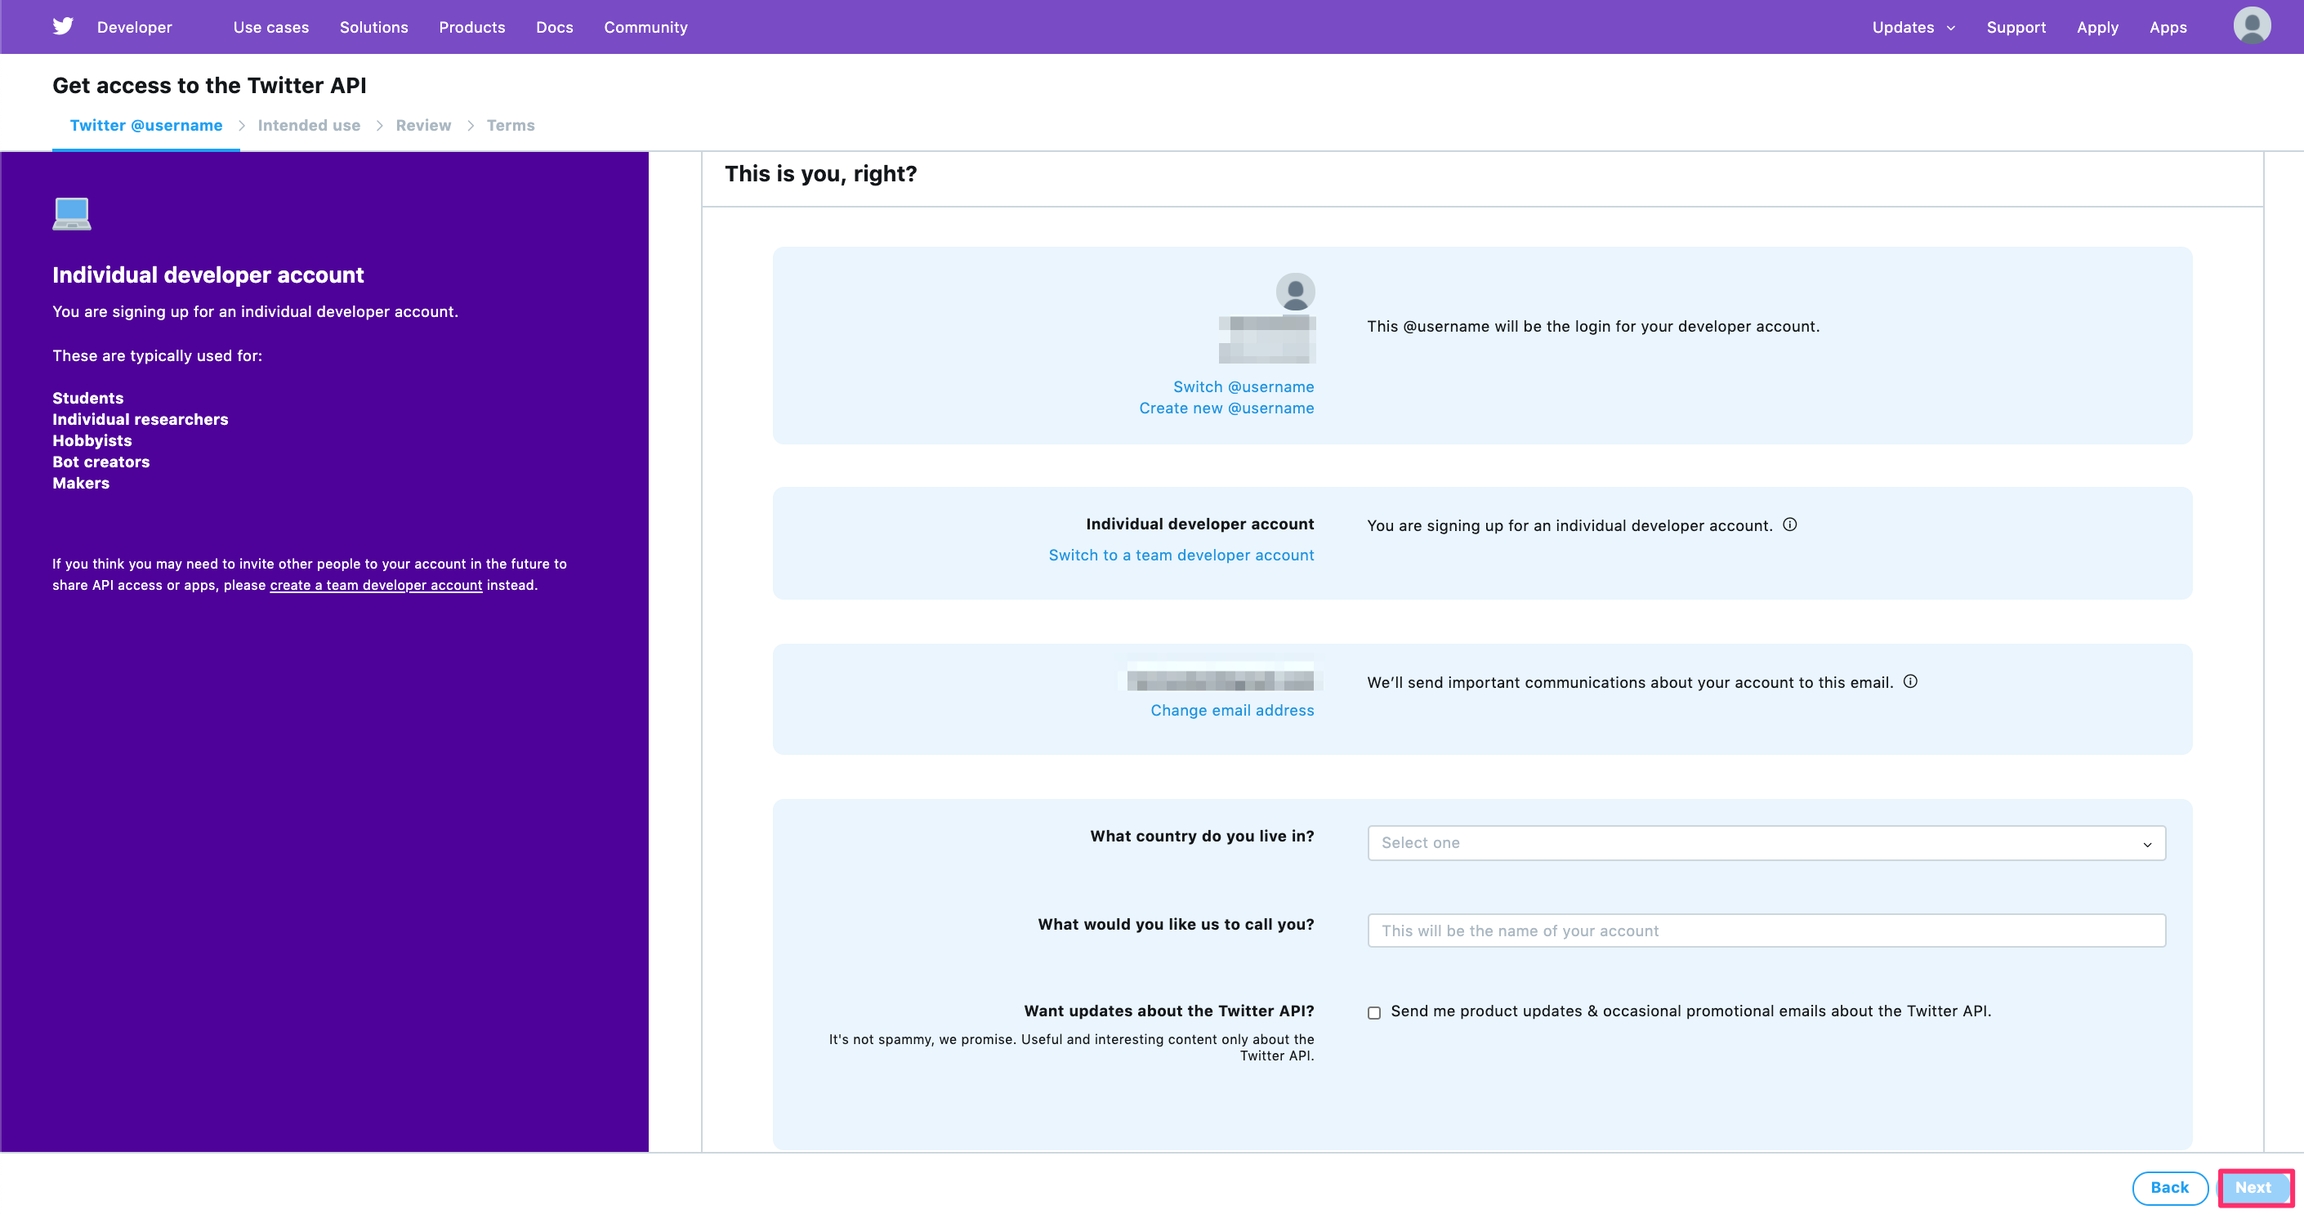
To get access to the Twitter API, you have to select the reason why you want it. You will be redirected to a page with options, in our case select Doing something else.
Click Next after checking that option.
Make changes or finish filling in your individual developer account profile details and click Next.
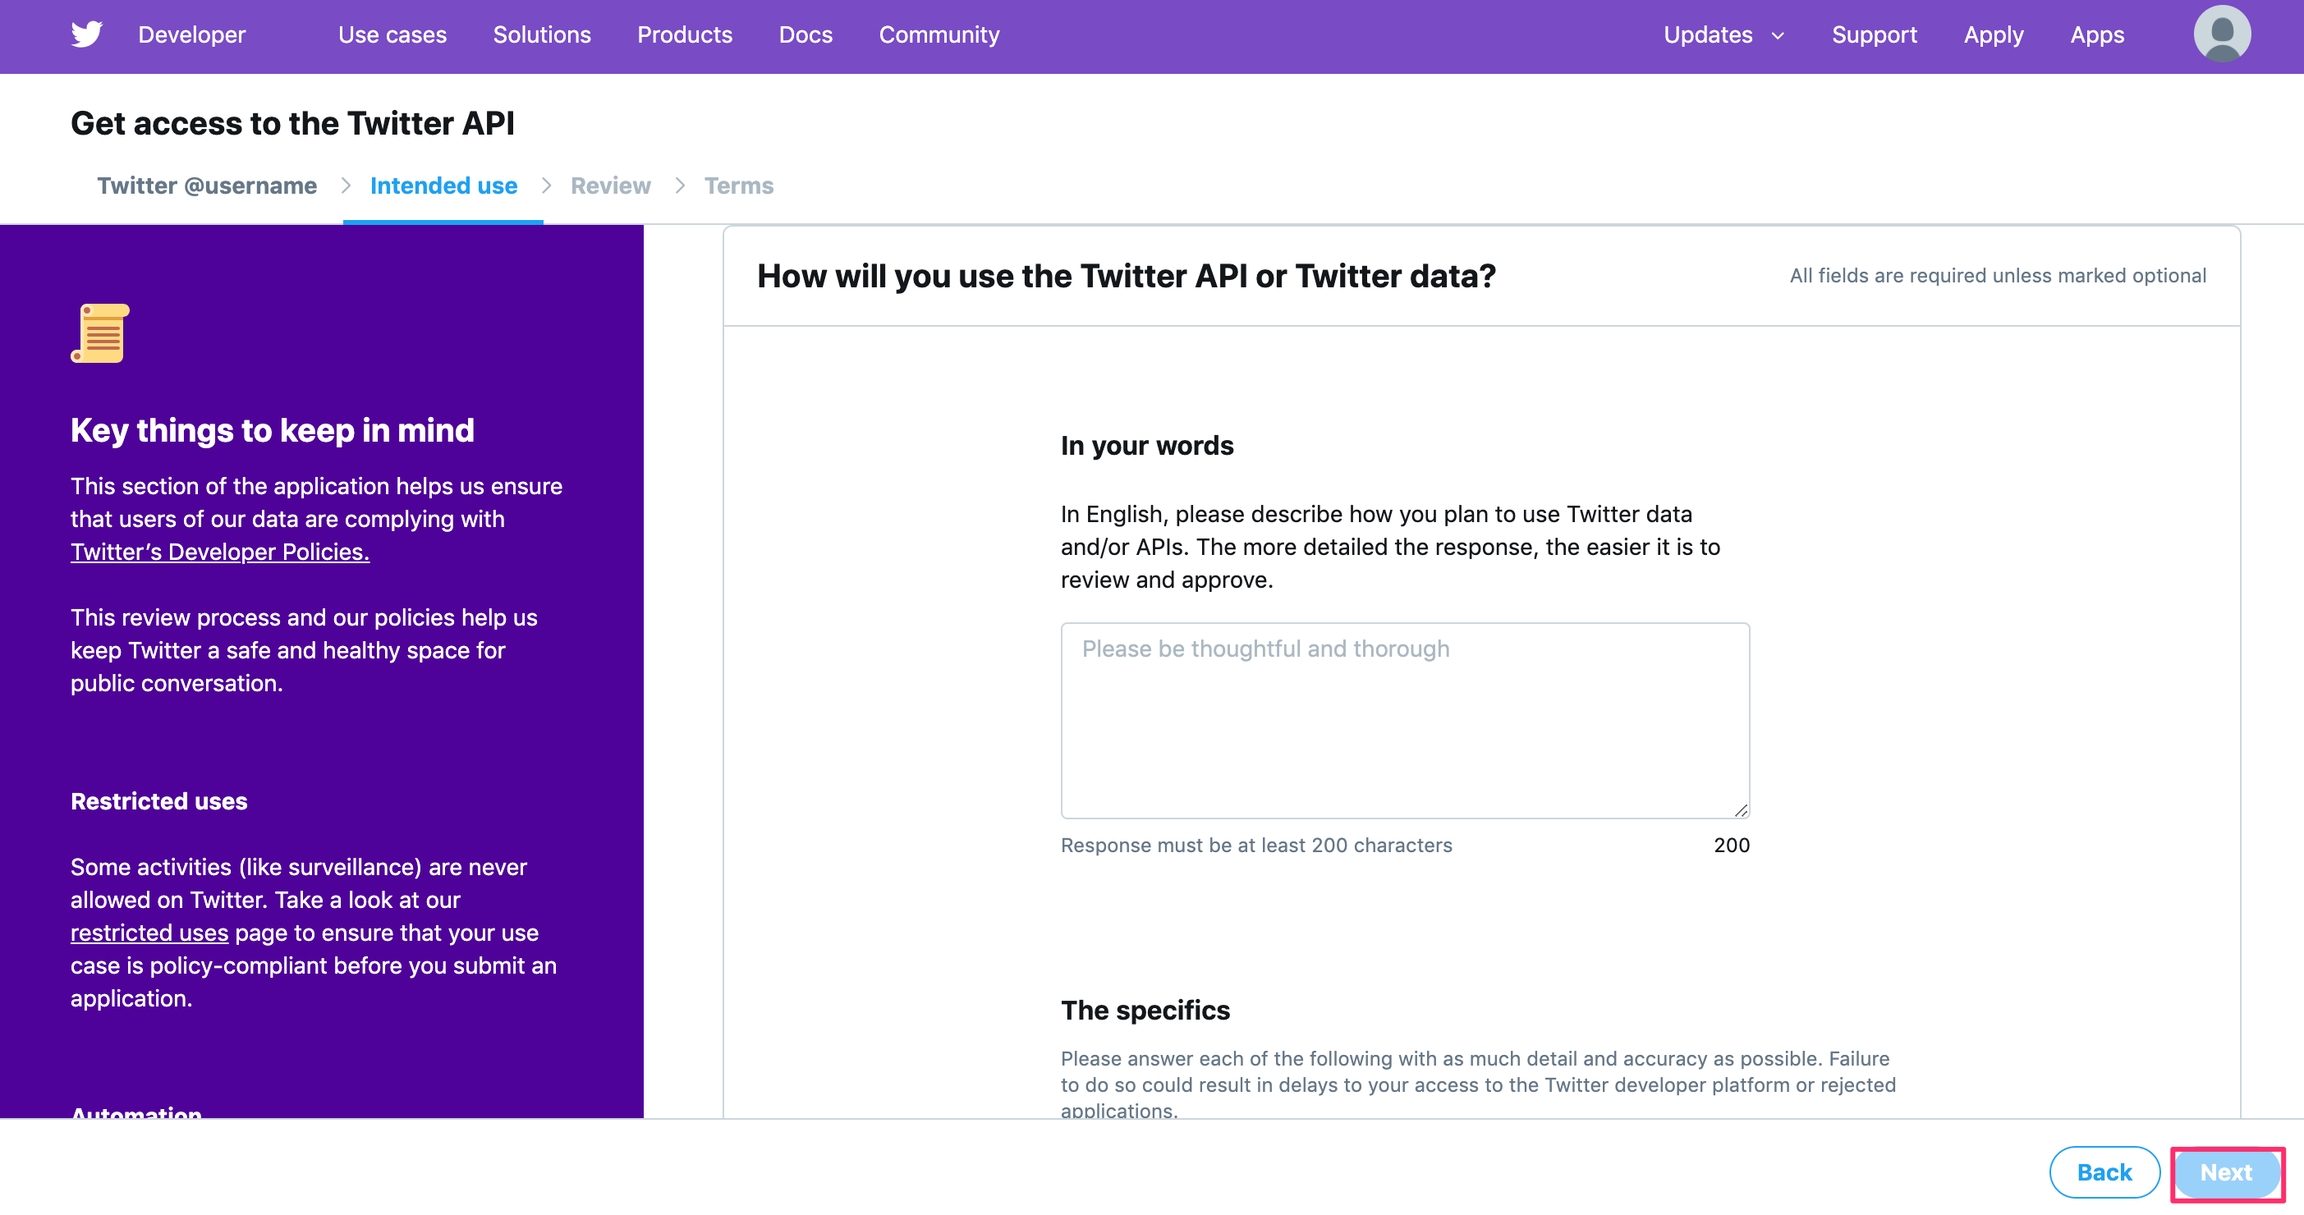
On the application page that will appear, fill in the details of how you intend to use the Twitter API key and click Next once done.
Review your information, if you would like to change anything, click Back but if you are done and do not want to make any changes, click it looks good.
Review the developer's Agreement and accept the terms if you agree to the policy.
Tick the checkbox to agree and conclude, click submit and submit the application.
A confirmation will be sent to your email, go to your email and confirm it. Once you confirm, you will be redirected to the Twitter developer platform.
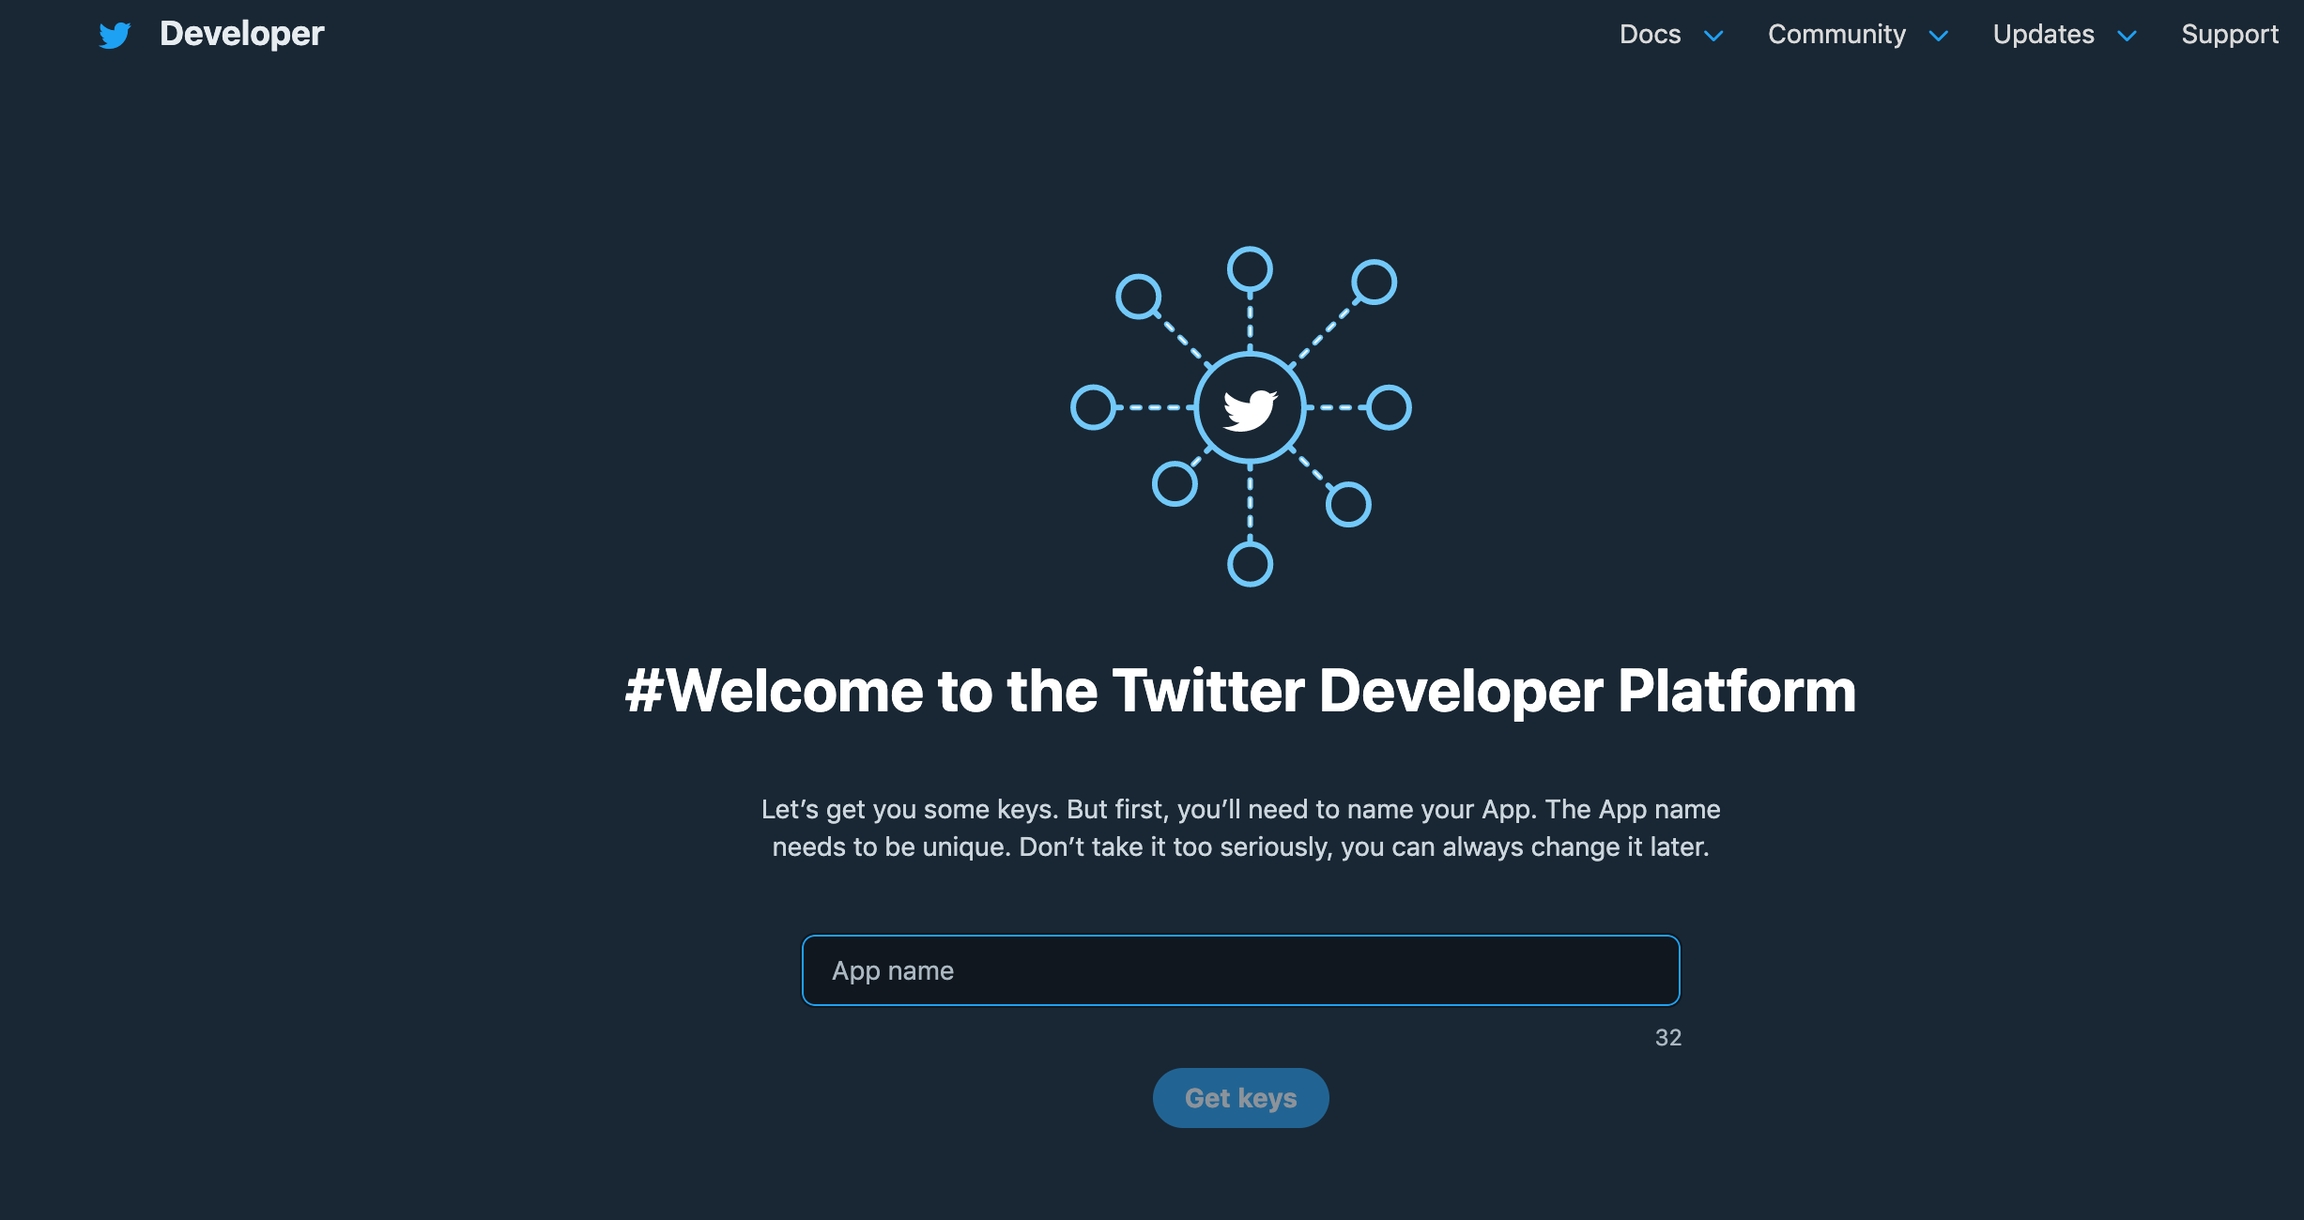
Select your App name.
You can enter the name of your deployment to make it more memorable.
Click on Get keys.
Test application configuration on Twitter.
Save them to access your developer's portal
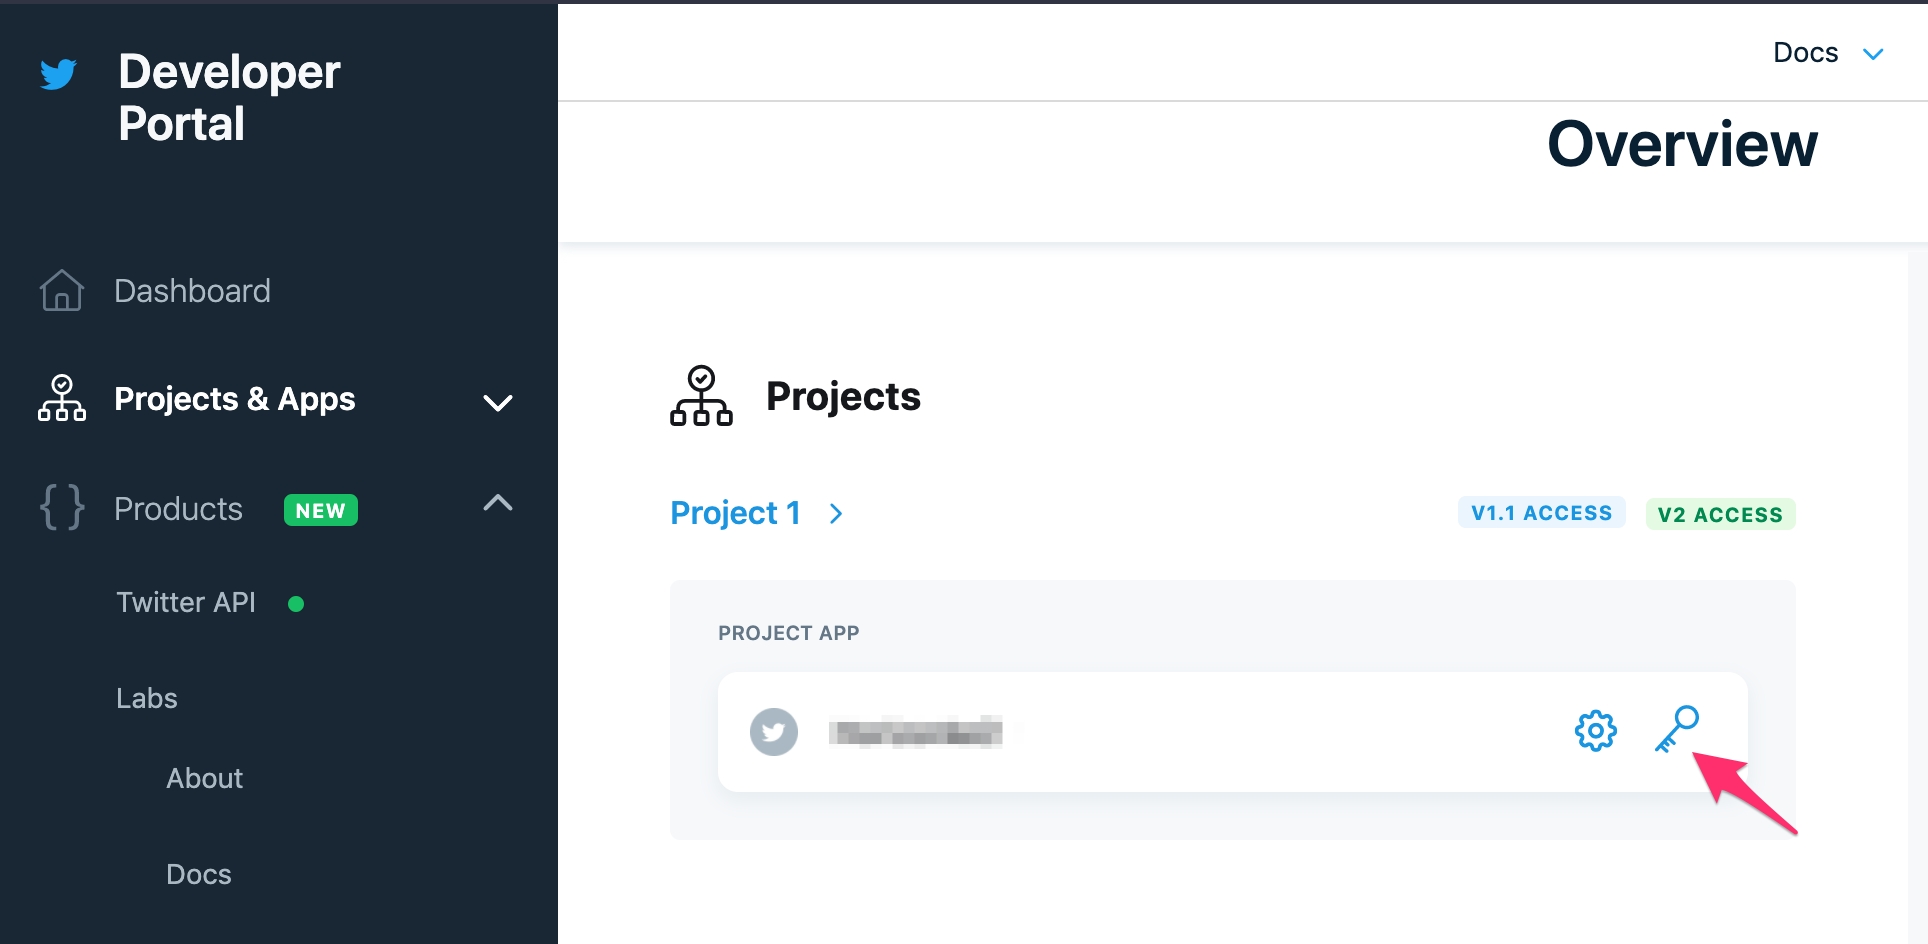
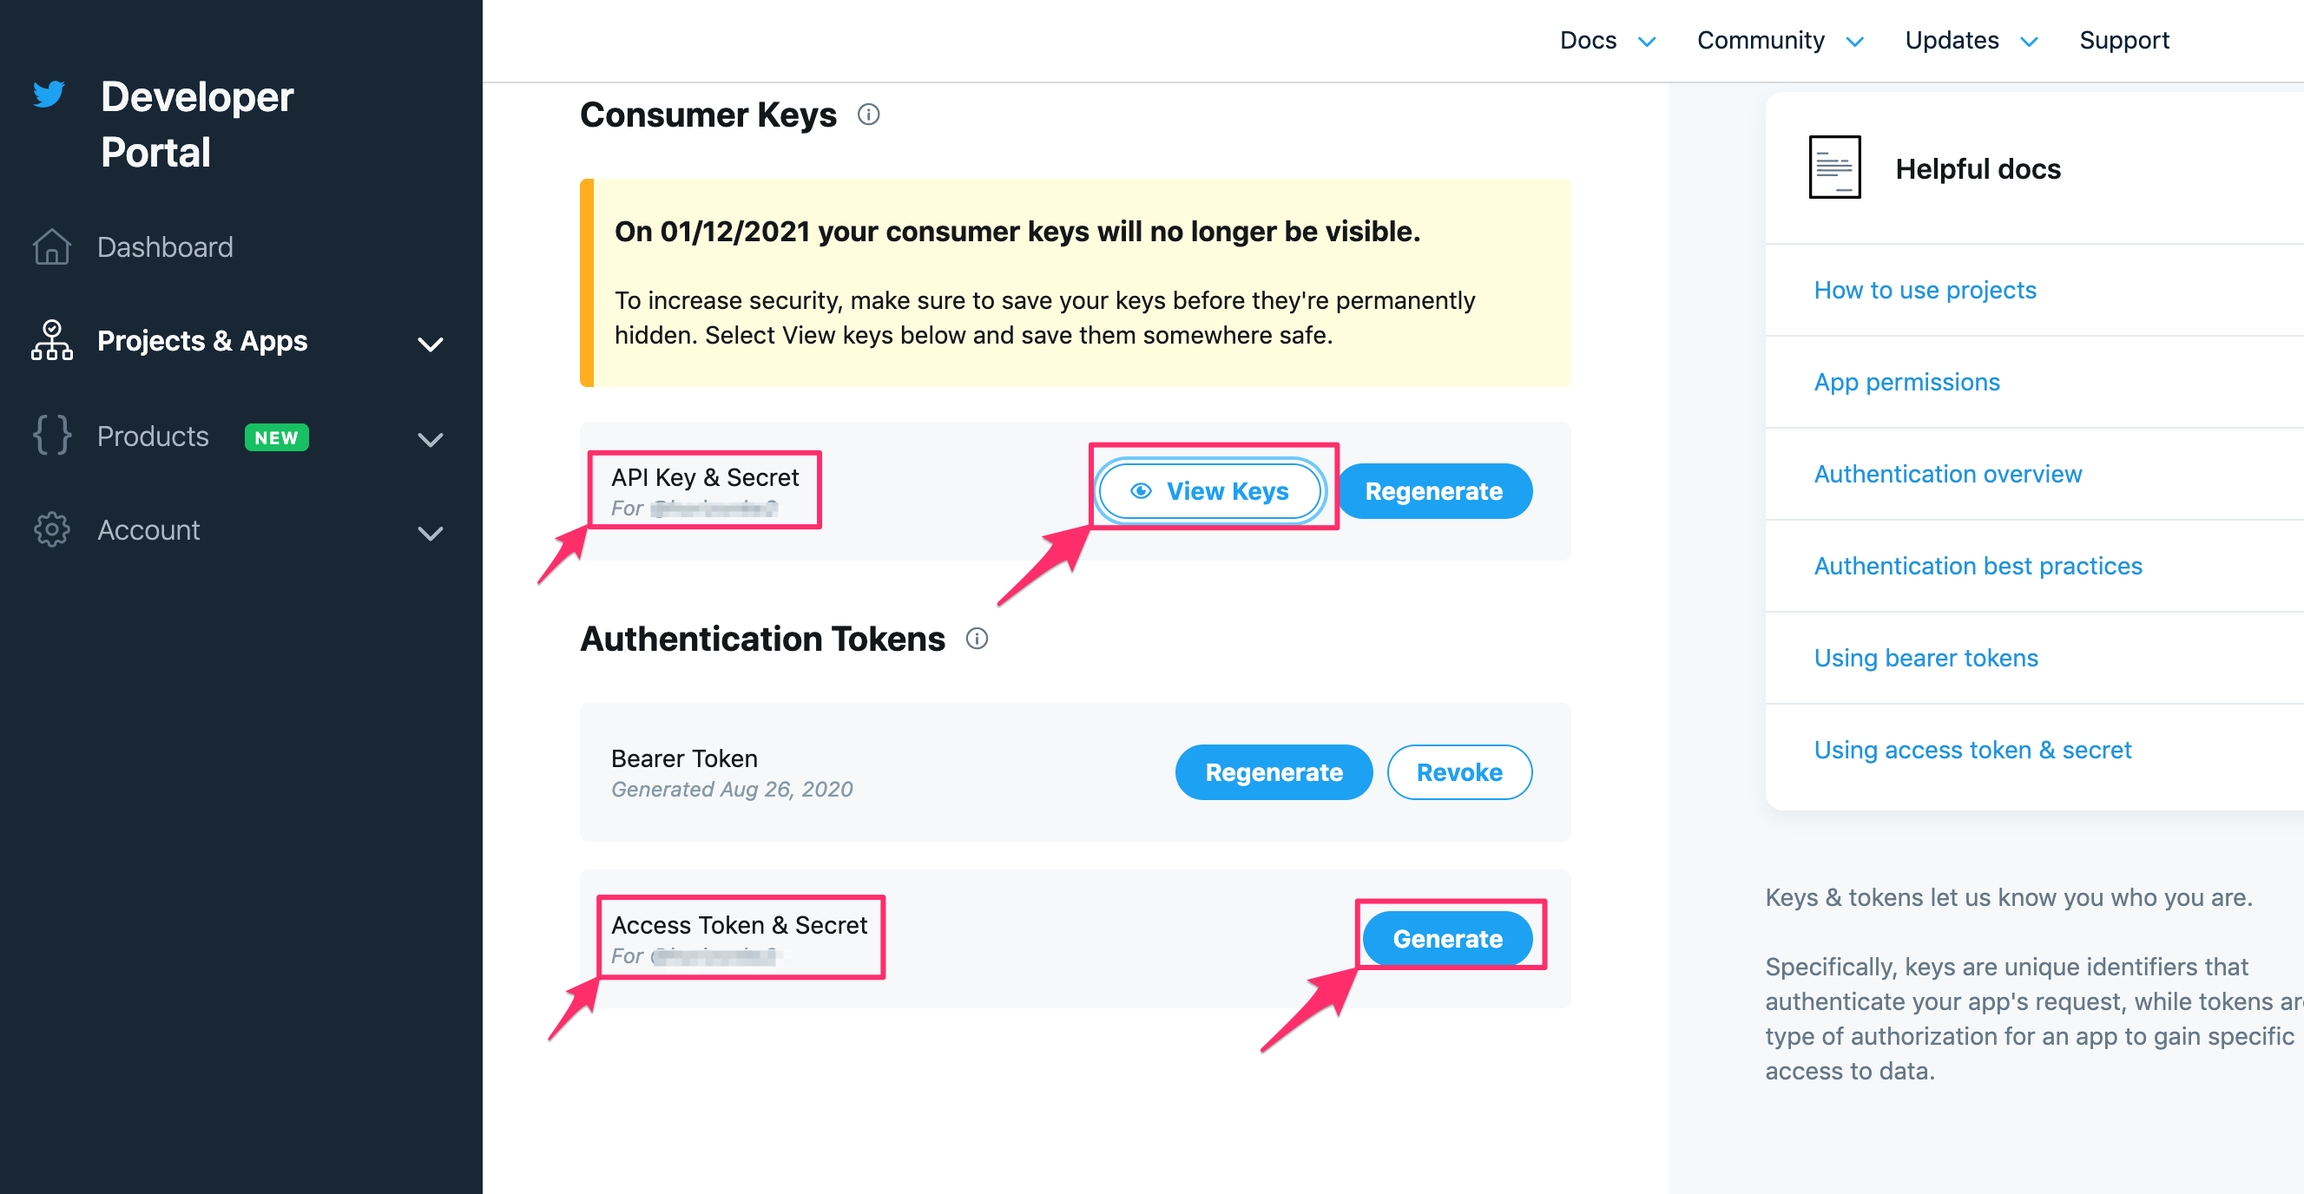
Go to overview https://developer.twitter.com/en/portal/projects-and-apps, adjacent to your project app name , there is a Key icon, click on it to view your API and Access token keys. These will be needed to configure twitter with your deployment.
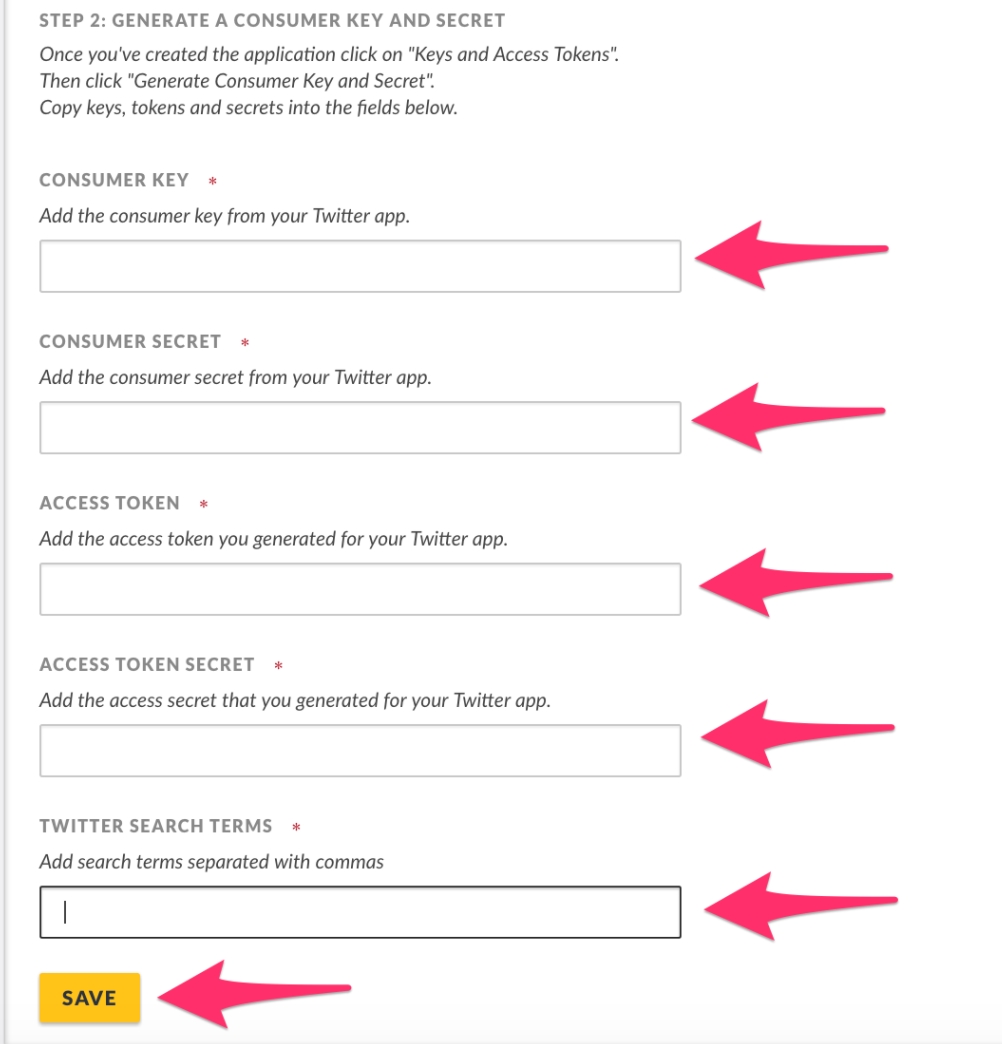
You’ll get redirected to a page where you can grab details needed to configure your Ushahidi deployment i.e CONSUMER KEY, CONSUMER SECRET, ACCESS TOKEN, ACCESS TOKEN SECRET.
Go back to your Twitter configuration page on your deployment and fill in all the details from your Twitter app management page.
On your Twitter developer account panel, click on view keys next to API key and Secret to display them, copy and paste them on your deployment Api and secret fields.
On the same panel, you will see access token and secret. You’ll have to generate an ACCESS TOKEN and ACCESS TOKEN SECRET by clicking on Generate my access token and token secret.
Copy and paste them on on your deployment ACCESS TOKEN and ACCESS TOKEN SECRET fields.
NB: if you save them without copy and pasting, you will be regenerating new ones.
Add the hashtags you want to pull tweets from in the Twitter Search Terms section. You can choose more than one hashtag, separated by a comma. It is recommended that short and clear hashtags be chosen.
Click on Save and this data source’s settings will be saved. Unstructured posts from Twitter will now get pulled into the platform.
To enable/disable the Twitter data source, simply click on the green toggle.
If you’d like to edit your twitter configuration, click on the drop down icon on the right while on the datasource list page and make your changes.
Enable the Twitter toggle in the datasource panel to get tweets into platform.
It will only take a few minutes and the tweets will appear on your deployment.
