Categories are a way of grouping your posts based on their content within a Survey.
The setup in this guide is demonstrated in the below video as well. You can watch and follow the guide at the same time!
Video setup guide
Category configuration videoTo access the Categories configuration page,
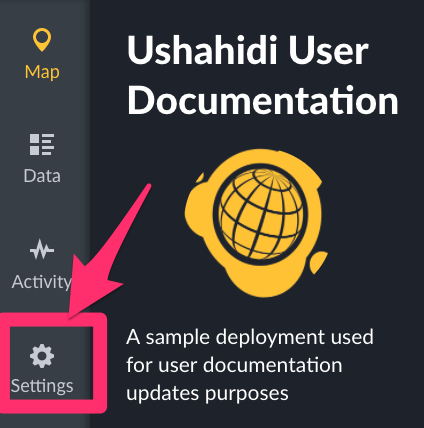
On the left hand menu bar, click on Settings
Settings button in Ushahidi side bar. Then, click on Categories.
Clicking on Settings -> Categories to access category list and actions. You’ll be redirected to a page where you can manage categories on your deployment
3.5.1 Adding and Configuring Categories
Unlike Ushahidi v2.x, your deployment DOES NOT come with pre installed/set-up categories. You will need to create this on your new Ushahidi deployment. Categories are now treated as custom fields within a Survey. This gives you the flexibility to add certain categories to some surveys, but not others.
There are two ways to create new categories. First, navigate to Settings → Categories
Click on the Add Category icon as shown below
Click on the + yellow circle to add a category. In the upper left corner of the category page, you will see the default language that your deployment is currently in.
Click on the + yellow circle to add a category. Add the following details
Category Name: Give your category a name that will appear on your homepage and when users are creating new posts.
Description: You can provide a brief description of what kind of information you will fall under this category
Child / parent settings: You can choose to set any category as a “child” to another, creating a hierarchy within the categories themselves, and will reflect this in their positioning on the sidebar.
Default language: Click on the drop down menu to select your preferred default language
Roles: You can opt to set your category as visible to specific user roles on your deployment here. This list is populated based on custom roles created. More on Roles here.
Once that is done, you can translate the category into other languages.
To do that;
Click on + Add translation at the upper right-hand corner of the screen.
A pop-up module will appear on your screen, click on the dropdown menu, and select the language you want to translate to.
Select a language you want to translate your content to. You will be redirected to a page with the translatable content in the default language and fields where you can add your translations.
Swahili was the language selected for translation On the empty fields, translate the category name and description details into the chosen language e.g in the above image the default language is English and the added language is Swahili.
Click Save when all is done to create the category. You can now choose to add this category to any of your Surveys.
Under the category name, you will see the available languages the category has been translated into.
All the available languages that the content has been translated to are shown.
Add categories as custom fields as you build and edit Surveys. First, navigate to Settings → Surveys, and either select the already existing Survey you’d like to edit, or create a new Survey.
Click on Add field at the bottom of the survey builder and select _Categories _from the list of field options
Add categories to a survey. Configure the following:
Name: Name or prompt for your survey field
Show field description: Turn this on if you’d like to add a short description or help text to the field
Which labels should be available: Select which categories you’d like to add to the field as options
Adding a category as a field to a survey. "Add field" modal. Click Add & Close to save your new categories field
It will now appear as a custom field with the appropriate categories on your Survey form
3.5.2 Editing Categories
To edit a category,
Click on the desired category from the category list page
Select a category's checkbox from the categories list in the Settings -> Categories page to edit it. You’ll get redirected to the Edit Category page, where you should be able to add/edit details as described in the adding categories section above.
Save your changes with the yell When done, click on Save, and your changes will reflect shortly.
3.5.3 Deleting Categories
You can delete one or multiple categories at a time.
Deleting a category from the category list page
To delete a single category, select the trash icon adjacent to the category.
Highlighted: trash (delete) button on the right side of the categories list. To delete multiple categories:
Tick the checkbox on the left, adjacent to the category/categories you would like to delete from the category list page
This action will activate the previously inactive Delete button on top left hand corner of the page. Click on this button to initiate deletion.
Select the checkboxes in the category list corresponding to categories you wish to delete. Click the trash button on the top menu bar to delete. Deleting a category from the category edit page:
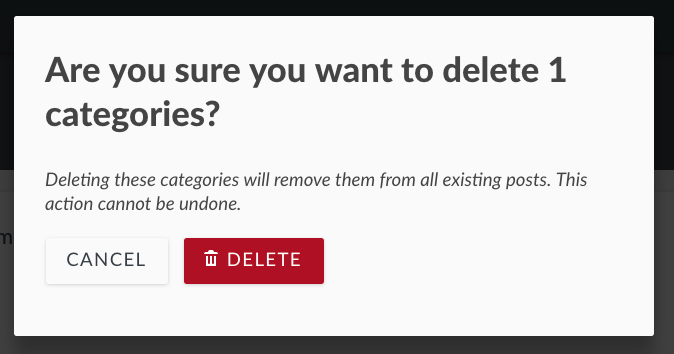
Click on the Delete Category button
DELETE CATEGORY button on the bottom of the edit page. A pop up box will appear on the top of the page, prompting you to confirm whether you would like to delete the category/categories
Click on Delete to delete your category/categories
If you’d like to cancel the category deletion process, click on Cancel